Each organization configures the Class and Gradebook Settings with the recommended configuration to save teachers’ time, so teachers may not need to adjust them. However, these Settings can be accessed by teachers by clicking the drop-down arrow at the top right of the Class and selecting Setup.
Teachers can also access the Class and Gradebook Settings menu from inside the Gradebook by clicking the drop-down arrow next to the gear icon and selecting Gradebook Setup.
Students and Parents
The Students and Parents section enables teachers to control how students and parents interact with their class.
Students
The Students field lets the teacher controls what students can do within a Class. When the teacher sets it to Can Enter Class and Participate, students can create Notes and Replies, participate in Polls, and Like items in the Class Feed.
When the teacher set the field to Can View Class but Cannot Contribute, students can enter the Class and see the same content as the teacher. In this case, students can like teachers’ posts, but cannot share Notes, Reply, or participate in Polls. With this setting selected, students can still submit online assessments and take online tests.
When the teacher sets the field to Cannot Enter the Class, students are prevented from entering the Class. Notes, Polls, Assessments, and journals can be seen in the student’s My Work report and their Home Screen Recent Activity feed. This option enables the teacher to keep the Class closed if it is not in use.
Parents
The Parents field lets the teacher control if parents can view teachers’ posts in the organized context of a Class or just in the Home Screen Recent Activity feed. If the teacher sets this field to Can Open Class but Only See Teacher Posts, parents can see teachers’ posts, but will not see the Students Panel, student posts, or teachers’ Replies to students.
In this case, parents can Like posts from within a Class or from the Recent Activity feed. Teachers can see Likes from both parents and students.
If this field is set by the teacher to Can Not Enter the Class, parents are prevented from opening the Class. Teachers’ posts are seen in the parent’s Home Screen Recent Activity feed.
Show Averages to Students and Parents
When set to Don’t Show by the teacher, students and parents will not see the calculated average beside the Class Name and in the My Work Report. Setting this field to a grade scheme, for example as a percentage, will enable the student and parent to see the calculated average beside the Class Name and in the My Work Report.
Subjective Performance Indicator
The Edsby Gradebook includes Subjective Performance Indicators. The SPI enables teachers to convey student progress independent of calculated averages. Teachers can choose if they would like to make this indicator visible to students and their parents.
If this field is set to Show to Students and Parents, the SPI will be visible in the student’s My Work Report and Classes Panel.
If this field is set to Don’t Show to Students and Parents, only teachers will see the SPI in the Gradebook and can use it as a personal organization tool. The SPI is also visible to teachers when completing a Report Card, however, this information is never shared as part of the Report Card Submission.
Mark Content Complete
When this field is set to automatic, students will see a check mark as soon as they open an item in the Content Panel. When this field is set to manual, students have the option to mark items complete themselves.
Teachers can see student progress by clicking Show Progress in the Content Builder.
Conditional Release
Teachers can also choose what content is available for students through Smart Release. Smart Release enables students to work through the Class Content at their own pace. To support this type of learning, assessments are not added to the Feed or Calendar. Instead, they are created directly in the Content Builder.
Teachers enable Smart Release by navigating to the Class Setup Form. Click the drop-down arrow at the top right of the class and select Setup from the menu.
Under Conditional Release, select Smart Release.
When a teacher has set Smart Release, a student must open and complete each item in the Content panel before they will see the next item of Content.
If an item or section is not visible to the student through hiding it, as mentioned above, it is not in Smart Release. In this illustration, students would not see the Chemical Compound Online Quiz, nor would the students see the upcoming Biology unit.
When the student views and completes all visible items, the Show Progress tab will indicate to the teacher which students have completed all items in the Content panel.
Show Assessment Weightings to Students and Parents
When the teacher enables this field, students and parents can view the weight assigned to assessments in the My Work Report on the desktop browser. When this field is disabled, students and parents cannot see the weight assigned to assessments in the My Work Report on the desktop browser.
Teachers can always see the weight assigned to assessments in the Perspective. Weights can be adjusted by clicking on the Weighting tab.
Teachers and Assistants
Teacher assignments are supplied by the organization’s Student Information System.
The assigned teacher can add additional teachers by searching for another teacher’s name. School administrators can also assign additional teachers.
Additional teachers can be assigned a group of permissions based on their responsibilities within the Class. Anyone assigned as a Teacher has full access to all Class Content and tools. The Teacher role is the only role that can assess the Report Card Sheets and the Class Setup form.
Teachers assigned the Support role can view all aspects of the Class, add Notes, Events, and Journal Entries, view Evidence within the Class, take Attendance, and update the Gradebook. However, the Support Role does not have access to Report Card Sheets.
Teachers assigned the Substitute Role can view the Class Feed and the Seating Plan but are unable to make any changes to them. The Substitute Role has the same view of the Planner as students and they do not have access to Evidence, the Gradebook, Report Card Sheets, or the Perspective.
The Class’ Teachers Panel will first list Teachers in the order they appear in the form. Teachers listed as Support will appear after the Teachers in the order they appear in the form. Substitutes do not appear in the Class’ Teachers Panel.
To reorder the list, click on the name and drag the name to the new location.
To remove a teacher from the list, click the trash can.
Note that the Student Information System will add the teacher of record back to the Class every night. If the teacher of record needs to be changed permanently, it should be done in the Student Information System.
Class Names and Visibility
Formal Name
The name of the Class is provided by the Student Information System. Parents see the Formal Class Name. Report Cards also use the Formal Name.
Formal Short Name
The Class code is provided by the Student Information System.
Personalized Name
The Personalized Name is visible to the teacher and students on the Home Screen Classes Panel. Parents are only shown the Formal Name.
Personalized Short Name
The Personalized Short Name is visible to the teacher and students on the Home Screen Classes Panel. Parents are only shown the Formal Short Name.
Show in Classes Panel
When this box is selected, the Class will be displayed on teachers’ Home Screen Classes Panel.
Teacher may unselect the box to remove the Class from their Classes Panel.
To add a Class back to the Classes Panel, click Classes to open the pop-out. Hidden Classes are labelled.
Click on the Class Name. Open the Setup form and select the Show in Classes Panel box.
Assessments
Display Results in this Grade Scheme
This field sets the grade scheme of the teacher’s Perspective and student’s and parent’s My Work Graph.
If the field is not set, the Perspective/My Work Graph displays percentages along the y-axis.
In the above example, teacher James Harris has set the Grade Scheme to Four Level.
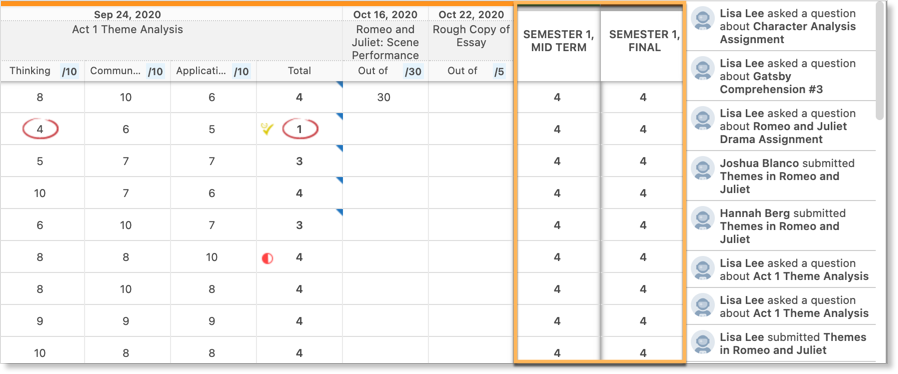
This field also sets the grade scheme for teachers’ Gradebook Summary Columns.
Create New Assessments with this Grade Scheme
New assessments will default to the grade scheme set in this field.
The grade scheme can always be changed on the assessment form by the teacher until grades are entered into the Gradebook by the teacher.
Show Averages in Gradebook and Perspective
Teachers can choose to hide the Gradebook’s averages. Elementary teachers who are not focused on a numerical grade may wish to set this field to Don’t Show.
Teachers of students in higher grades generally want to see averages within the Edsby Gradebook. However, sometimes teachers wish to review the Edsby Perspective with a student and/or the parent(s) of the student directly from Edsby and do not wish to have the average displayed, for example, at a parent-teacher conference. This change enables the teacher to disable the display of an overall average, if desired for this sort of teacher-student or teacher-parent dialogue, and then re-set when meetings end.
Gradebook Summary Columns
The Gradebook enables teachers to choose from a wide range of summary columns. This provides teachers with great flexibility in how they can view assessment data and what information is shared with students and parents.
Teachers can create summary columns based on:
- Strands, if available
- General level outcomes, if available
- Overall average
- Student number
- # Evidence/Observations
Teachers can create summary columns that display results as a:
- Average (Arithmetic mean) – the sum of a set of numbers divided by the count of numbers in the set
- Mode – most common number in a data set
- Median – middle of the set of numbers
- Latest – the last entry for a strand our outcome
- Highest – the highest value
- Decaying Average – a weighted moving average where more recent data is given greater weight
- Range – the lowest and highest numbers
- Count – the number of non-blank assessments
- Standard Deviation – a way of describing the variability or spread in a set of data
Teachers can select the Show to Students box if they wish to have the values of a particular column made available to each student and their parents via the My Work Report on the desktop browser.
The columns can be reordered by grabbing the three horizontal lines icon and dragging to reorder.
Click X to remove a column.
If teachers are using Decaying Average, they can set the calculations at the bottom of the Assessments page. This method considers the most recent scores as more representative of a student’s current mastery level and puts more emphasis on those scores compared to older ones. The default setting is 65%. The option will apply to Perspective Analyze and the report card’s Graph view but has no impact on Gradebook calculations unless a summary column is added to the Gradebook.
Here’s an example of how Decaying Average calculations work. Student A has been assessed on outcome A.1. four times during the term. The student’s grades are:
The gradebook summary columns display averages to one decimal place. The decaying average does not take the assessment weight into account.
The benefit of using a decaying average for this student is that it provides a more accurate reflection of their current performance by giving more weight to recent assessments. For instance, with a decaying average, the student’s grade improves from 70.75% to 77.86% after their most recent assessment, showing their progress more effectively compared to a traditional mean average.
With symbolic grades schemes such as 4 levels, the decaying average will be based on the percentage equivalent as defined in the grade mapping scheme.
Weighting
Edit Weighting displays the assessments and their weighting points in a compact way and enables teachers to adjust the weighting points without opening multiple assessment forms. When teachers change an assignment’s weighting points on the Edit Weighting form, the assessment form is updated.
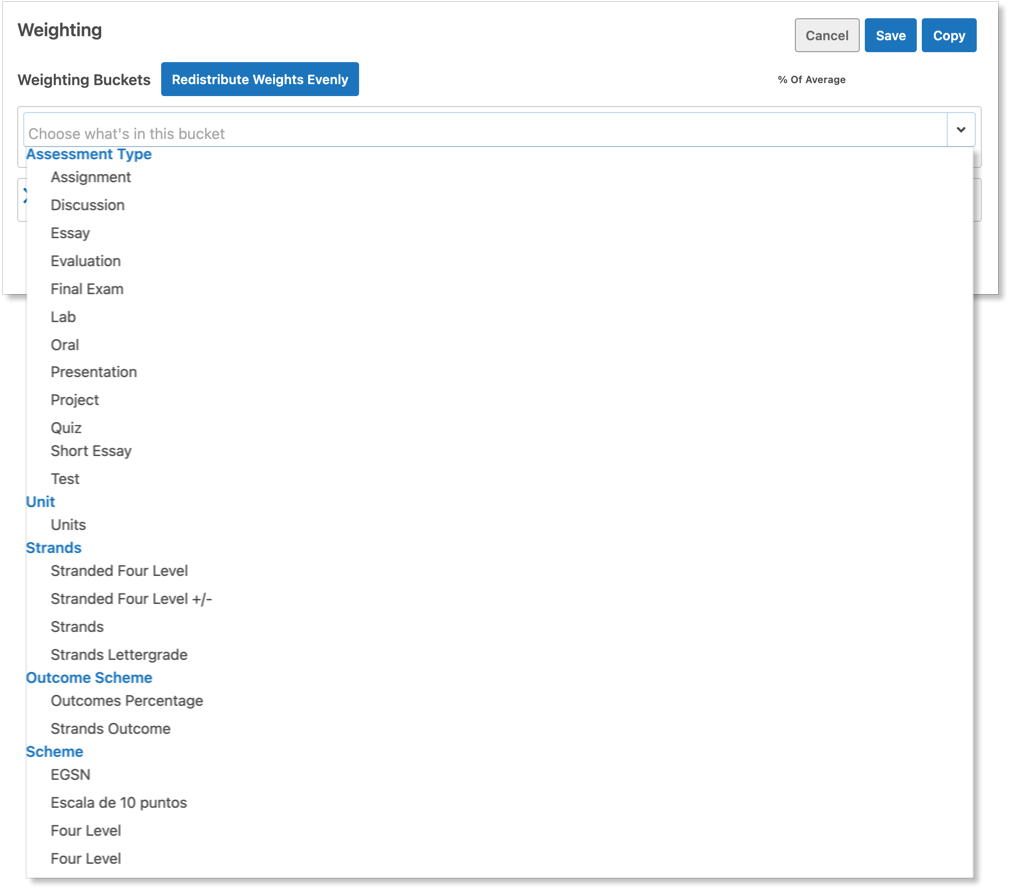
In addition, Weighting enables teachers to group assessments into a bucket and assign a weight to the bucket. The weighting of assessments can be done at any time during the school year.
Teachers can create buckets based on:
- The assessments type
- Unit
- Strands
- Standards, Outcomes, or Expectations
- Grading Schemes
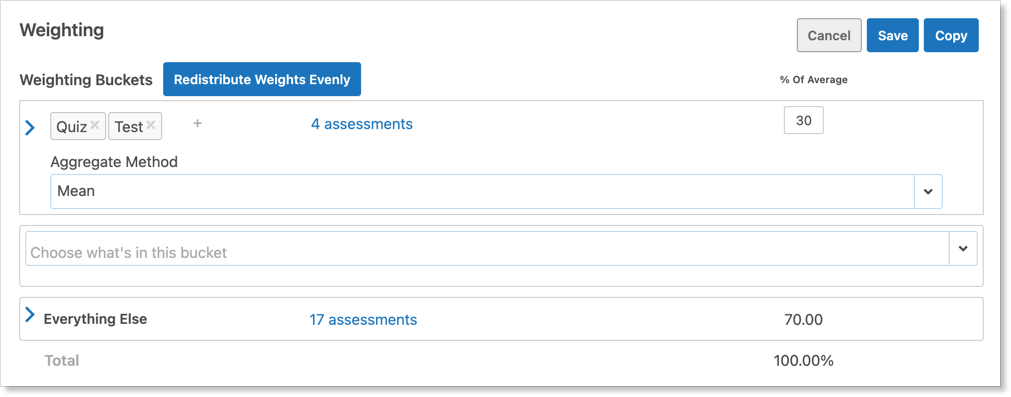
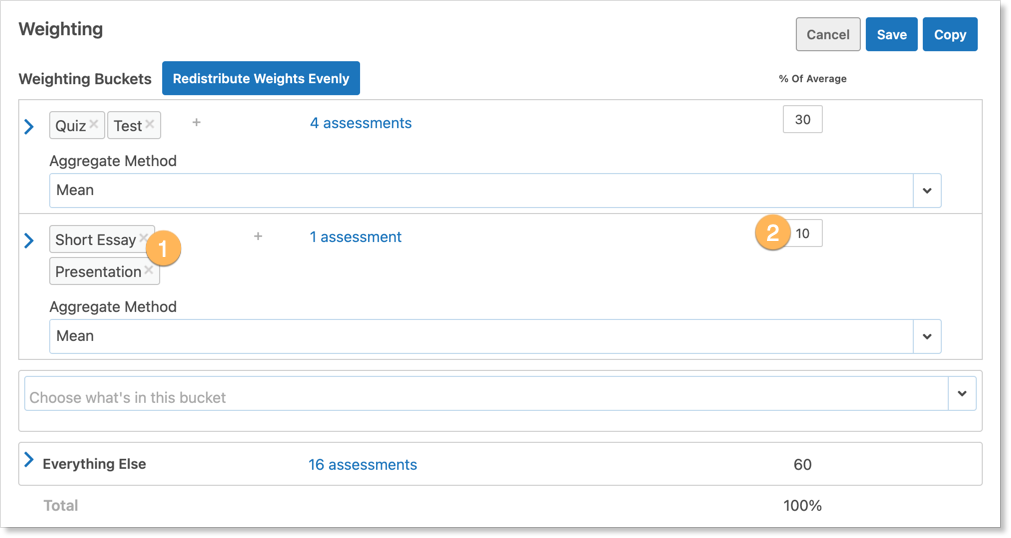
Existing and future assessments are placed into the bucket. For example, tests and quizzes can be put in the same bucket and given a weight of 30%.
Teachers may click the blue triangle to see a list of the assessment type, name, unit, weighting points, and the percentage the assignment contributes to the overall average.
Creating a Bucket
Teachers can click Choose What’s in This Bucket and select from the available options. Then enter the weighting points. The weighting points entered are deducted from Everything Else. The assessments are moved from the Everything Else bucket into the new bucket.
Teachers may remove an assessment type from a bucket by clicking X. Assessments of that type are removed from the bucket and automatically moved to the Everything Else bucket.
Additional Options
The additional options page lists the information Edsby receives from the Student Information System for the teacher. This includes the Class Name, Course Code, Strands, Outcomes, Standards, Expectations, and Scheduling/Timetable information.


