Jump to a section
Adding classes and groups to the schedule
Printing a main list by teacher
Managing bookings on behalf of a parent
Printing a list of parent appointments
Completing the registration period
Overview
Edsby knows about every class in the school including who the teacher is, who the students are, and who their parents are. Edsby Parent-Teacher Scheduling considers the needs of all school administrators, teachers, and parents.
The process is in four key steps:
- Create a schedule/Edit: A school administrator creates a Parent-Teacher Interview schedule by choosing dates, times, and the length of the slot. After choosing which classes are part of the schedule, the administrator opens the Parent-Teacher Interview schedule to teachers when ready.
- Open to Teachers: Teachers block off slots they want to reserve for parents who may need additional time.
- Open to Parents: The administrator provides access to the parents. Parents receive an Edsby message alerting them that slots can now be booked. Parents can make their bookings and print out a summary list. If they have more than one child at the school, all students will appear on the same booking screen to assist with time management. Once open to parents, teachers and administrators can book appointments on behalf of parents.
- Complete: When the school is ready to print the main list or complete other preparations, the administrator can close the schedule to parents. School Administrators and teachers can continue to book appointments for parents.
Roles
Senior Administrator, Office (Head), Guidance, and School IT can create and manage parent-teacher interview schedules.
Classes and Groups
Classes currently in progress can be added to a schedule. Groups that include students as members can be added to a schedule. Note that students are not members of Monitor or List groups and therefore cannot be used to book appointments.
Preparation checklist
Parents need an Edsby account in order to receive the schedule in their Edsby Messages. Consider inviting parents to create their Edsby account well in advance of creating your first schedule. As soon as parents validate their accounts, they can book appointments through the Parent-Teacher Interview Schedule form found in the Edsby Messages.
The following information is required to create a Parent-Teacher Interview schedule.
- Name of the schedule.
- The dates of the schedule.
- Starting times of the interviews.
- The length of the interview slot.
- The number of concurrent bookings per teacher.
- Which classes are part of the schedule.
Creating a schedule
- From the home screen, click Parent-Teacher Interviews.
- Click Create Parent-Teacher Interview.
- Enter the name of schedule, the start date, and the end date.
- Click Save.
If Parent-Teacher Interviews are conducted on non-consecutive days, create the schedule to include the first and last day. Days without slots won’t appear on the teacher or parent schedule.
A new schedule is added to this list.
Creating slots
Select the name of the schedule from the list. On each day of the schedule, click on the cell that corresponds to the starting time.
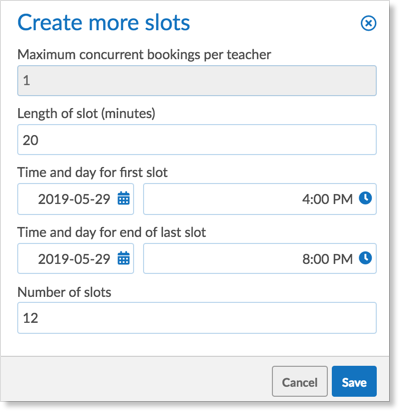
- Set Maximum concurrent bookings per teacher
- Set the length of the slots. This field is available when the first slots are defined. The length of the slots will be the same for every day of the schedule.
- Set the time and day of the first slot.
- Set the time and day of the last slot.
- Repeat for each day of the schedule. Dates without slots will not appear on the schedule for parents or teachers.
Example of slot creation
The Parent-Teacher Interviews are conducted over 2 days. On the first day, the interviews begin at 4:00 pm, continue for four hours and each interview is 20 minutes long. Each slot can only be booked by one parent. The form has the following configuration.
The form has the following configuration.
The second day, the interviews begin at 4:00 pm and end at 8:00 pm. The form has the following configuration. The length of the slots does not need to be defined because the interview time was set the first time slots were created (15 minutes).
Slot tab
Deleting slots
To delete a slot, click X and confirm the deletion. Prior to opening the schedule to teachers, any slot can be deleted.
Adding Classes and Groups to the schedule
- Click Classes and Groups tab
- Click the Classes drop-down list. A list of classes will appear.
- To select all classes, click the checkbox in the title bar.
- Or filter the list by using the filters or search, then click the checkbox in the title bar.
- Click Select. The list of classes will be selected.
- Click Add. The selected classes are added to the list.
Note: Although List and Monitor Groups show up in the Group picker, they are not schedulable in the parent-teacher interview schedule as they are not intended to be exposed to students and parents.
Examples of adding classes
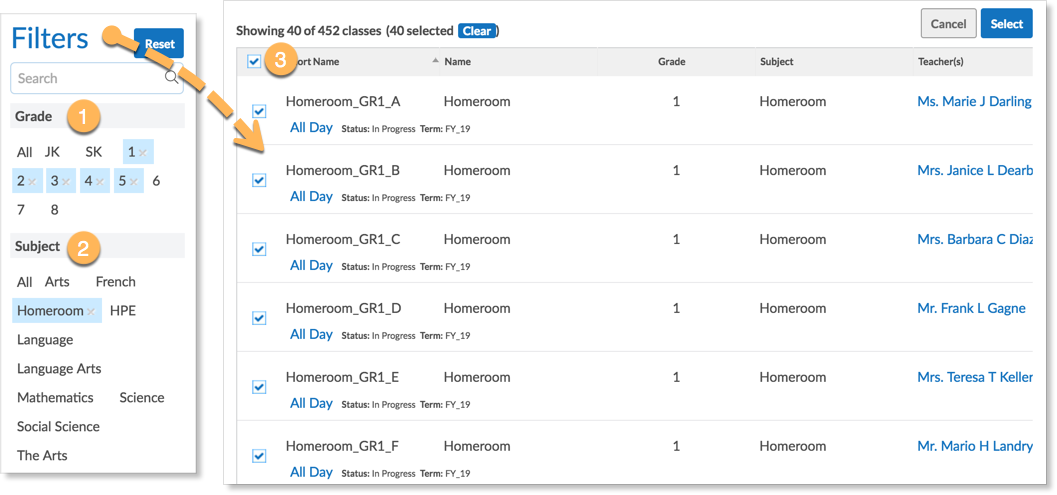
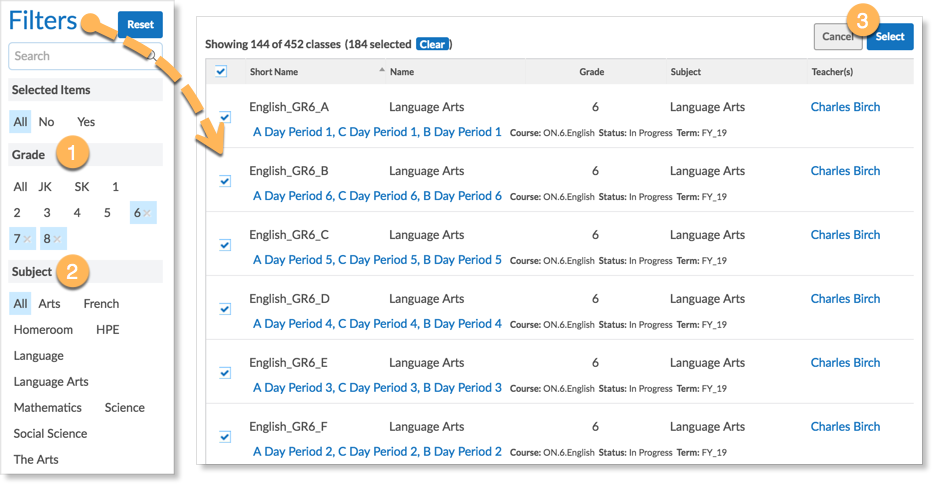
For grades 1 to 5, parents only meet with the homeroom teacher. For grades 6 to 8, parents meet with all teachers.
After clicking the Classes drop down list
- Use the Grade filter to select grades 1, 2, 3, 4, 5.
- Use the Subject Filter to select Homeroom.
- Click the checkbox in the title bar.
- Click Select. The list of classes will be selected.
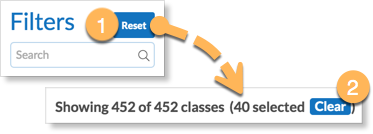
After clicking the Classes drop-down list click Reset to display all classes. Click Clear to reset any previous selections.
- Use the Grade filter to select grades 6, 7, 8.
- Click the checkbox in the title bar to select all 6,7, 8 classes.
- Click Select. The list of classes will be selected.
Click the Add button. The selected classes are added to the list.
Open to teachers
After the slots have been defined and the classes and groups added to the schedule, the schedule can be opened to the teachers. To do this, click on the Open to Teachers option on the progress bar.
Once clicked, every teacher of the classes included in the schedule will receive a Parent-Teacher Interview Message.
Teachers may block slots for when they will not be available due to prior engagements, pre-booked meetings with specific parents, or desired breaks. A teacher hovers over a slot, and clicks block to remove the slot from their schedules.
Example of Teacher’s Parent-Teacher Interview Schedule
- Teachers enter the room number for each day of the schedule. School administrators can also enter the room number by clicking a teacher’s name in the Progress tab. To facilitate online meetings, URLs of meeting links can be used instead of a room number by copying and pasting the link.
- Hover and click to block or unblock a slot.
- Click Add Note to add a note to a blocked or booked appointment slot.
- Hover and click to book for a parent. Note: Teachers cannot book for parents until the PTI Schedule has been opened to parents.
- Name of parent, student, and class scheduled for the slot.
Teachers and administrators can also add notes to blocked and booked appointment slots. The note could include information about why the slot is blocked or relevant information the teacher may need to know for a given booked appointment. These notes are only visible to teachers and administrators.
To include these notes in the schedule printout, select the box next to Include Notes, then click the printer icon.
The online help for teachers can be found here.
The online help for parents can be found here.
Teachers tab
The Teachers tab is available after the schedule has been opened to teachers. The progress tab lists the current count of blocked, booked, and free classes for all of the teachers included in the interview period. As parents book appointments, the counts are updated. Click on the teacher name to enter room numbers or block slots.
Administrators can enter the room numbers on behalf of teachers. Click the Teachers tab, then click on the teacher’s name. Teachers can be searched for by name using the search bar. Enter the room numbers and click Done.
If the schedule is set up for concurrent bookings, teacher’s will see the “book for parent” link until all slots have been filled.
Administrators can book an appointment on behalf of a parent through the Teachers tab or the Parents tab. However, the Parents tab provides access to a parent’s schedule which enables the School Office to book appointments with multiple teachers.
Printing a main list by teacher
Click the Teachers tab and click the printer icon.
Open to parents
After teachers have had the opportunity to block slots, the schedule can be opened to parents. To do this, click on the Open to parents option on the progress bar.
Once clicked, every parent or guardian of a student enrolled in the classes included will receive a Parent-Teacher Interview workflow item in Messages. Upon receipt of the workflow item, all parents of the student can book appointments. For example, if a student has three parents or guardians with access to records, all three parents can book an appointment with the student’s teachers.
Teachers may still block any free appointment slots, but once a slot is booked by a parent, it cannot be unbooked by the teacher.
Example of a parent’s Parent-Teacher Interview workflow
-
-
-
- Students associated with the parent account.
- Click slot to book the appointment. Parents cannot book another appointment for this appointment slot.
- Click Remove Booking to cancel the appointment.
- Click Add Note to supply a note to the teacher.
- Click Change to change the appointment to a new slot.
-
-
- Click Done to view the schedule.
Example of a parent’s Appointment Summary
A list of teachers, classes, and room number. The room number is set by the teacher. Click Make changes to open the appointment schedule form and alter the bookings.
The online help for parents can be found here.
Managing bookings on behalf of a parent or student contact
School Administrators can book and cancel the booking on behalf of a parent or student contact (a parent/guardian without an active Edsby account) by navigating to the Parent-Teacher Interview schedule.
- Click Parents tab.
- Search for parent name.
- Click manage.
- Click on a slot to book an appointment. Click on a booked appointment to cancel the appointment.
If the schedule has been set up to enable concurrent sessions, the book for parent link will appear until all concurrent slots have been filled.
Printing a list of parent appointments
Click the print icon to view an overall list of parent appointments.
To include both teacher and parent notes in the printout, select the checkbox next to Include Notes, then click the print icon.
Completing the registration period
The school can close the registration period by clicking the Complete option on the progress bar. Parents will no longer be able to book or change appointments. The school administrators and teachers can continue to book appointments on behalf of parents.
When the schedule is closed, parents are directed to call the office if any changes are necessary.
Schedules become read-only once the dates are in the past.
Group PTI Schedules
Occasionally, administrators may want to set up parent-teacher interview periods for groups of students at the school. To create a Group PTI Schedule, create a new interview period and search for the Group to add in the Classes and Groups tab.
Note: Groups must include students to be included in a PTI Schedule.
It is important to note that although List and Monitor Groups show up in the Groups picker, they are not schedulable in the parent-teacher interview schedule as they are not intended to be exposed to students and parents.
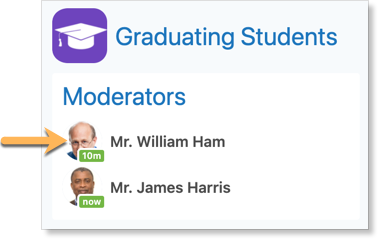
When the PTI is open for teachers, only the first moderator of the group will have access to the schedule in their Mailbox and have the ability to block or book appointment slots.
When it’s time for parents to book appointments, they will do so through their Edsby mailbox. Parents do not need to be members of the Groups added to the interview period – only students need to be members.
Note: The above picture demonstrates the process of accessing the PTI Schedule for both parents and the first group moderator.


