Edsby groups are a very powerful way for groups of people to collaborate with each other in a convenient, secure and effective way. Most schools using Edsby very quickly end up with 50 – 100 groups as they add groups for sports teams, clubs, teacher professional development, the student council, parent advisory councils and the like.
Groups can be closed or open to the entire school (or even wide open across a school district). Groups can be shown to everyone, or made visible only to people with specified roles (ex. only teachers).
Members can be added by invitation from a group moderator. Members can also be added automatically to Groups based on role. For example, a group named Staff Lounge can be configured to automatically include all staff as members of the group. When new teachers are added to the school they will automatically be put into the Staff Lounge.
Jump to a section
Creating groups through Groups Zoom
Settings for common group types
Closed Groups workflow for teams and clubs
Removing multiple members from groups
Sending a message to group members
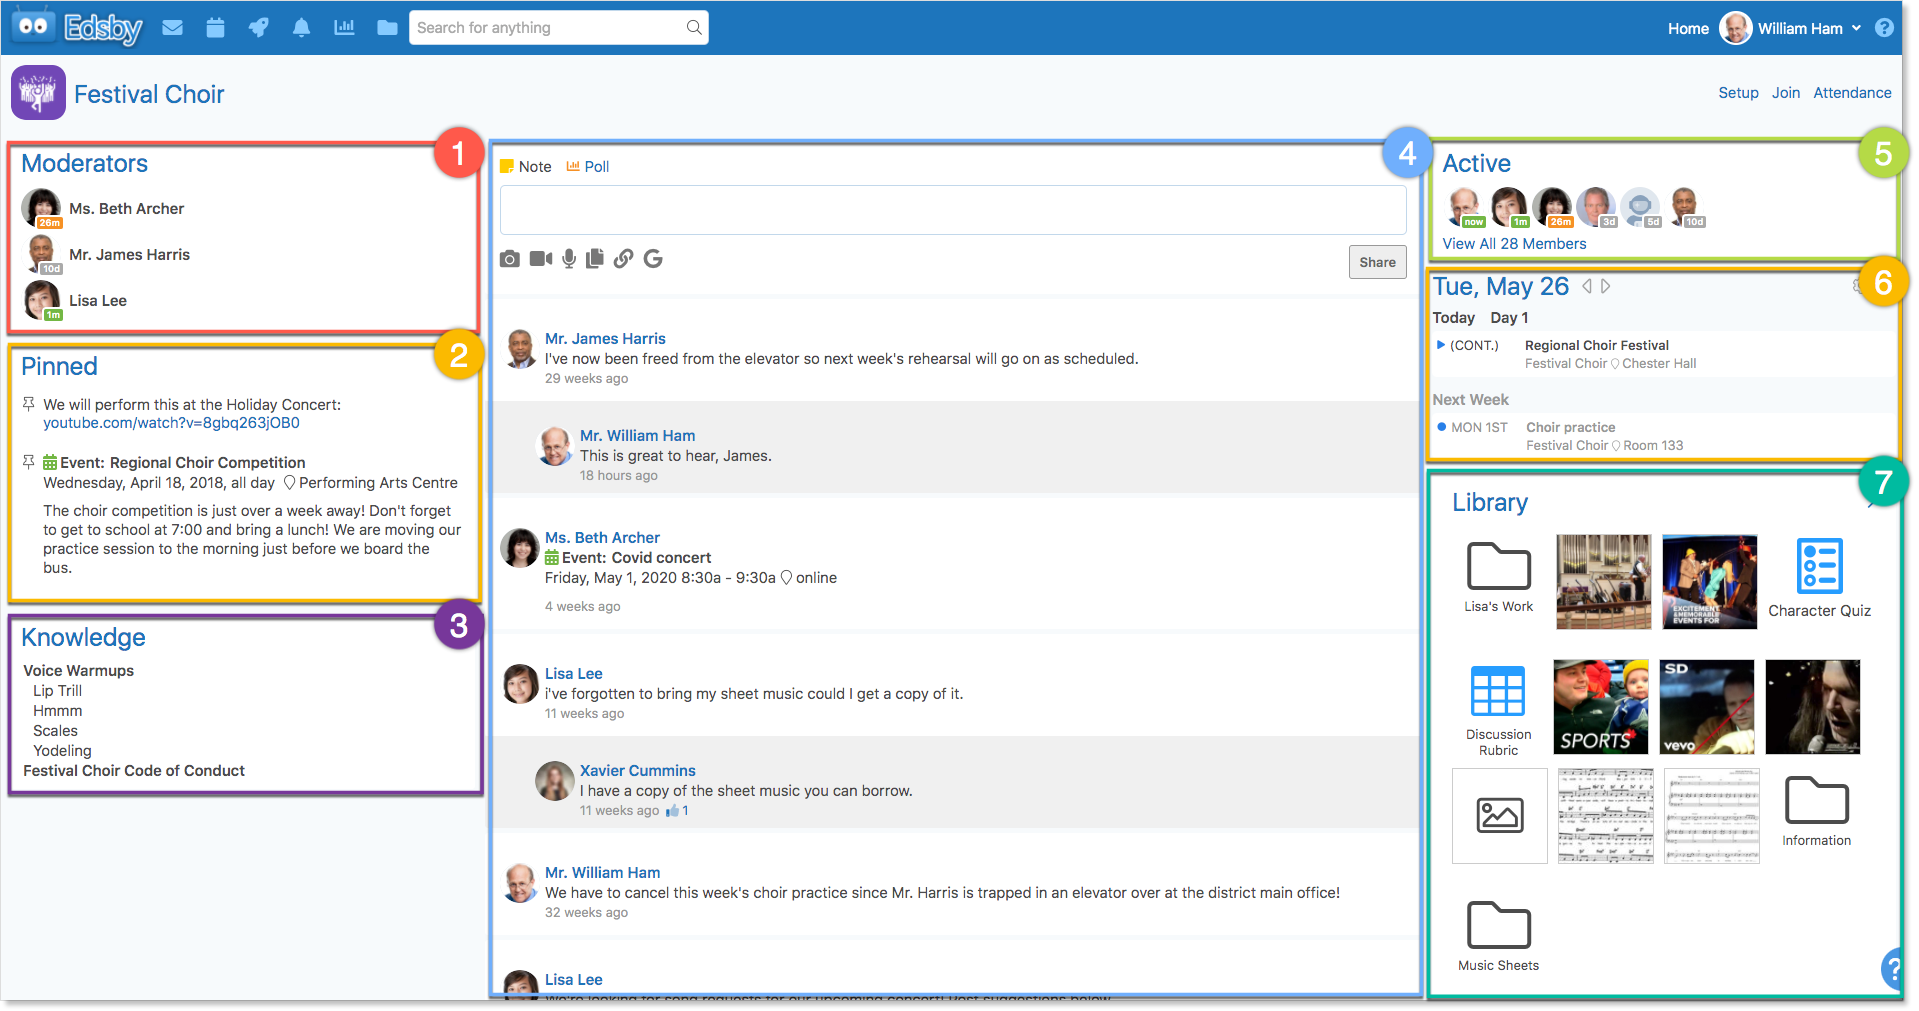
Inside a Group
Groups include a conversation area, a Knowledge Base, a Calendar, and a Library.
- Moderators
- Pinned Items
- Knowledge Base
- Group Feed
- Active Panel
- Group Calendar
- Library
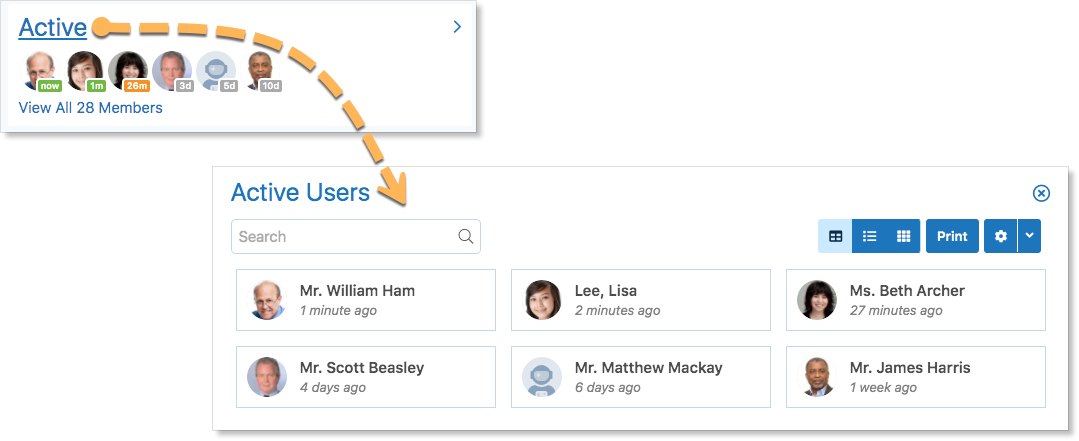
The Group’s Active Panel is visible above the Calendar on the right side of the screen.
This panel displays information about when members last entered the Group. Those tagged with “now” are currently engaging with content in the Group. Group members will be tagged with the number of minutes, hours, or days since they last entered the Group.
The panel is organized by the time of last entry, with the most active members listed first. Users active in the last 15 minutes are coloured green, users active between 15 and 60 minutes ago are coloured in orange, and all others are grey.
Clicking Active will pop out the panel, where group moderators and members, if enabled by the moderator, can view the Active list. The Active list shows when any individual has accessed the Group.
To view all members of the group, click View All Members.
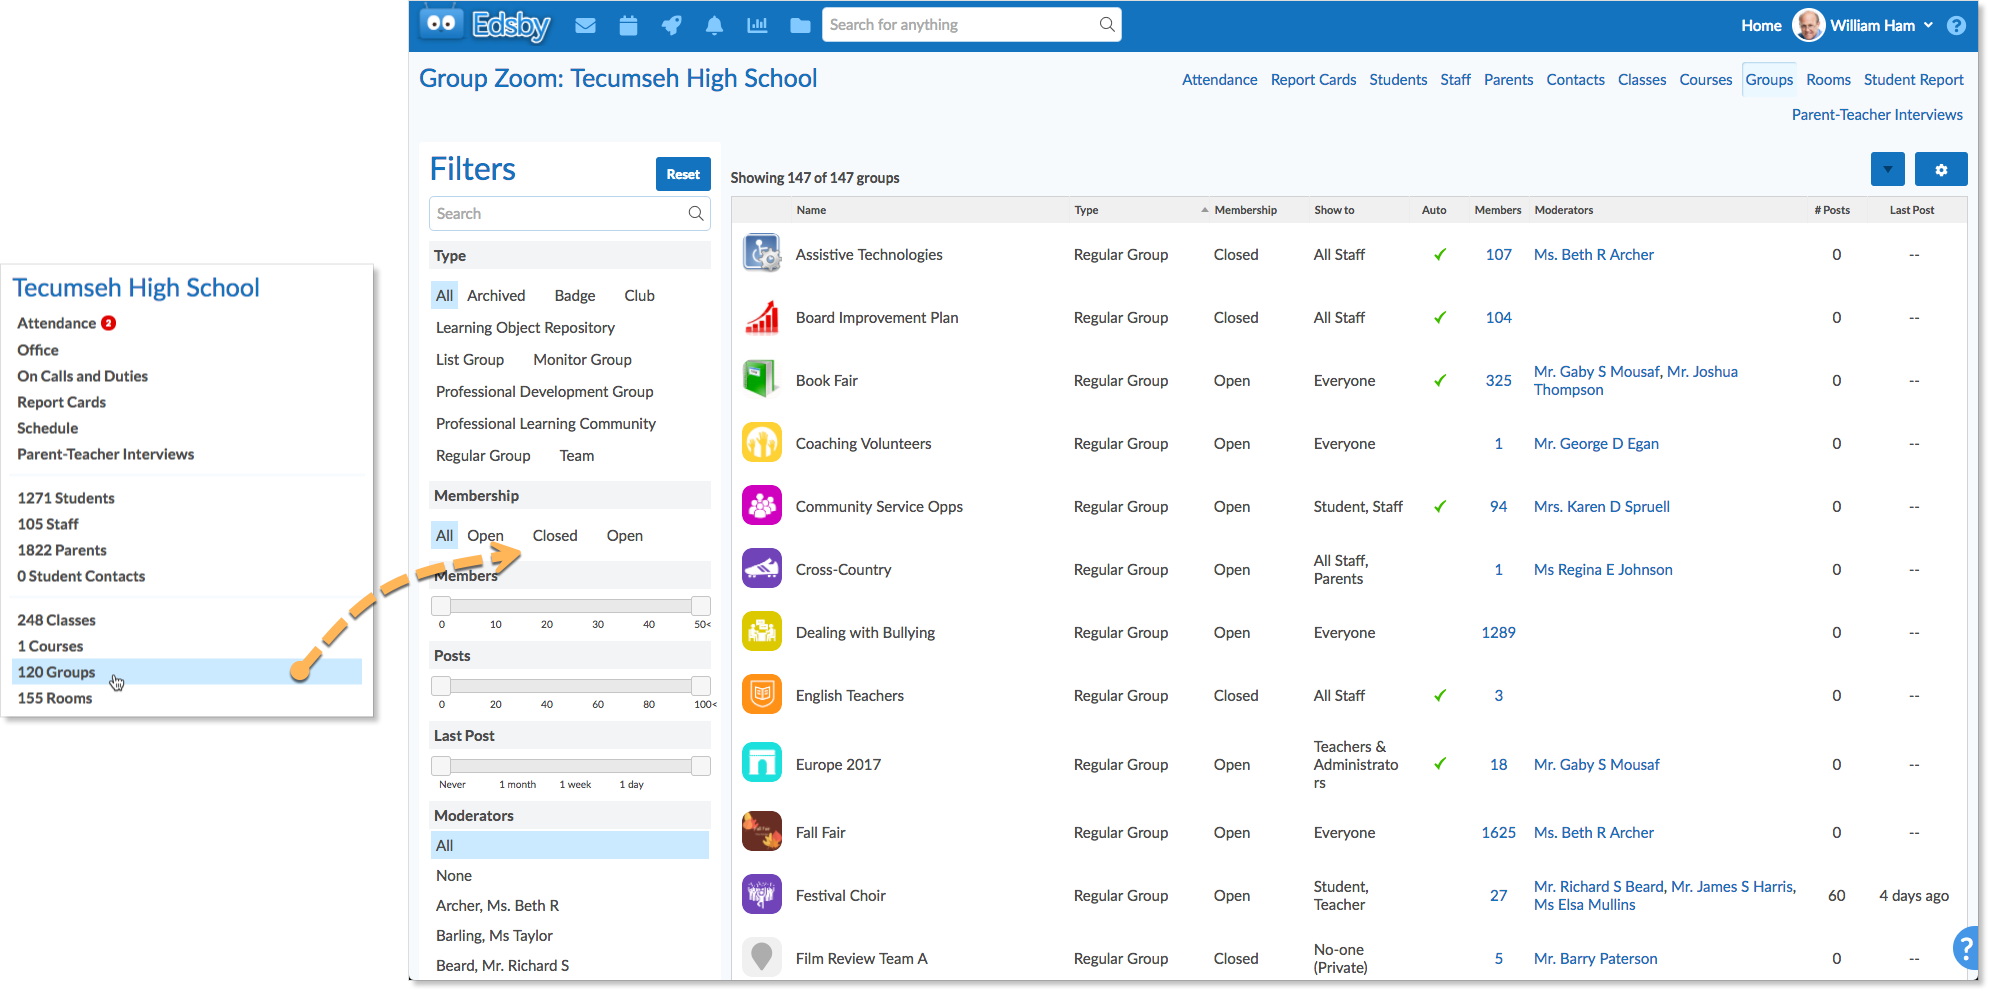
Groups Zoom
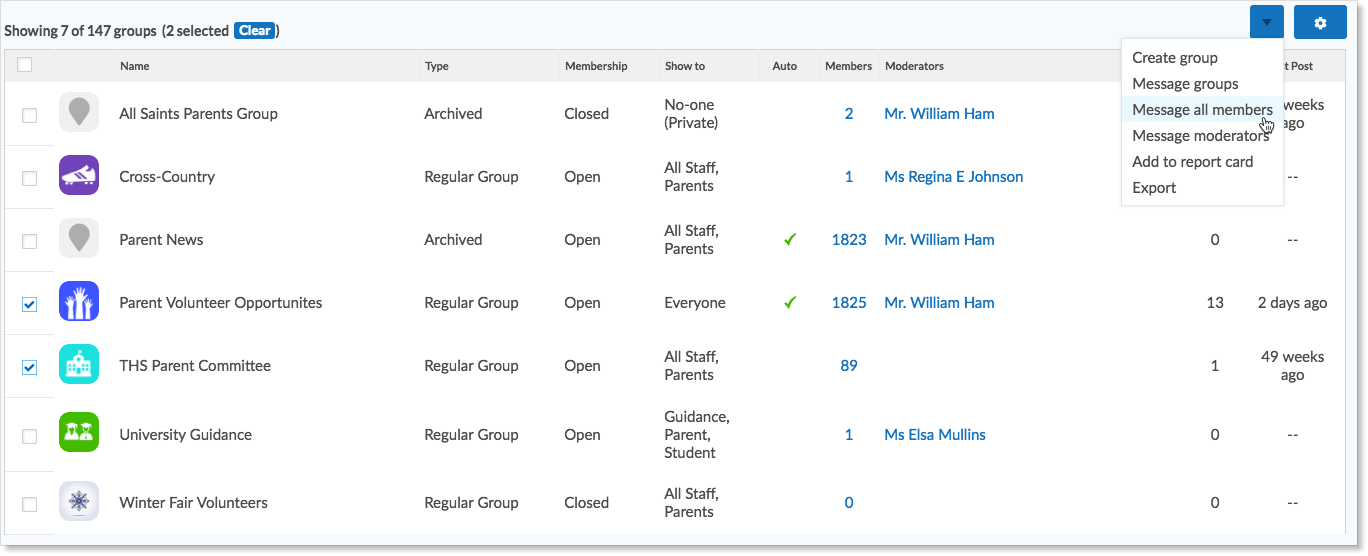
The Groups Zoom shows all groups created by staff members at the school. This provides a good mechanism for administrative staff to have visibility into the kinds of conversations that are happening in the groups at the school.
Click on the group name to view the group, or hover over the name to view the Setup form link.
Creating groups with the Groups Zoom
To create a group:
- On the home screen, click My Groups.
- Click Create.
- Enter the name of the group.
- Set the Show To and Membership fields.
- Click Create Group.
Note: School Administrators can create Groups in both the Groups Zoom and by clicking My Groups on the Home Screen. Teachers create Groups by clicking My Groups on the Home Screen only.
Group Setup Form
| Name | The name of the Group. |
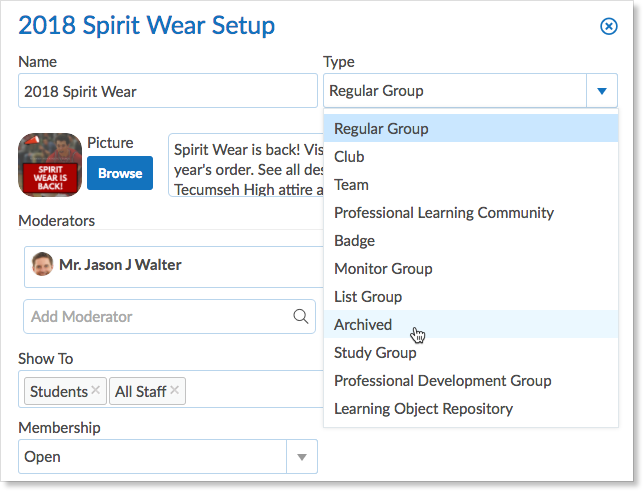
| Type | Regular Group, Club, & Team have the same functionality. A Professional Learning Community includes a Planner like that found in a Class. A Badge Group awards and tracks certifications and badges. A List Group can include students without the student knowing they belong to the Group. A Study Group is set up by Edsby and automatically enrolls students and teachers in a Group if they are teaching or taking the same course. A Professional Development Group enables people to take professional development training. Moderators are content creators and facilitators. Members are participants. Contains a Content Builder. Learning Object Repository enables people to share and use files. Changing the Group type to Archive will remove it from the Home Screen of moderators and members, deleting it, in effect. |
| Picture | Use the standard group icon or choose the Group’s icon by clicking Browse and locating a jpg or png file from the computer. Drag and drop is also supported. The image file will automatically scale to the dimensions of the Group icon. |
| About this Group | Add a brief description about the focus of the Group. |
| Moderators | Type in the names of additional Moderators. Moderators are automatically members of a Group and see the Group in their My Groups Panel. |
| Show To | Choose which type of users can see the Group name when they click on the Find More link in the Groups Panel. |
| Membership | Choose who can be a member of the Group and how. Open Groups mean anyone specified in the Show To field can enter a Group and join it as a member if they choose. Closed Groups either require an invitation from a Moderator to join and enter or an individual can request to join the Group and become a member upon approval by a moderator. |
| Permissions | The Permissions section is collapsed initially; click the blue arrow to expand the section. |
| Invite People | Controls who can invite other people to this Group. |
| Make Posts | Controls who can post Notes, reply to Notes, and create Polls. |
| Reply to Posts | Control who can reply to a Note or participate in a Poll. |
| Edit Knowledge Base | Controls who can create, edit, and delete Knowledge Base entries. |
| Edit Calendar | Controls who can create, edit, and delete Calendar Events. |
| View Members | Control who can see the Members panel. |
| Academic Info | Groups can be included in Report Cards. The Subject and Grade field are used to ensure the Group receives the correct Report Card template. |
| Enable Attendance | Organizations that use the Edsby Attendance system for Classes can also take Attendance for Groups. When enabled, an Attendance link will appear within the Group if the Group has at least one student as a member. |
| Automatic Membership | The Automatic Membership section is only available to School Admin roles. Automatically subscribes and maintains membership according to the criteria set in the form. |
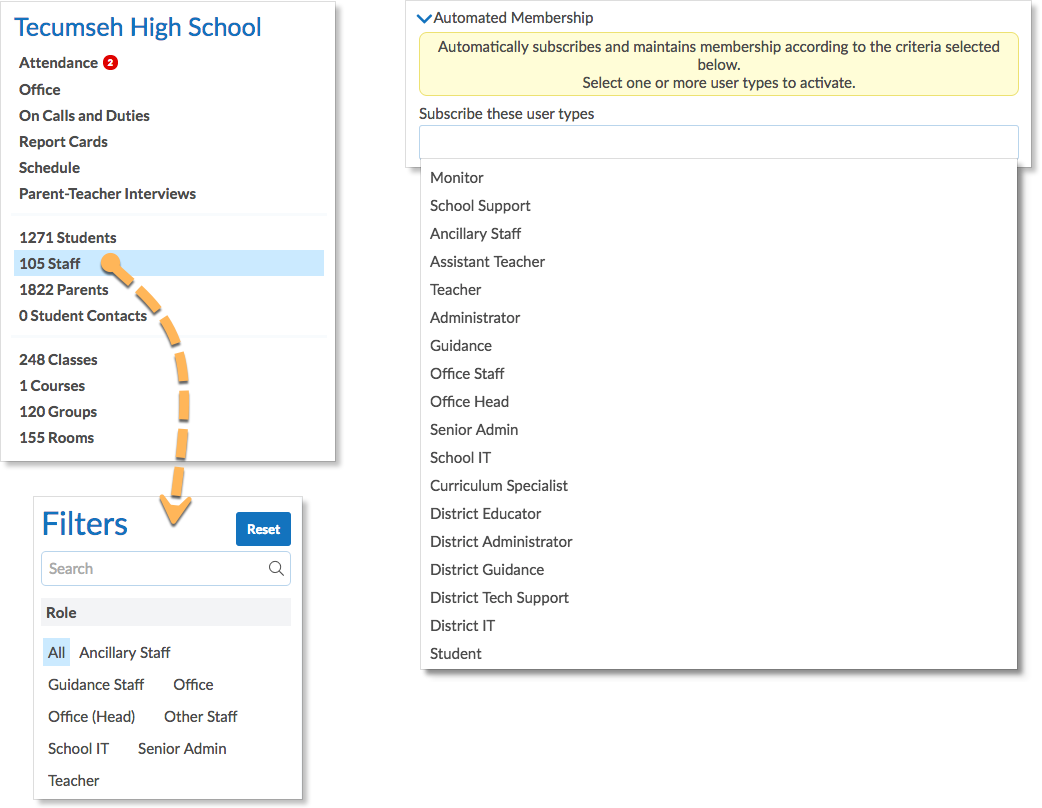
| Subscribe these user types | The field lists all available user types. The Staff Zoom lists the roles used at the school or district. |
| For Grades and/or subjects | Enter a list of grades, subjects or grade.subject if relevant. For example, 9, English or 10.Mathematics. |
| Unsubscribe users if they no longer meet the criteria | Membership will be adjusted during the daily synchronization. For example, if a Group is setup for the grade 9 students, at the beginning of a new school year, the membership will change to include the current 9 students. This checkbox is not required to unsubscribe people who are no longer connected to the school. When people are no longer members of a school they are dropped from all Groups. For example, when parents no longer have a student at a school, they lose all access to Groups. |
Changing a group’s Setup form
Group names, moderators, icons or any other information can be changed by editing the Setup form. To open a group’s setup form, hover over the group name in the Groups Zoom to view the Setup link.
The Setup form can also be opened from within the group. Those who are moderating a group and who do not have access to the Groups Zoom can change the Setup form from within the group.
Archiving and deleting a group
When a group is no longer needed, group moderators and school administrators can open the group’s Setup form and set the group type to Archived. This will immediately remove the group from everyone’s desktop. The group will be effectively deleted from Edsby, but the content is retained for the remainder of the school year. Just before a new school year begins, Archived groups are deleted.
Group Setup examples
The following is a set of examples of recommended Group Setup form for common situations.
School Groups
The following examples can be used for groups such as:
- Parent Groups
- Parent Volunteer Opportunities
- Community Volunteer Opportunities
- Parent Council
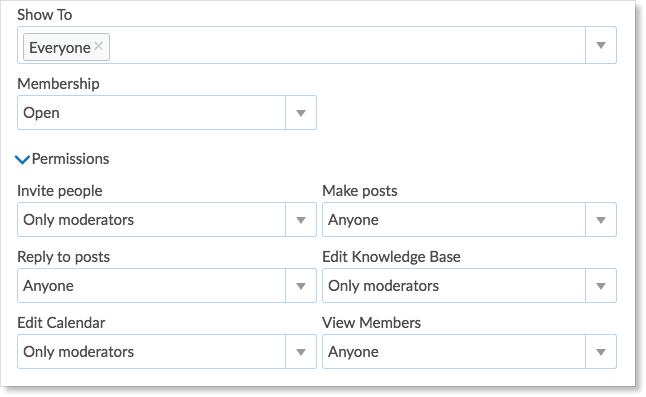
For example, the Parent Volunteer Opportunities group can be seen by staff, parents, and students. Anyone can ask questions about volunteer opportunities. Younger students, who love having their parent on a field trip, can tell parents about new posts.
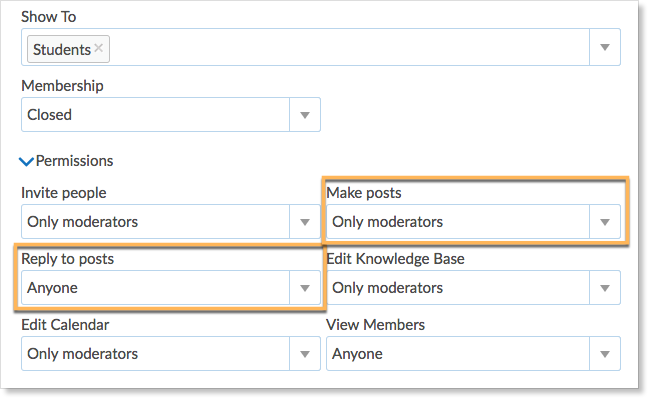
The Parent Volunteer Opportunities group could also be set up to only enable the moderators to make a post, but permit anyone to reply to posts.
When naming groups for parents, remember that a parent may see groups from more than one school. Consider using the school name as part of the group name, or choosing the school logo as the image.
Staff Groups
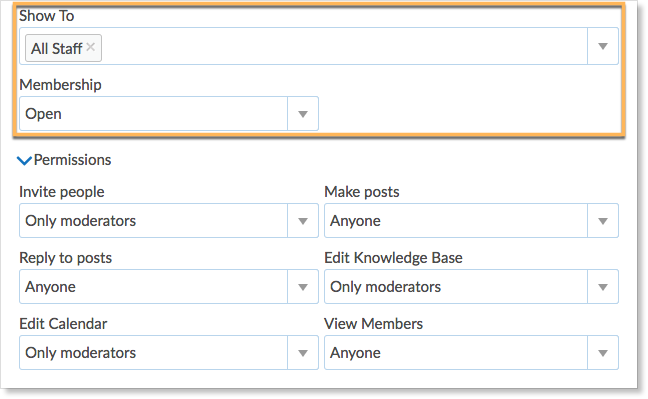
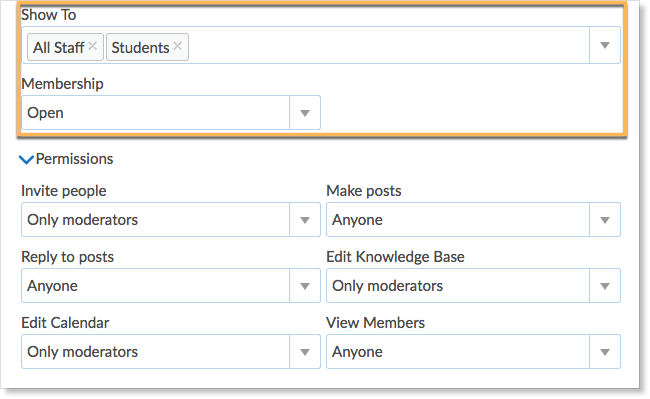
Sometimes it is a good thing for parents and students to be aware of all the work and activity that happens at school, but to avoid overwhelming parents and students with a list of groups that they can’t join, staff groups can be hidden from parents. For staff groups, set the Show to field to All Staff.
Groups provide departments or committees with a great way to collaborate. In this example, only staff can see the name of the group and any staff member can enter and join the group.
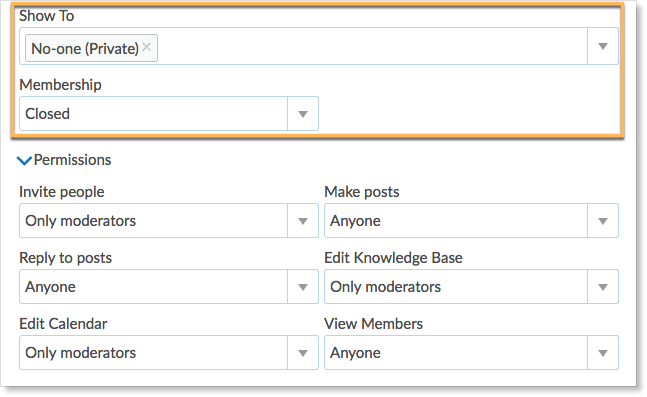
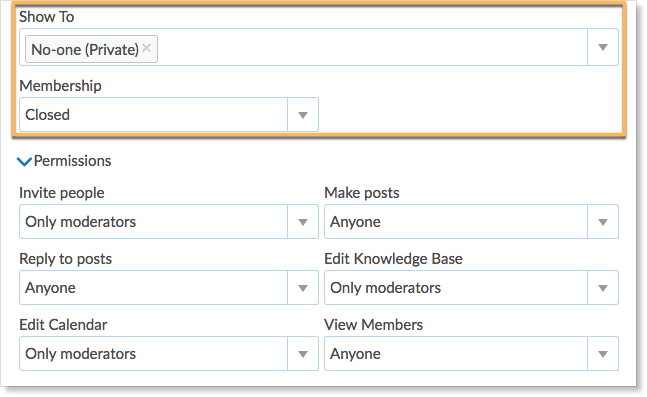
Follow this example if the group only needs to be seen by the group creator and people invited to join the group. The Show to and Membership fields can be changed at any time. A group may begin as a private group while people create content then opened to all staff. For this scenario start with this setting below, and then switch the Show to field to All Staff and the Membership field to Open.
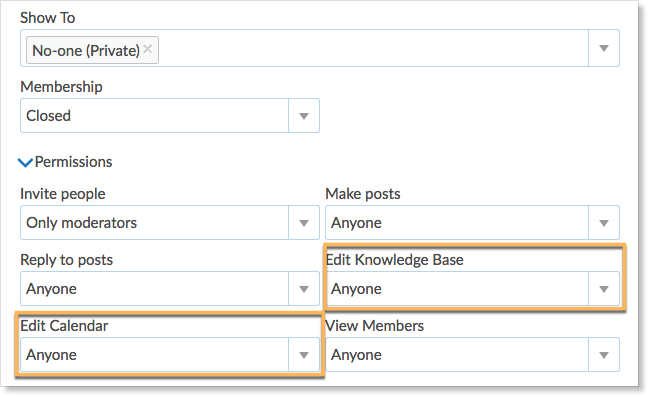
When working with a group of people to create content, follow this example to enable everyone in the group to have the same set of permissions as the moderator.
Student groups
Groups can give students a safe place to practice digital citizenship. Groups such as student volunteer opportunities or clubs that are always open to new members can be set up like this:
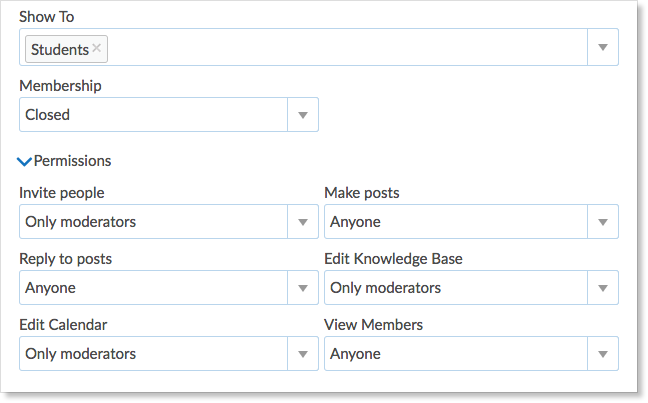
Follow this example to set up a group whose name can be seen by students, but only members can enter the group and contribute.
People who are not in a group can click the group name and request to join the group.
To create a group where students can only read content and reply to moderator posts, follow this example.
Private Group
To create a group that can only be seen by the creator and members, set the Show field to No-one (Private).
Adding people to groups
People can be added to groups in 6 ways:
- Joining in any open group displayed in the expanded Group panel.
- Requesting to join any closed group displayed in the expanded Group panel.
- By moderators of groups, by opening the group and clicking the Invite link.
- Teachers can invite students they teach and their parents to groups they moderate through the My Students and My Parents Zooms.
- School Admins can bulk invite people to groups through the Students, Staff, and Parents Zooms.
- School Admins can configure the Group Setup form’s Automated membership section.
Automated membership
School and district administrators can automatically subscribe staff members, parents, and students to a Group.
Automated membership is based on a user’s Edsby role. The Staff Zoom can be used to identify which people are designated as which user type.
For example, if a group is set to automatically subscribe Guidance staff, every time new guidance staff members are added to the school, they will be added to the group.
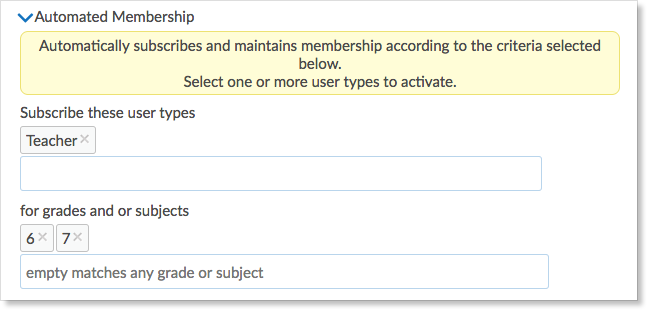
For teachers, the automatic membership can be refined by specifying grade, subjects, or a combination of grade and subjects. For example, the administrator can create a Staff Room, which for all time, will automatically add any new staff members to the group or groups can be created to enable grade 9 English teachers, or high school Art teachers to collaborate.
Use the For Grades and or Subjects field to enter a list grades (K-12), subjects, or to combine grade and subject.
This example illustrates how to automatically subscribe all current and future grade 6 and 7 teachers to a group.
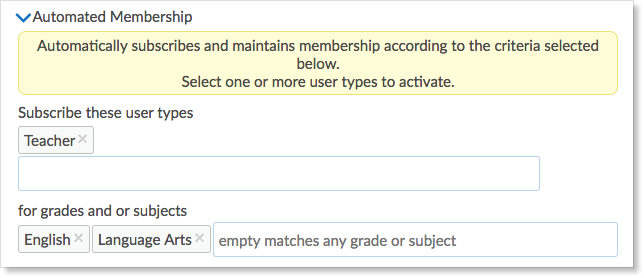
This example illustrates how to automatically subscribe all current and future teachers of English and Language Arts classes to a group.
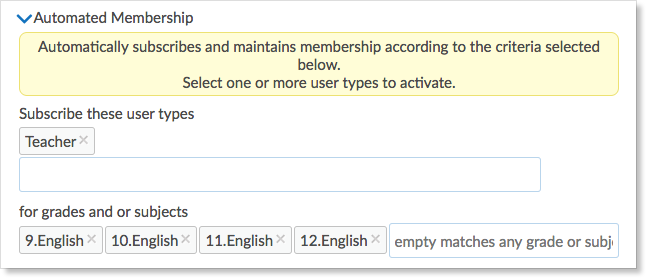
This example illustrates how to automatically subscribe all current and future high school English teachers to a group.
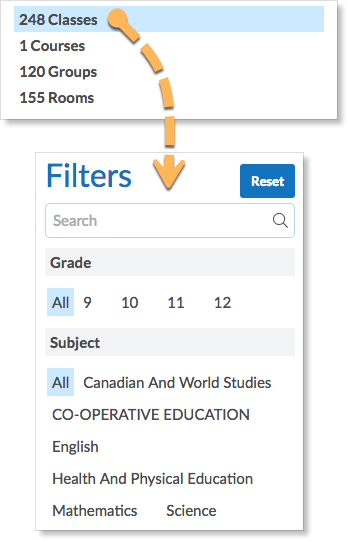
The Classes Zoom lists the valid choices for the For Grades and or Subjects field.
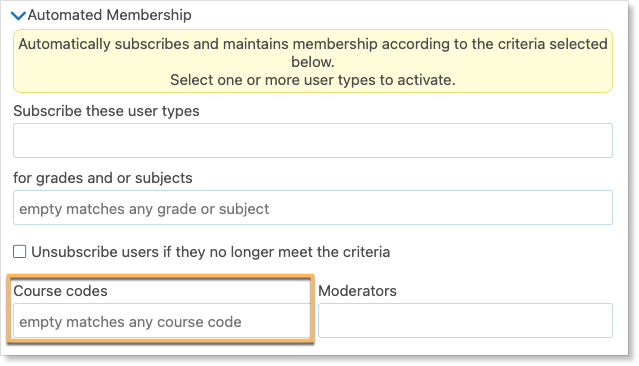
Use the Course Codes field to automatically subscribe users associated with specific course codes to the group.
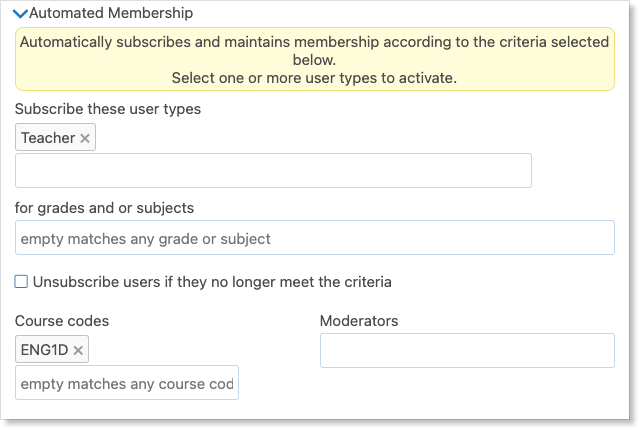
This example illustrates how to automatically subscribe all teachers who teach the ENG1D course code.
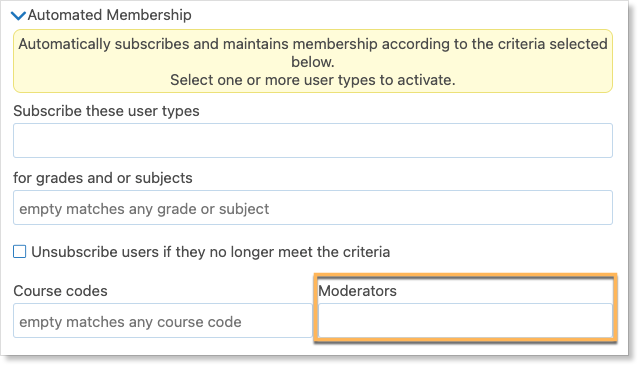
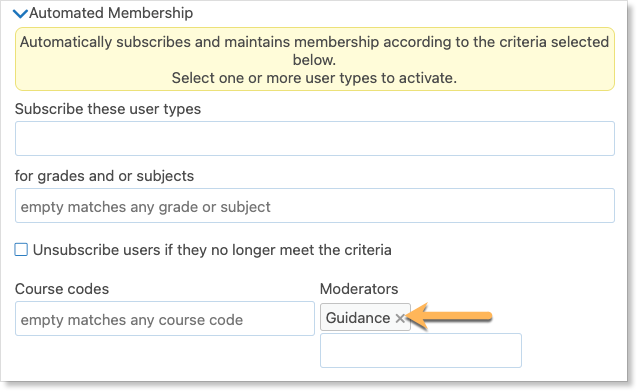
Use the Moderators field to automatically subscribe certain roles as moderators of the Group.
This example illustrates how to automatically make all Guidance staff moderators of the Student Success Group.
Group members with automated membership are distinguished by a gear icon next to their name in the Group Member List.
Note: Automated membership created by a school-level administrator will only apply to users at that school. If a district-level administrator uses automated membership, all users in the district matching the membership criteria will automatically be added as Group members.
Automatic Membership for students
To create a group that includes all current and future students set the Subscribe these user types field to Student.
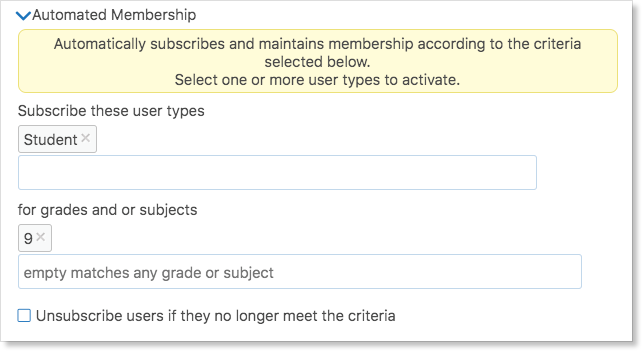
To create a group that includes all current and future students in a specific grade, set the Automatic Membership as follows. In this example, the group will be for grade 9 students.
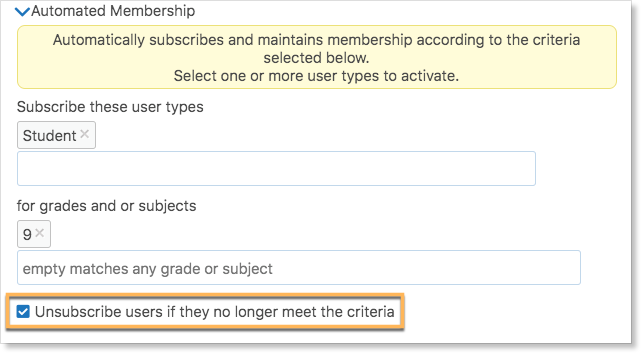
When the Unsubscribe users if they no longer meet the criteria check box is enabled, students will be subscribed or unsubscribed based on their current grade level. At the beginning of a new school year, only the current grade 9 students will be subscribed to this group.
Automatic Membership for parents
To create a group that includes all current and future parents set the Subscribe these user types field to Parent.
Note: Individuals automatically enrolled in groups will only be unsubscribed if they no longer meet the criteria for the automated membership. If they click the Unsubscribe button from within a group, the group will temporarily be removed from their My Groups panel. However, the group will be added to their My Groups panel again the next day.
Bulk invitations for Students, Parents & Staff
In addition to automatic membership, the Students, Parents and Staff Zooms include the ability to invite people to pre-existing groups.
First, navigate to the relevant Student, Parent or Staff Zoom view. Then, filter the list to the people who you seek to add to the group, or click the Gear icon to select people.
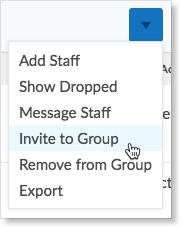
Click on the drop down menu arrow and select Invite to Group.
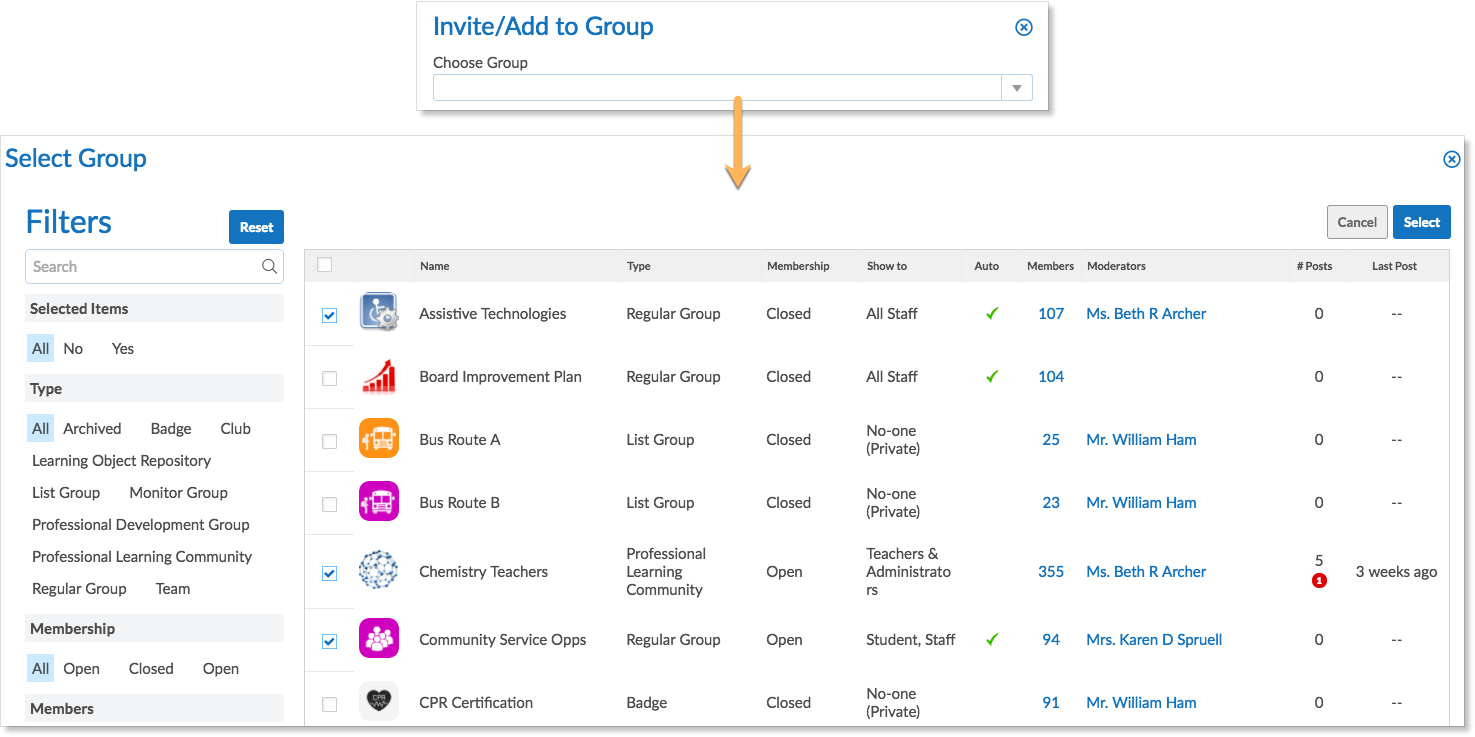
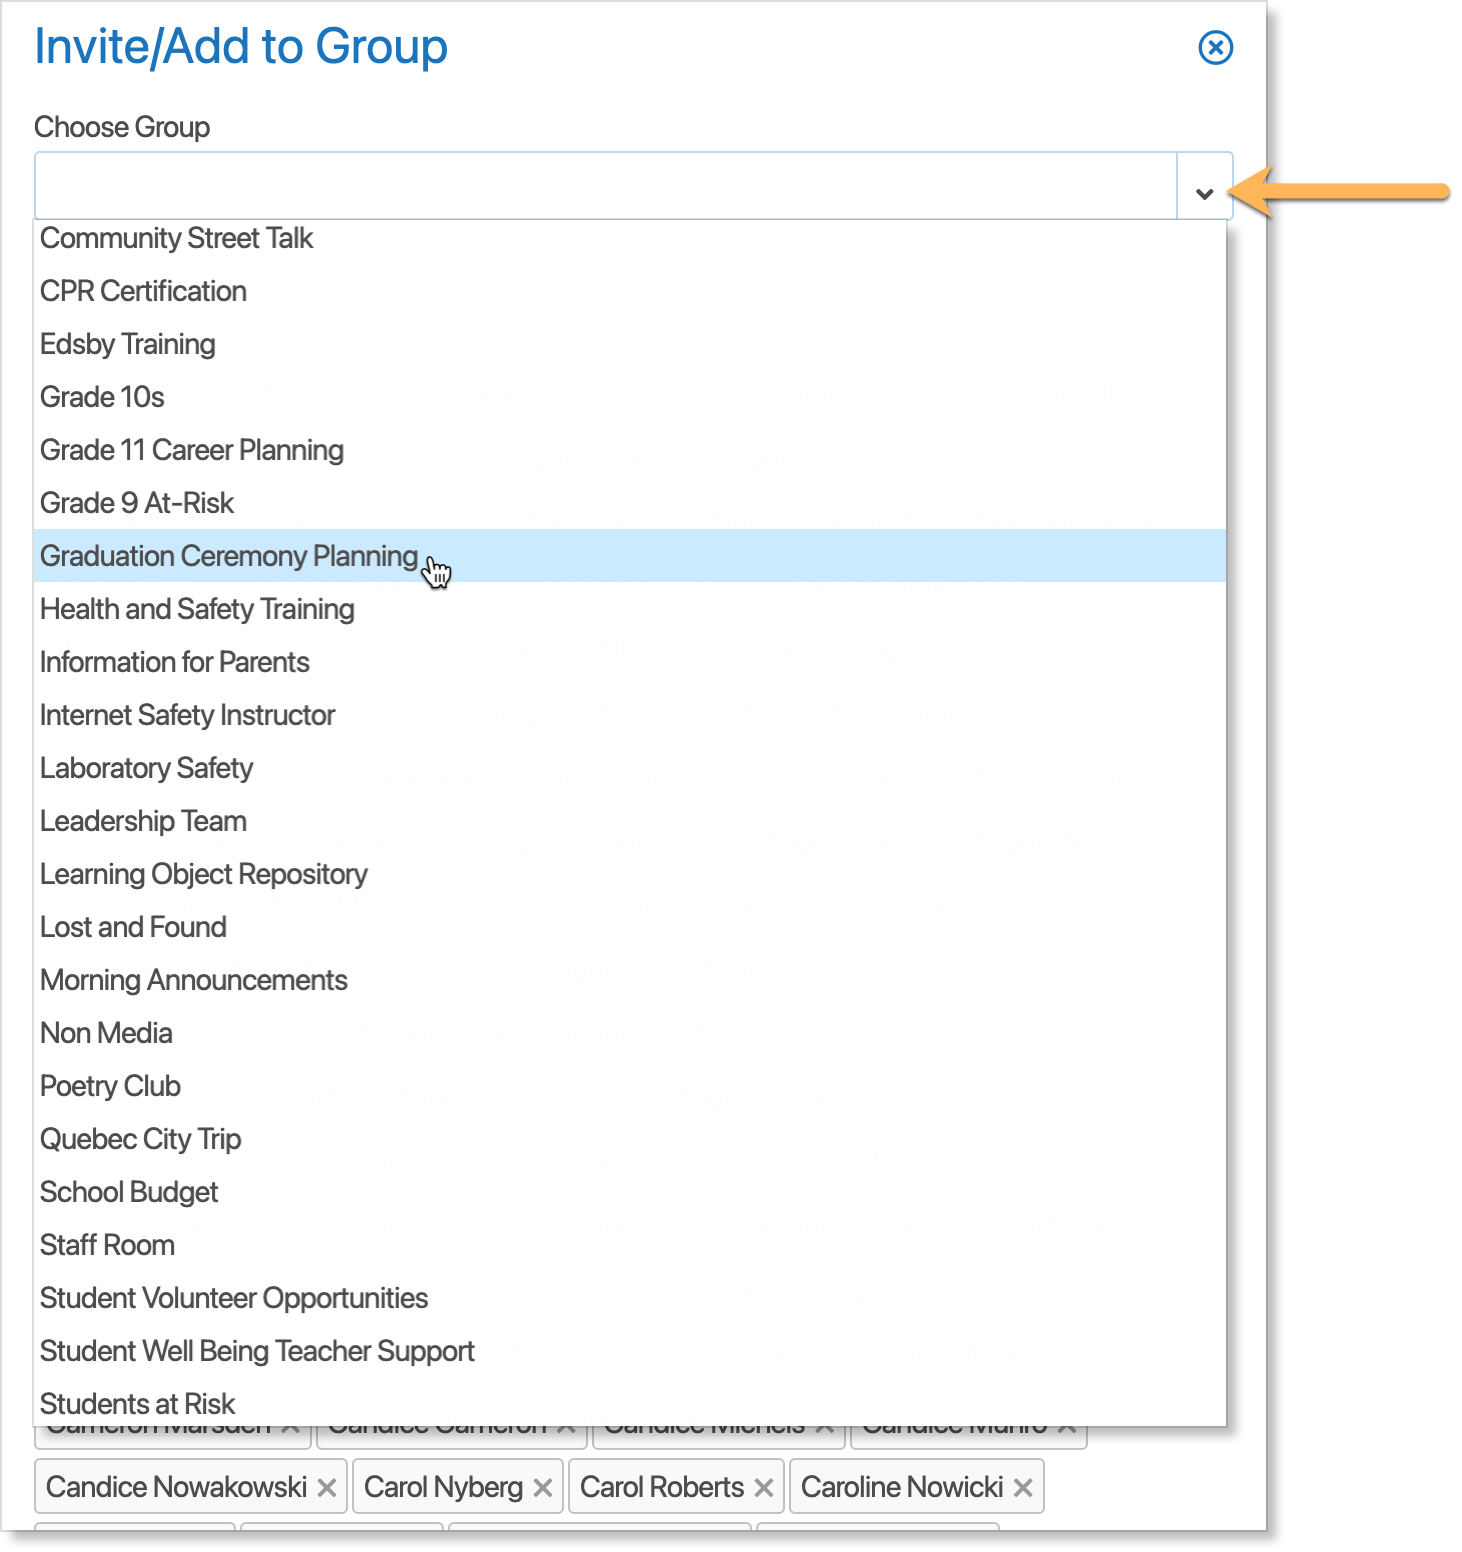
Click Choose Group. The Groups Zoom appears. Select the group or groups and click Select.
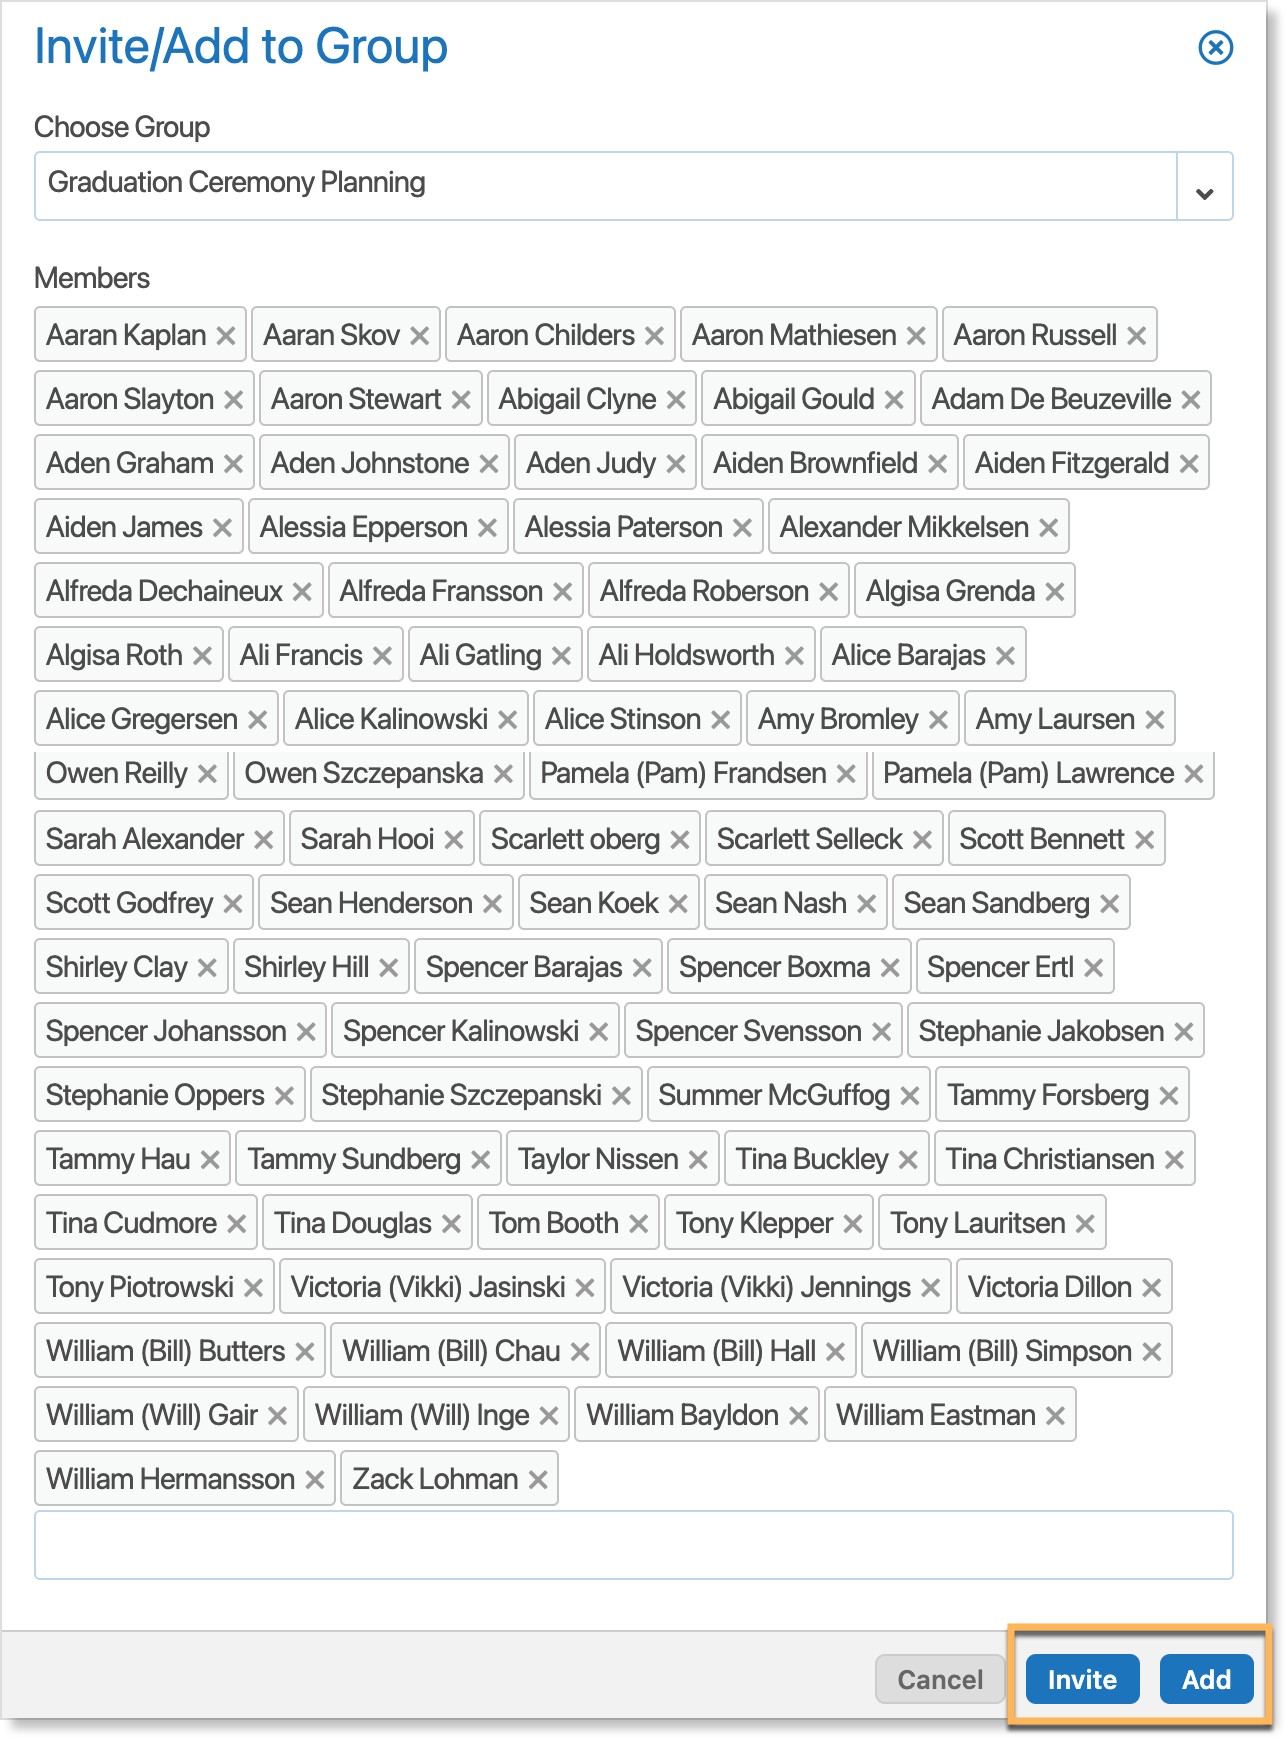
Click Invite to give people the option to decline the invitation. The group will appear on the home screen with an Accept & Decline button. Click Add to immediately add people to the group. Students and teachers cannot choose to leave a group if the Add button is clicked. Any moderators and school administrators can leave a group or remove a member from a group.
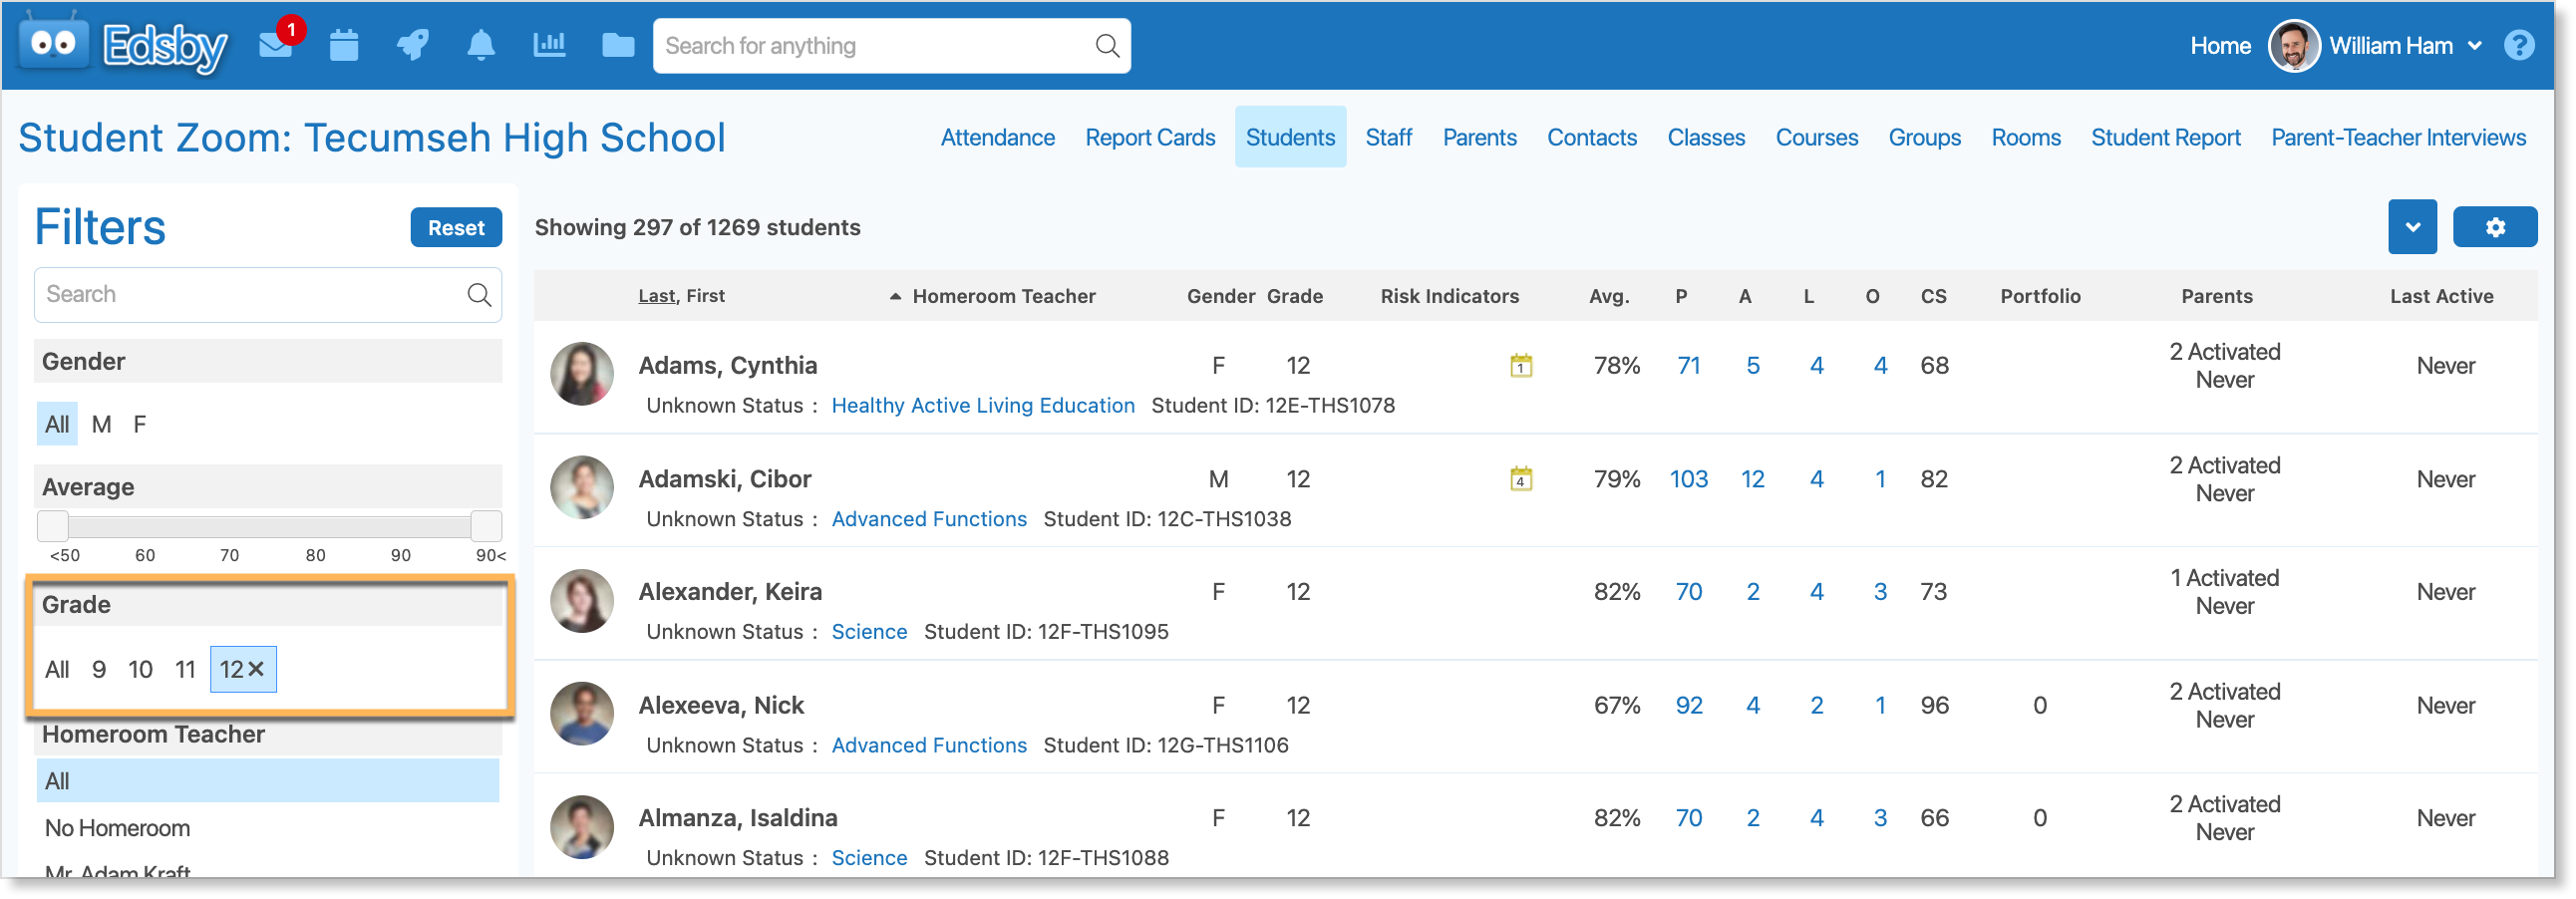
In this example, the school Principal has created a Group for the parents of the grade 12 graduating students to plan for their graduation ceremony and would like to issue a bulk Group invitation to all of the parents. This can be done from the Parents Zoom using the process shown above or through the Students Zoom.
In the Students Zoom, filter to the grade 12 students.
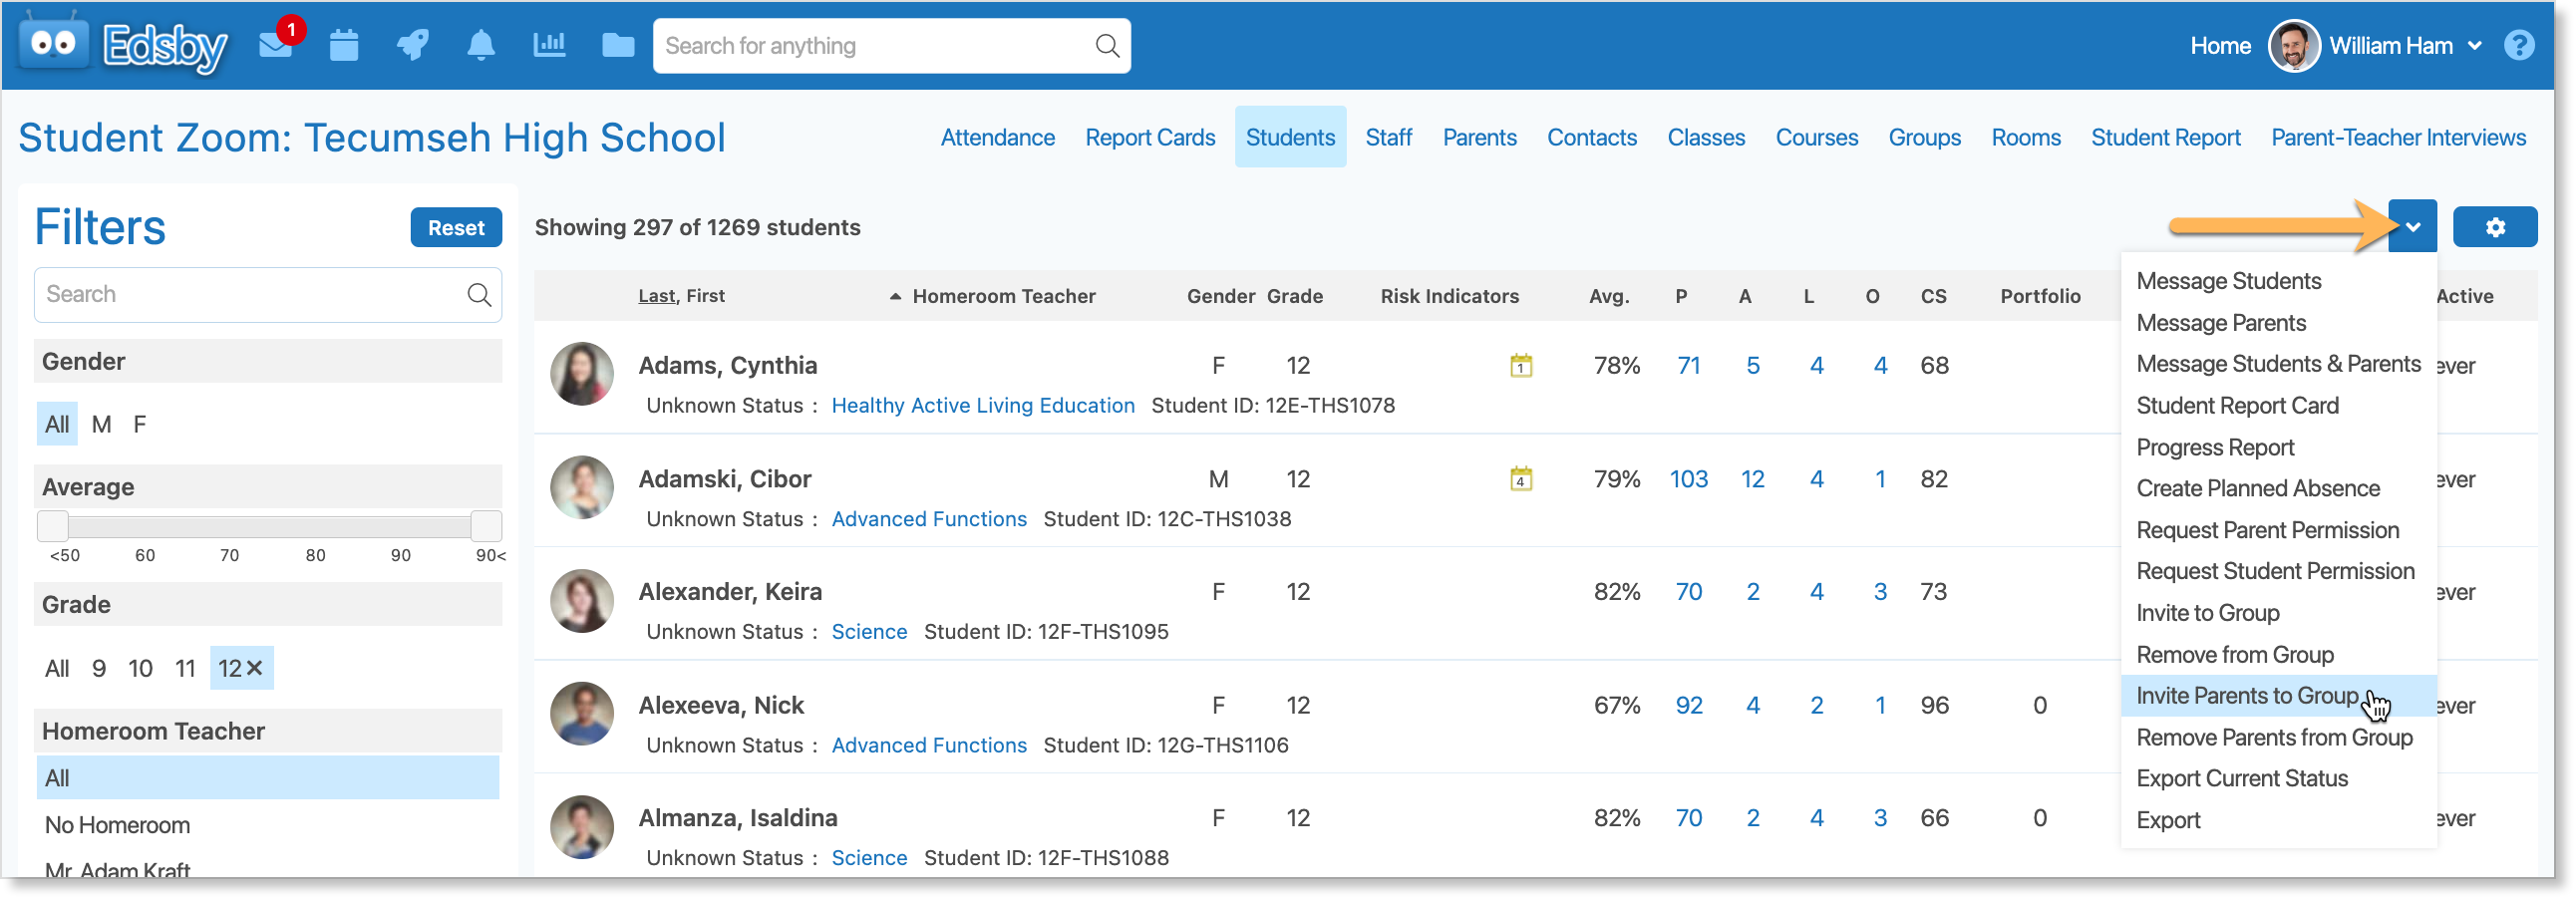
Click the drop-down arrow and select Invite Parents to Group.
Select the Group from the Choose Group drop-down.
Click Add to automatically add the parents to the Group or Invite to give parents the option to decline the invitation.
Closed Groups workflow for teams and clubs
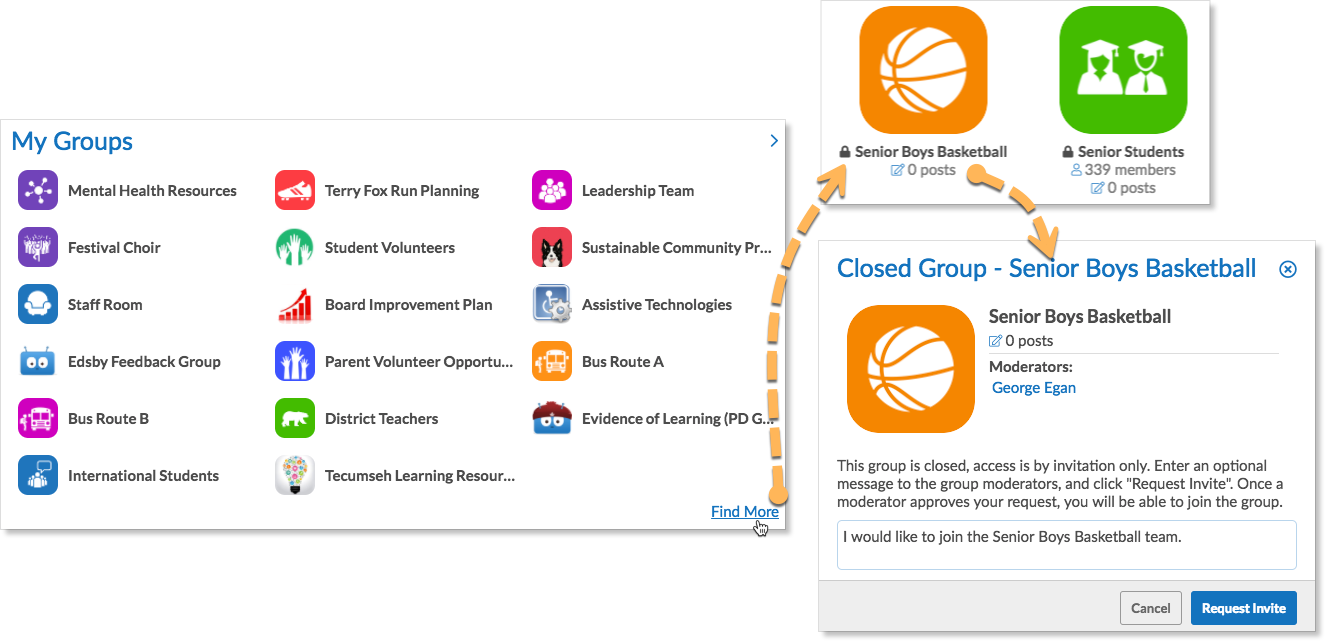
One of the challenges at the beginning of the school year is to get students connected to the right groups, whether a sports team or a club. Closed groups can be used to help with this task. The faculty member creates a closed group that is visible to students. The team members request an invitation to join the group, and the moderator approves or rejects the request. When all the team members have been added, the moderator can then change the group’s Setup form’s Show To field to No-one(Private).
If a group is closed, but not private, moderators may receive requests from people to join a group.
To request an invitation:
- From the home screen’s Group panel click Find More link.
- Click the group to submit the request. The person can send an optional message with the request.
- Click Request Invite.
The request is sent to the moderator’s Edsby Message Centre.
The moderator clicks Approve to add the person to the group. If moderators do not wish to grant access, they can do nothing, click Reject, or click Reject and enter a message in the space provided. The person requesting the invitation will see either the Approved or Rejected and optional message in his or her Edsby Message Center.
Removing a member from a group
Moderators can remove any member of the group, by doing this:
- Open the group.
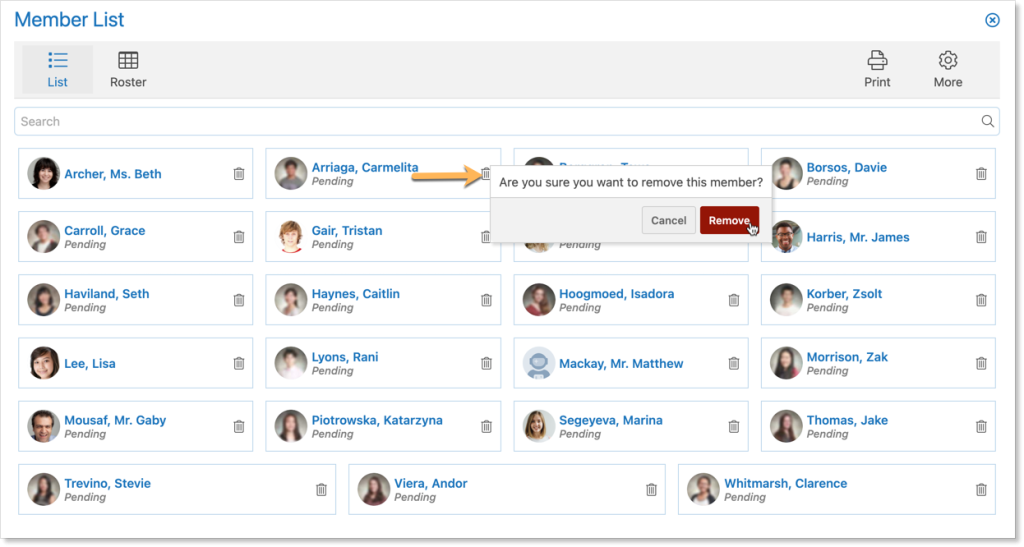
- In the Active panel, click the view all members link.
- Click the trashcan to remove the member. Confirm the deletion.
Users can remove themselves from Edsby groups by clicking “Unsubscribe” within the group when logged in to Edsby with a web browser. This deletes the group from their desktop. The user will be re-added to the group the next day if they were added using auto-enrolment and still meet the auto-enrolment criteria.
Removing multiple members from a group
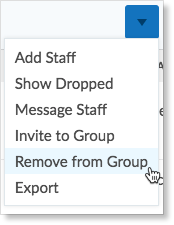
If an administrator needs to quickly remove multiple users from a group, they remove them through Zooms. Once a list of selected individuals is generated, the users can be removed from a single or multiple groups using the Remove from Group function.
The lists generated in a Zoom can only contain one role type (student, staff, or parent). If an administrator needs to remove users from a group across multiple roles, they must repeat the process in each Zoom.
To remove multiple users from a group:
Navigate to the correct Zoom. Administrators can access the staff, student and parent zooms from the home page.
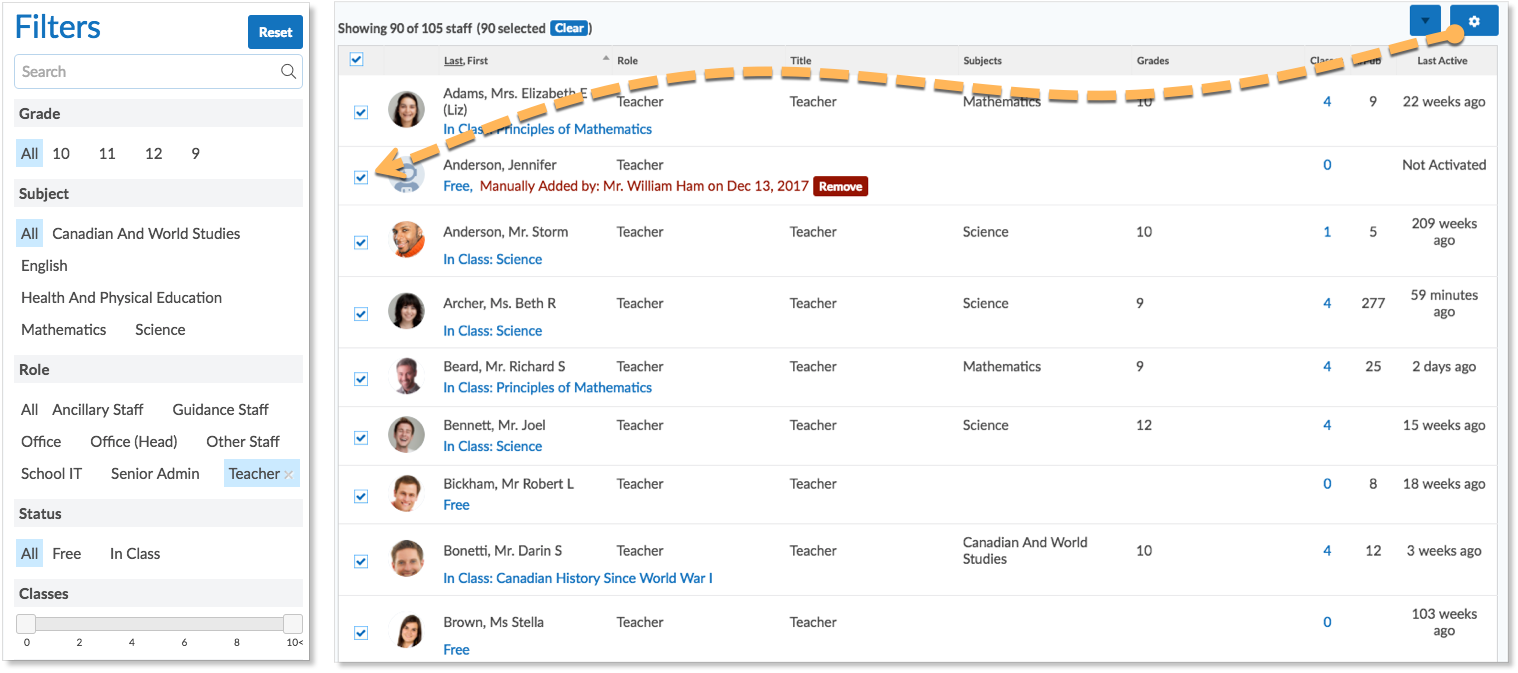
Select (or filter) a set of users to be removed from the group within the zoom. To select users, click the gear in the upper right corner. Click the checkbox beside a user to select them or click the checkbox in the top row to select all users in a list.
| Once a user has been selected, they will not be unselected unless the selection has been manually cleared. This means that administrators can create new filtered lists or search for a particular user within the zoom without their previous selections disappearing. |
After selecting users to be removed, click the downward arrow in the upper right corner of zoom. Select Remove from group.
| Administrators can also remove the parents of selected students from group(s) within the Student Zoom by clicking the Remove Parents from Group option in the drop-down box. |
Click on the box beneath Choose Group.
Select the group(s) to remove the users from. Administrators can choose groups of which some of the selected users are not members. Edsby will simply remove the students who are members of that group.
Click Remove Members to remove the students from the group. In the case of a closed group, this will also revoke any pending invitations to students.
Sending a message to group members
In addition to posting a message within the group, an Edsby message can be sent to groups members or the group moderator. This example illustrates sending an Edsby message to all the members of the Parent Committee and the Parent Volunteer Opportunities groups.
The Staff, Students, Parents, and Classes Zooms can also be used to send an Edsby message to people.
