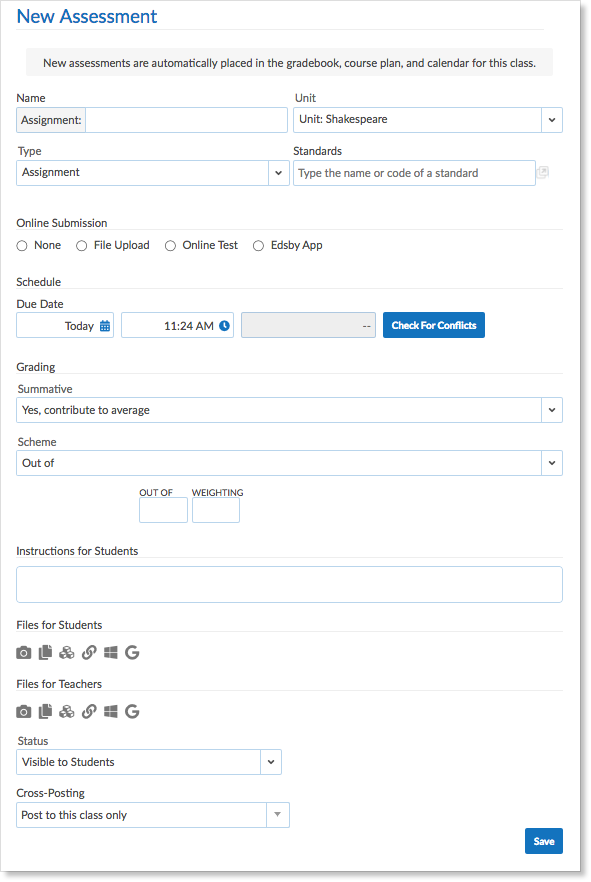
Teachers can use Edsby to create assessments that are automatically linked to the Edsby Gradebook. Edsby helps teachers organize everything connected to an assessment in one convenient place such as learning goals, success criteria, relevant documents, and even learning standards (ex. Common Core standards or ministry expectations).
Accessing the Assessment Form
Teachers can create assessments from multiple places in their Edsby account. Adding an assessment will add it to the class feed, the class and home screen calendar of the student and parents associated with the class, the Planner, the Content Panel, and to the Gradebook. Teachers can create assessments in the Class Feed, the Content Builder, the Gradebook, and in the Planner.
In the Class Feed:

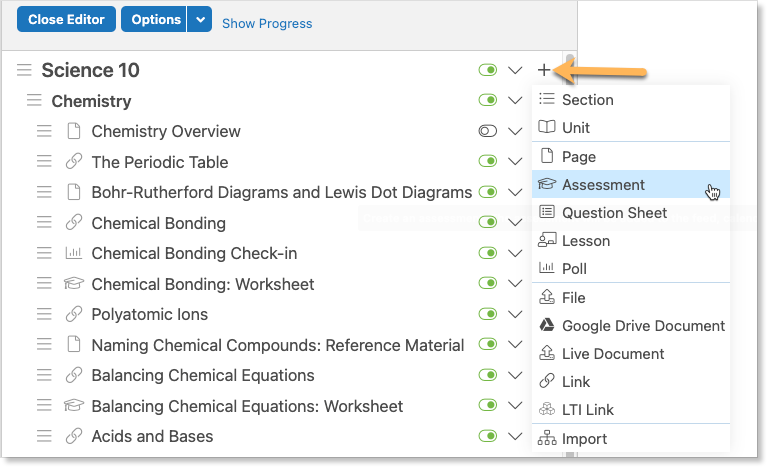
In the Content Builder:
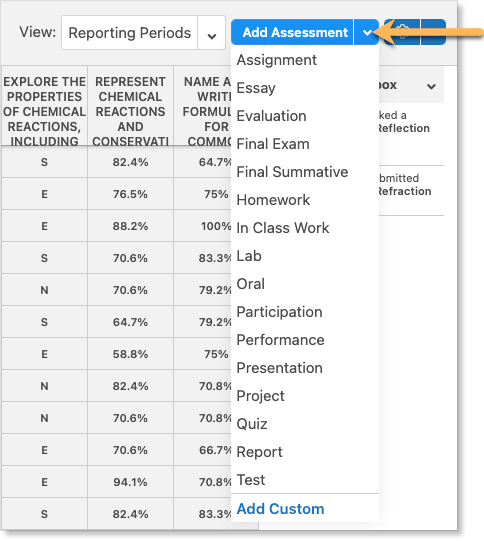
In the Gradebook:
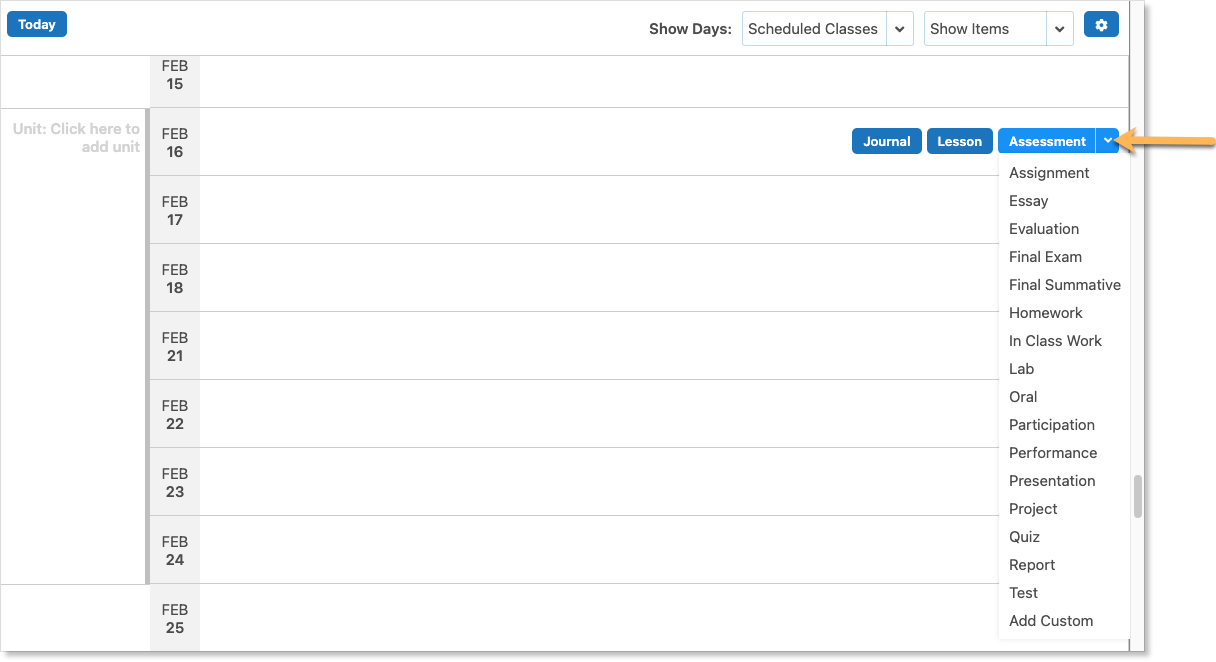
In the Planner:
Creating Assessments in the Class Feed or Gradebook
When creating an assessment in the Class feed or Gradebook, Edsby requires:
- The name of the assessment
- The unit the assessment is part of
- The due date of the assessment
- The grading scheme associated with the assessment
All other fields in the form are optional. Additionally, all information can be changed even after the Assessment has been posted.
Creating Units in the Assessment Form
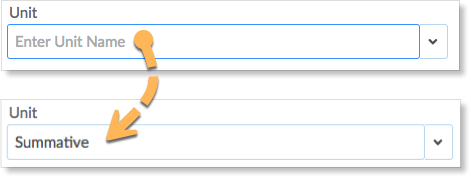
Units are required when creating an assessment in the Class feed or Gradebook. New units can be created directly from the assessment form. To create a new unit, click the drop-down arrow under Unit.
Select Add New Unit from the menu and enter the new unit’s name in the text box.
This new unit will be added to the Gradebook, Course Plan, and Planner.
Note: If the class if not divided into units, create a unit named Term Work, for example, to fill the Unit field.
Creating Assessments from the Class feed
If an assessment being created is due soon, teachers may find it fastest to create the assessment from the class feed. To create an assessment from the class feed, navigate to the desired class. Click Assessment from the options at the top of the class screen. The assessment form will open. Fill out the form with a name, unit, due date, and grading scheme. Customize it using the additional fields, if desired. When the form is complete, click Save.
The Assessment will be posted to the class feed, the Planner, the Course Plan, Calendars, the Gradebook, and will be visible to the teacher as well as students and parents associated with the class if their visibility is enabled.
Creating Assessments from the Gradebook
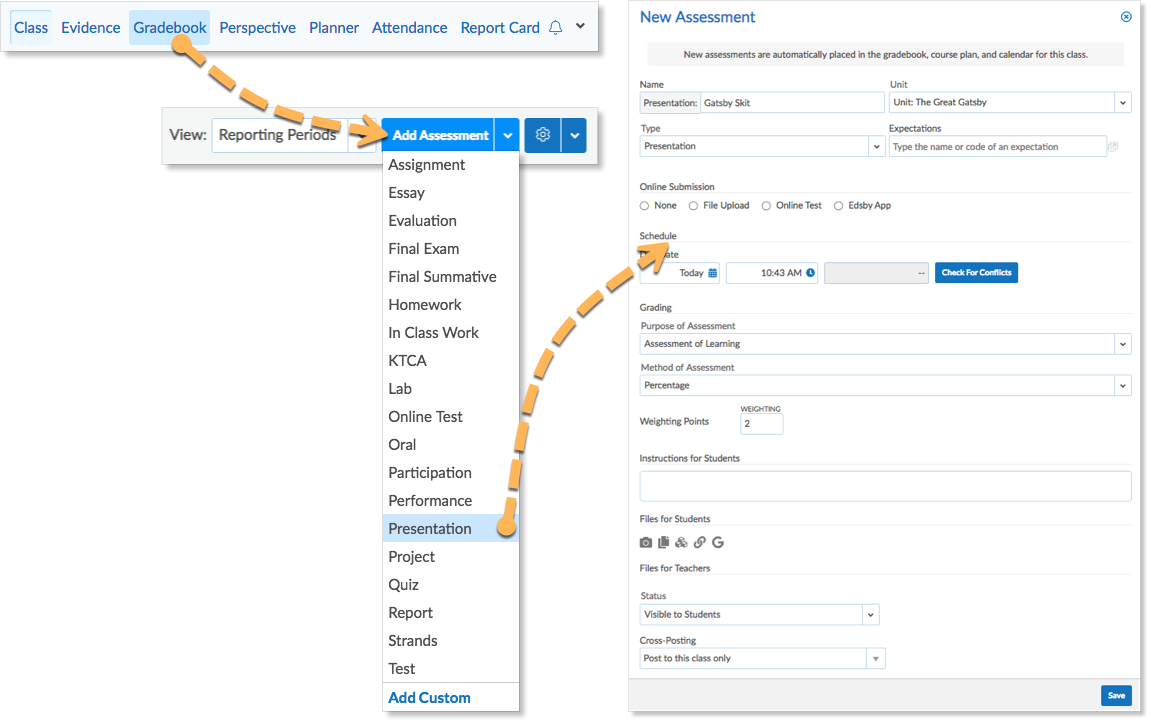
To create an assessment from the Gradebook, navigate to the desired class and select Gradebook from the options on the top right of the class screen. At the top right of the gradebook, click the drop-down arrow beside Add Assessment and choose an Assessment type.
The Assessment form opens. Fill out the form with a name, unit, due date, and grading scheme. Customize it using the additional fields, if desired. When the form is complete, click Save.
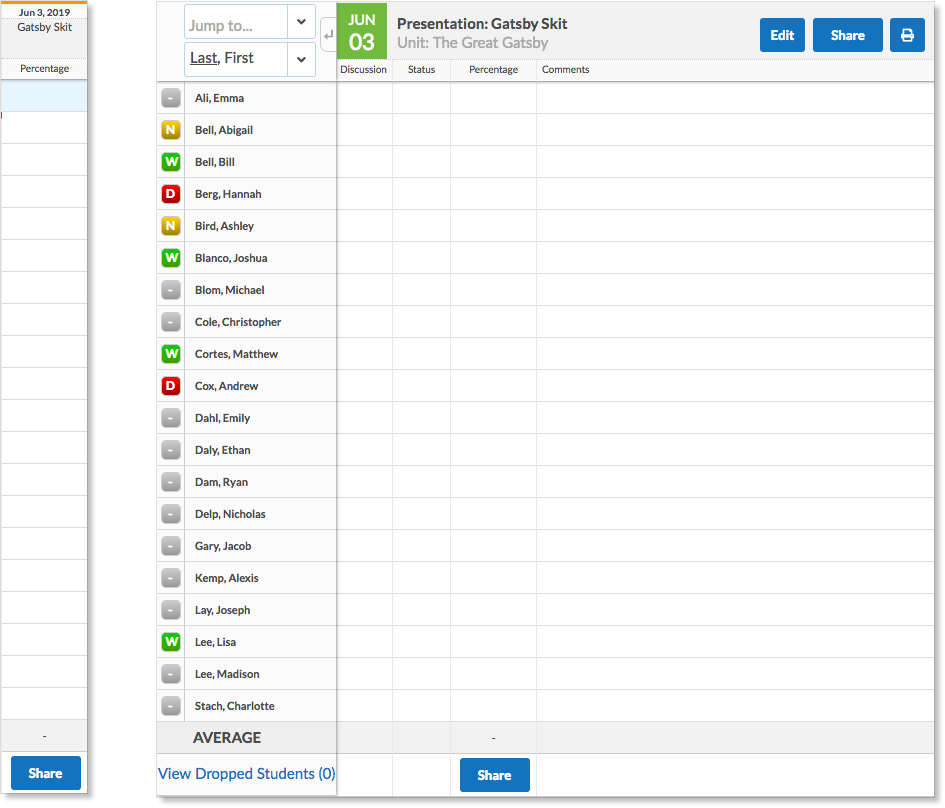
A new column will be added to the Gradebook for the new Assessment. The assessment will be posted to the Class feed, the Course Plan, Calendars, and will be visible to the teacher as well as students and parents associated with the class if their visibility is enabled.
Creating Assessments in the Planner
Teachers who are planning assessment dates for an entire semester should consider using the Planner. When creating an assessment in the Planner, Edsby requires:
- The name of the assessment
- The due date of the assessment
All information can be changed even after the Assessment has been posted.
To create an Assessment from the Planner, navigate to the desired class and select Planner from the options on the top right of the class screen.
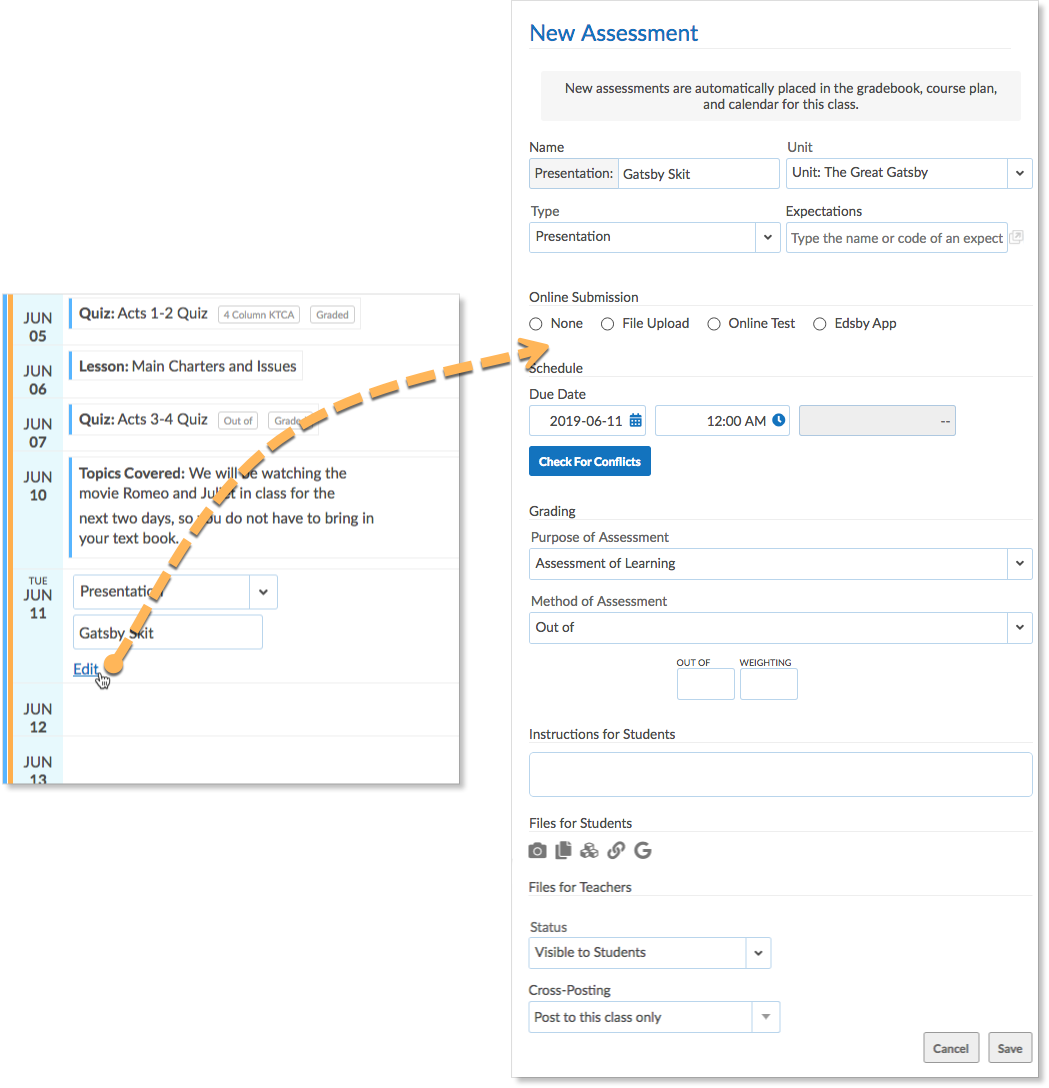
When in the planner, hover over the date the assessment will be due. Click the drop-down arrow that appears next to Assessment and select an Assessment type. Type in the name of the Assessment.
Click Edit to open the full Assessment form and select a grading scheme. The form automatically assigns the Assessment to the unit in which the due date occurs. Click save when the form is complete.
The Assessment will be added to the Planner, the Class feed, the Course Plan, Calendars, the Gradebook, and will be visible to the teacher as well as students and parents associated with the class if their visibility is enabled.
Editing Assessments
Assessment forms can be edited even after the assessment has been published in the class. Assessments can be edited from the class feed, the Gradebook, or the Planner.
In the class feed, click on the name of the assessment to open its editing form. Make any necessary corrections and click Save.
In the Gradebook, click on the name of the assessment in the column headers to open the detailed view of the assessment. Click Edit at the top of the screen beside the name to open its editing form. Make any necessary corrections and click Save.
In the Planner, click on the name of the assessment to open its editing form. Make any necessary corrections and click Save.
If an assessment has been cross-posted to other classes a teacher teaches, any changes made to one can be applied to all of the cross-posted versions as well. When the assessment form is reopened for edits, there are two options.
If the teacher makes changes to the assessment and wishes for the changes to apply only to the selected class, click Save in this Class Only.
If the teacher makes changes to the assessment and wishes for the changes to apply to all classes the assessment was cross-posted in, click Save.
Deleting Assessments
Assessments can also be deleted from a class by accessing their assessment forms from either the class feed, the Gradebook, or the Planner. Once the form is open, click Delete at the bottom left of the form.
If an assessment has been cross-posted to other classes a teacher teaches, deleting the assessment in one class will not delete the assessment in the other classes. Teachers must manually delete the assessment from each class it has been posted to.
Adding Standards, Expectations, or Outcomes to an assessment
Expectations, Standards, or Outcomes can easily be added to an assessment through the assessment form. These can be done by searching for a word or phrase in the Standards text box, entering codes into the text box, or using the Standards pop-out to use the Standards picker form.
Searching for a word or phrase
If a teacher wants to add Standards to an assessment but does not know the exact code, they can easily search for a word or phrase in the specific Standard they are looking for.
To do this, use the text box under Standards and type in a word or phrase that a Standard covers. Edsby will automatically generate a list of Standards that contain the entered word or phrase. Select standards from the list to add them to the assessment.
Entering Standards codes
If a teacher wants to add Expectations to an assessment and knows the exact code or part of a code, they can easily add the specific expectation to the assessment.
To do this, use the text box under Expectations and type the known code or part of a code in. Edsby will automatically search through all of the expectations to find the codes that correspond to what is typed. Click the Expectation from the list to add it.
Using the standards picker form
To access the full standards picker form, click the pop-out beside Expectations. This form can either be used by Topic View or All Codes View.
Topic View
Topic View is the default view of the standards picker when the pop-out is first clicked. The standards that correspond to the course that the assessment is being created in are automatically added to the picker.
Select an area of standards to view the specific expectations in each area. This will provide a list of specific standards in a specific area of the course. Select the correct standards for the assessment.
If a particular assessment falls under more than one course (this would happen more often in Elementary schools), expectations from all applicable classes can be accessed. To do this, click + choose a new course from the top of the picker form and search for the class using the search bar.
The standards for the additional course can be added to the assessment as well.
When all standards have been selected, click Done. They will be added to the assessment form.
All Codes View
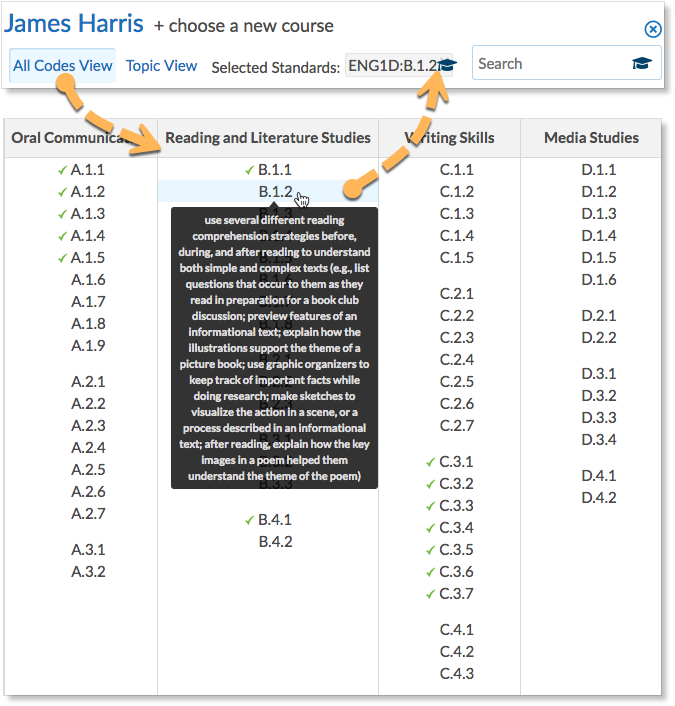
All Codes View is another view of the standards picker form that can be accessed by selecting this option at the top right of the picker. This shows a detailed view of all the areas of standards and the specific expectations under each area.
Hover over an expectation to view its description.
Select expectations to add to the assessment by clicking them. Green checkmarks indicate that the standard has been covered in the class already by another assessment. When all standards have been selected, click Done. They will be added to the assessment form.
About the Assessment Form
The Assessment Form can be customized in many ways. Edsby requires certain fields in the form to be filled out while others are optional.
| Name | The name of the assessment. This is a required field. |
| Unit | The unit the assessment belongs to. This is a required field. |
| Type | The type of assessment – test, essay, presentation, etc. This field is optional and enables teachers to compare assessment types in the Perspective as well as customize the weighting in a Class. |
| Standards | The standards associated with the assessment. This field is optional. Type, search, or use the pop-out to see a list of standards. |
| Online Submissions | None – the default of the assessment unless otherwise specified by the teacher. Does not allow for any online submissions.
File Upload – enables students to upload files or submit text. Uploads are viewed in the Gradebook and the Gradebook counter notifies teachers of new files. Online Test – enables teachers to select an online question sheet. (link to online testing) Edsby App – enables teachers to select LTI tools. |
| Schedule | The due date of the assessment. This is a required field and provides a picker for the teacher to select a date. Blue dots on the calendar indicate the class is taught on that day. Times can be selected manually or using the period the class is taught. |
| Check for Conflicts | Searches the calendars of the students in the class for any events, assessments, or planned absences that would conflict with the assessment due date. Teachers can hover over each item for more information and navigate between days. |
| Summative | No (Formative) – help teachers identify concepts that students are struggling with and using this information to improve their instruction. This type of assessment is not included in a student’s calculated average.
Yes, contribute to average – summative assessments evaluate student learning and academic achievement. They are included in a student’s calculated average. Bonus – only contribute to a student’s average in a positive way. |
| Scheme | The way the assessment will be assessed – percentage, letter grade, learning skills, four level rubrics, strands, etc. This is a required field and options differ by organization. Learn about strands here. |
| Instructions for Students | This is an optional field. Teachers often include the purpose of the assessment or the learning goals associated with the assessment. |
| Files for Students | This is an optional field. Teachers can Add Resources for the students that may aid them in completing the assessment. |
| Files for Teachers | This is an optional field. Teachers can Add Resources for themselves that connect to the assessment. These are not visible to students. |
| Status | Visible to Students – adds the assessment to the feed, calendar, and planner for students as well as the Gradebook for the teacher.
Hidden from Students – adds to the planner and Gradebook only for the teacher. Teachers often create formative or diagnostic assessments as hidden. |
| Cross-Posting | Teachers can choose to post the same assessment to any other classes they teach.
Post in this class only – posts the assessment only to the class the teacher creates the assessment in. Select All Current – selects and posts the assessment to all classes the teacher teaches. Select specific classes – teachers select which classes the assessment will be posted to. |
Creating Assessments for Online Teaching
Try creating a formative assignment just to gather student questions. In the Assessment Form, enable File Upload. Your students can submit any questions they have to you by uploading a file.
You’ll be able to see which students have submitted questions at a glance by looking at the file icon.
You can also set up an assignment like this to have students respond to asynchronous material you give them outside of your regular class time.
Click here for more suggestions on using Edsby for online learning.
