Edsby features a convenient way to test students online. Delivering an online test to your students has two key steps:
- Create a Question Sheet
- Create an assessment and attach a copy of the Question sheet.
Question Sheets can be created within the Personal Folder, a Class Content panel, or within the Knowledge panel of Professional Learning Community group. Question Sheets can be copied between the Personal Folder and Content/Knowledge panels. If teacher doesn’t anticipate the need to share Question Sheets, creating them in the Personal Folder involves the fewest steps. If the teacher wants to keep all the Course Content together, including Question Sheets, they can create them within the Class. If teachers want to work together to create Question Sheets, a Professional Learning Community group can be created for this purpose.
Jump to a section
Adding Questions from the Question Bank
Sharing Online Tests with Other Teachers
Using a Sub-Set of Questions
Setting Retake Attempts for Specific Students
Creating a Question Sheet
To create a question sheet, first navigate to the Personal Folder. Click New and select Question Sheet from the drop-down menu.
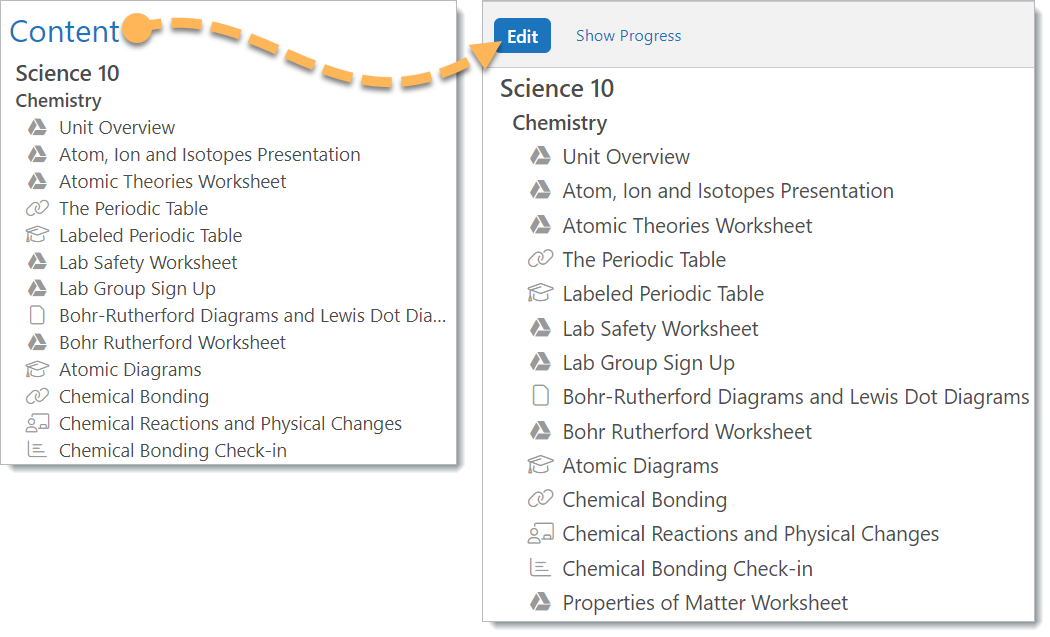
Alternatively, Question Sheets can be created directly within the Content Builder of a Class. In a Class, click Content, then Edit.
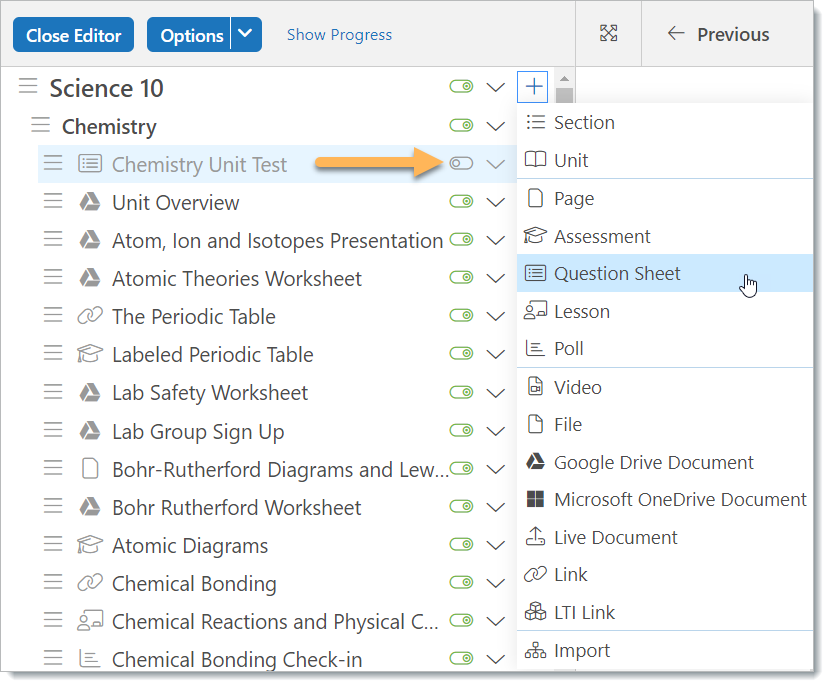
Click the + icon under the item you want to add the sheet and select Question Sheet.
Note: It is best to keep Question Sheets hidden from students in the Class. Ensure the toggle next to the sheet is turned off.
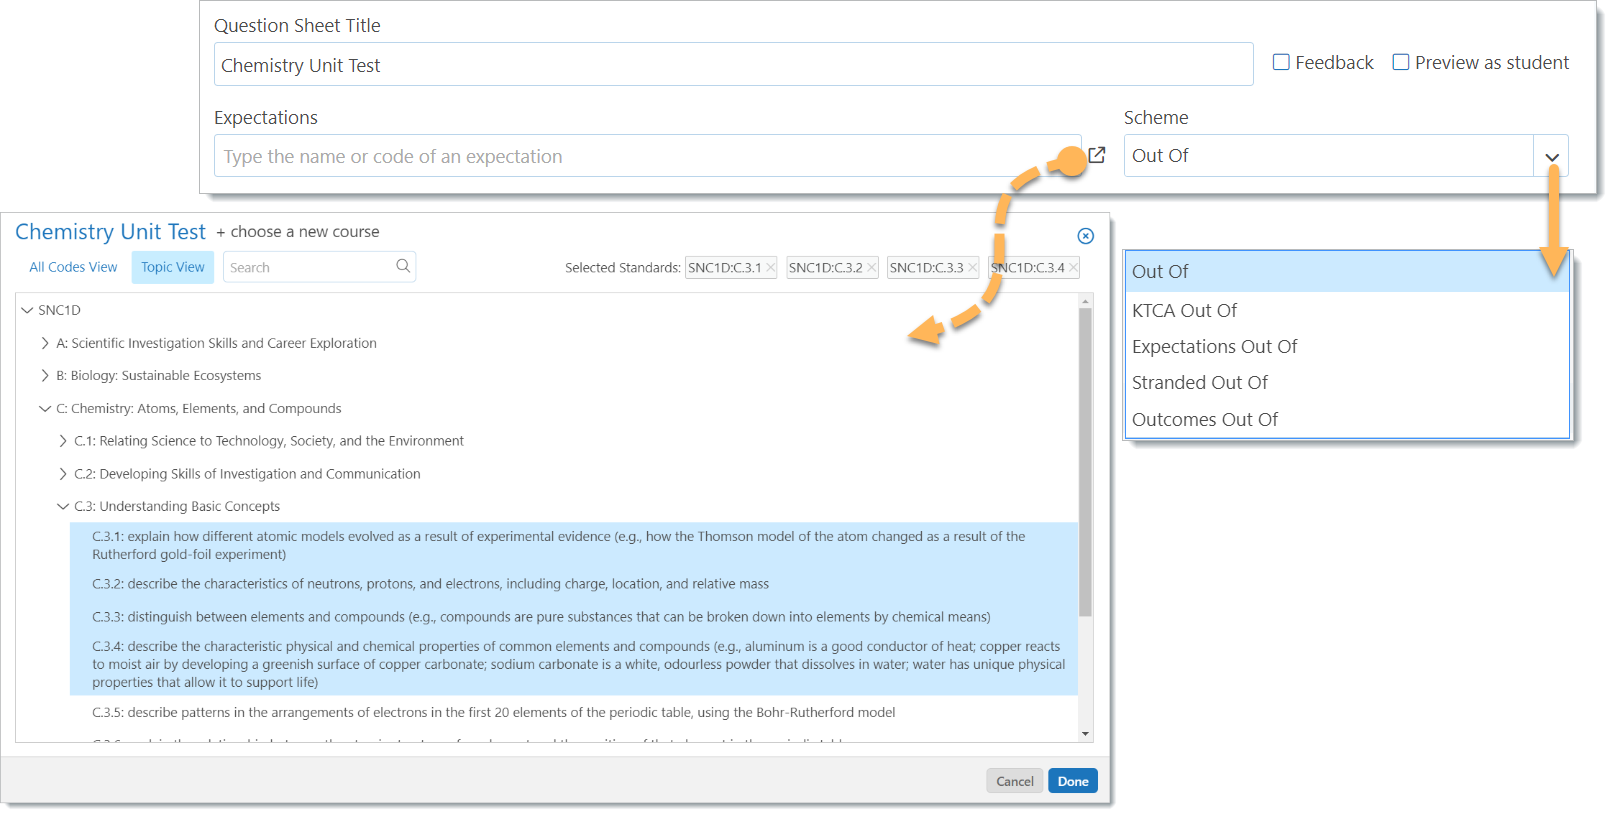
Enter the title of the test. Add any relevant expectations to the test by clicking the pop-out. When the test is added to an assessment, the expectations will automatically be linked to the assessment form. Choose a scheme, if desired.
Once a question sheet has been created, it remains in the Personal Folder and can be used in any current or future classes.
Note: To speed up the use of standards/expectations/outcomes within a question sheet, question sheets remember previously used courses.
Creating Sections
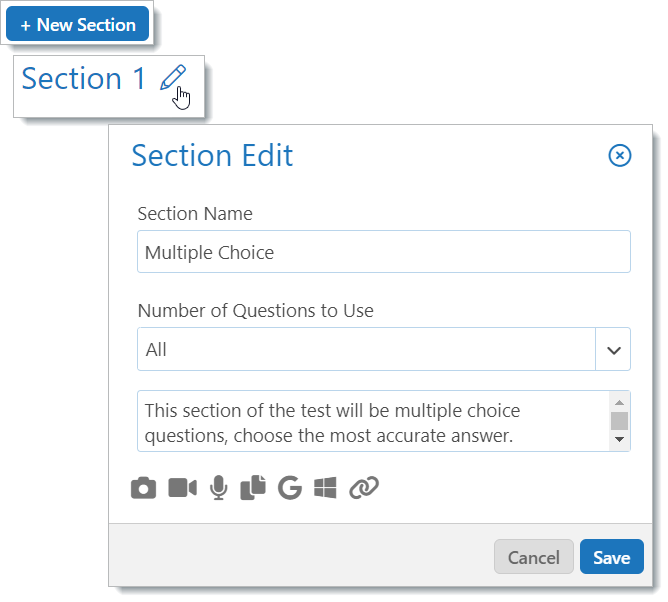
To create sections, for example, a section for multiple choice questions and another for paragraph questions, click +New Section. Edit the section name and description as well as the questions included in the section by clicking the Edit Section button.
Adding Questions
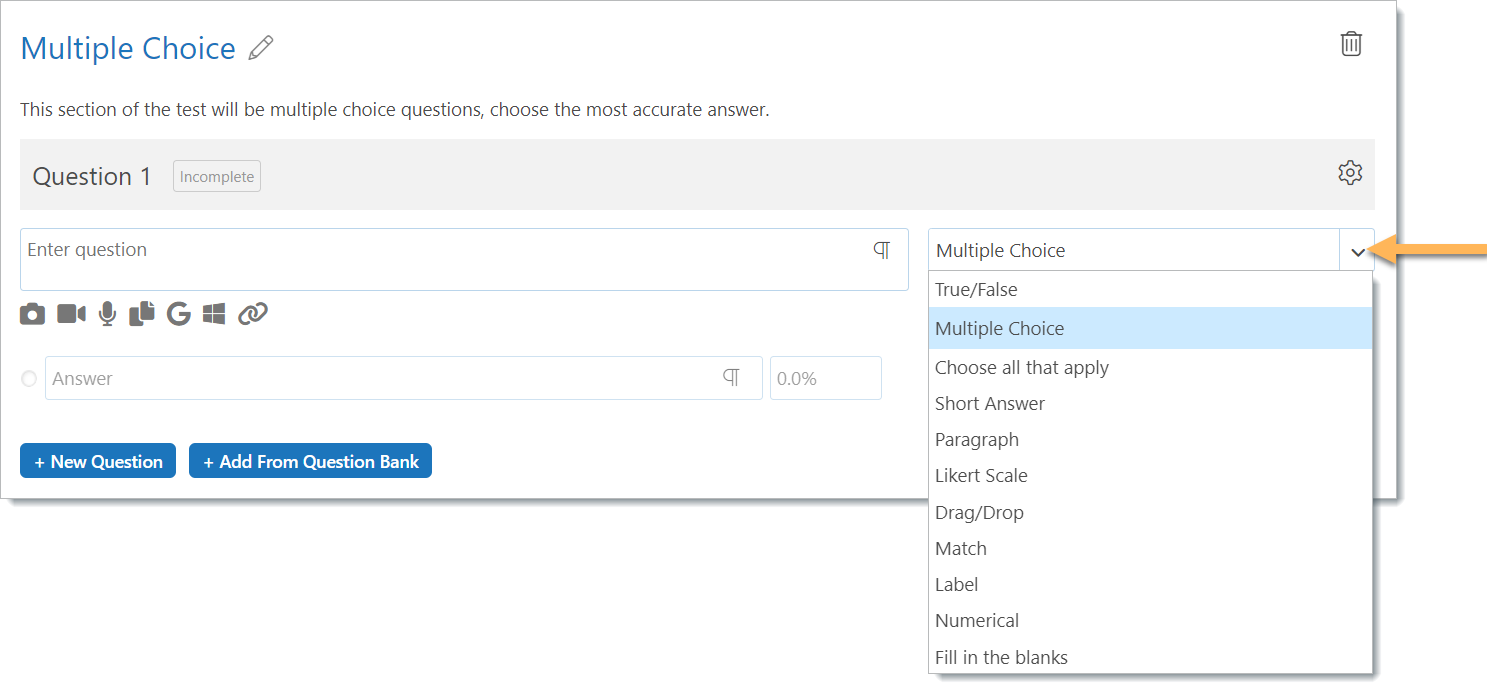
When it’s time to add questions to the sheet, the first question in the test will be blank. First, choose the type of question from the drop-down menu. The default question type is Multiple Choice, however, this can be changed as desired.
Edsby Question Sheets support eleven types of questions. They are described below.
Multiple Choice
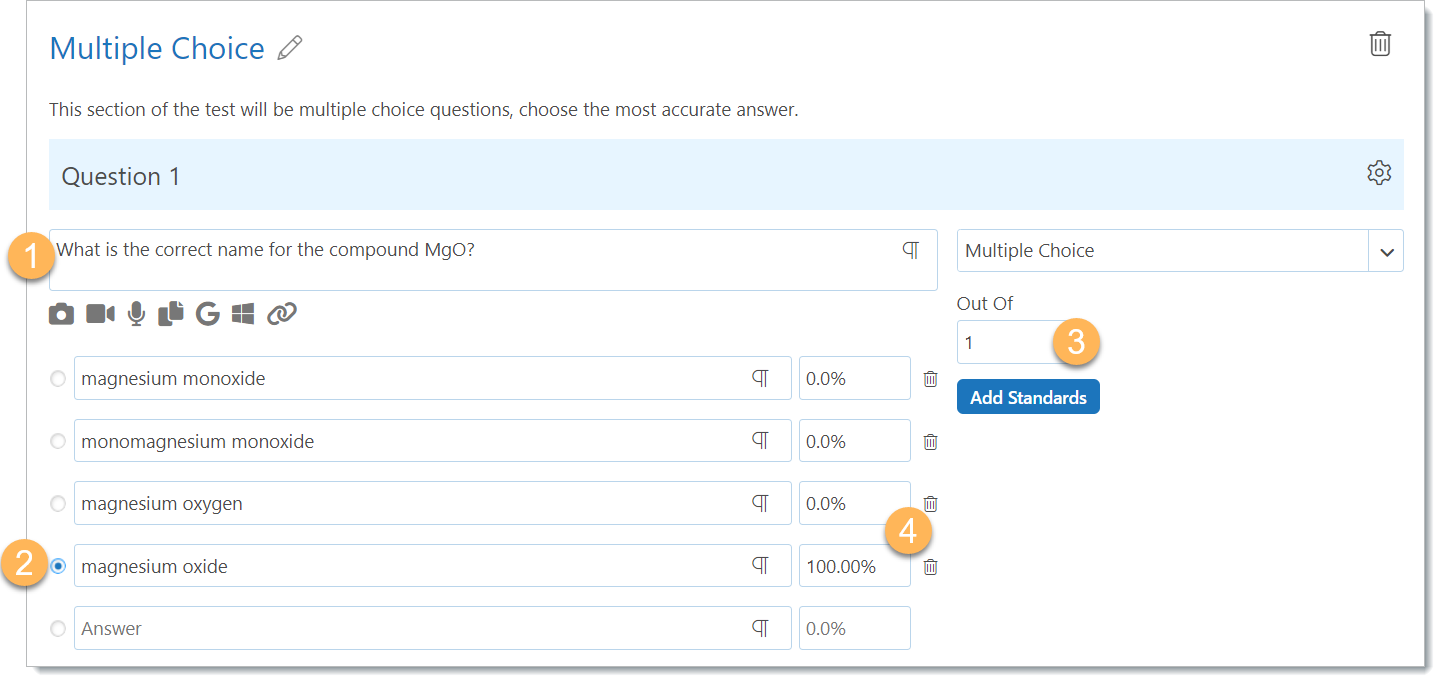
Multiple Choice is the default question type set when a new question is added.
- Enter the question stem and the set of possible answers.
- Click the circle to identify the correct answer.
- Set the Out Of value. The default is for each Multiple-Choice question to be worth one mark.
- Optional: Enter partial or negative marks into the box to the right of each answer. The percentage indicates the percentage of full marks each answer is awarded – ranging from 0% meaning zero marks to 100% meaning full marks.
True/False
- Enter the question and click the circle to identify whether the question is True or False.
- Set the Out of value. The default is for each True/False question to be worth one mark.
Choose all that apply
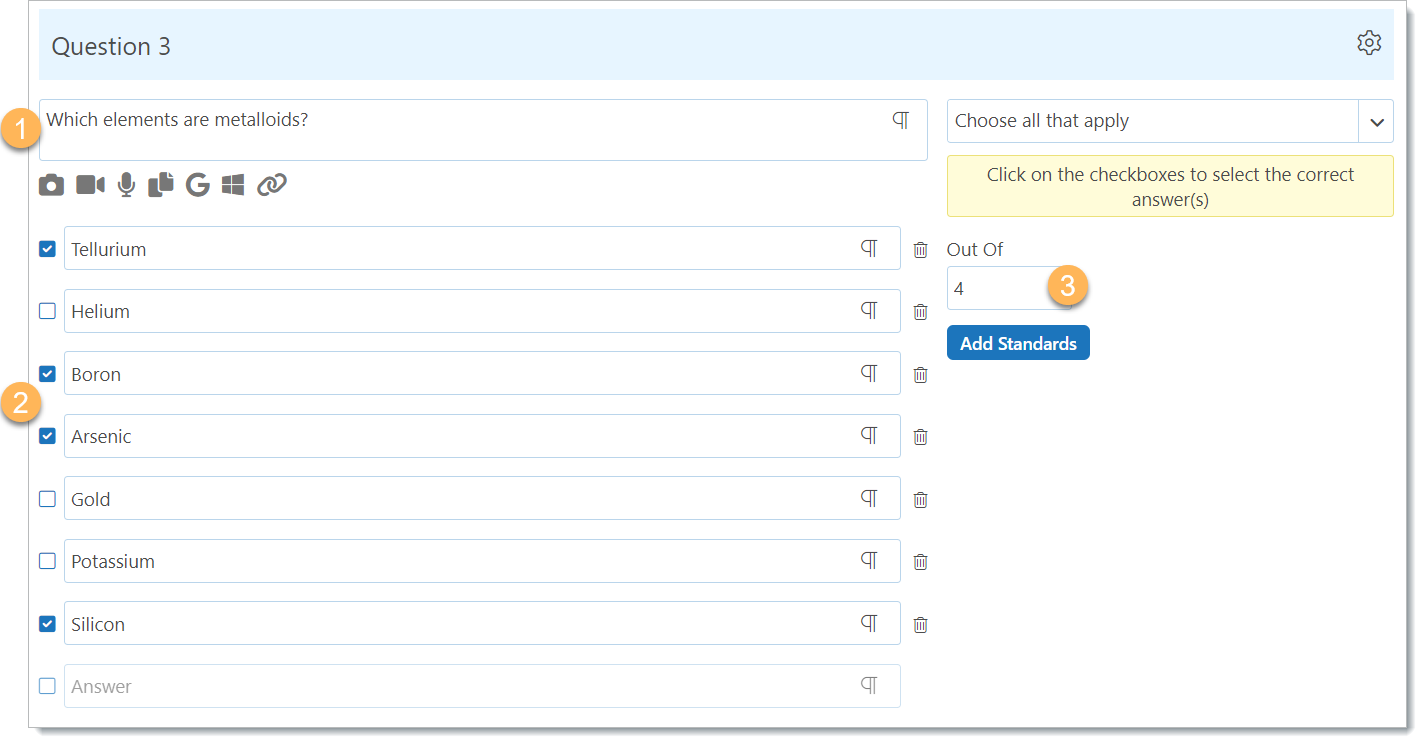
- Enter the question stem and the set of answers.
- Click on the checkboxes to select the answers that correctly apply to the question.
- Set the Out of value.
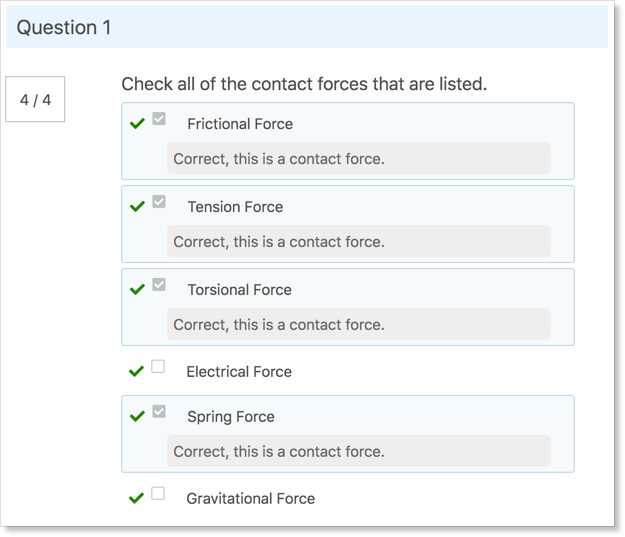
Note: Answering Choose All That Apply questions means the student must correctly select the answers that apply and not select any answers that do not apply. Students are graded both on the boxes they select and those that are left blank.
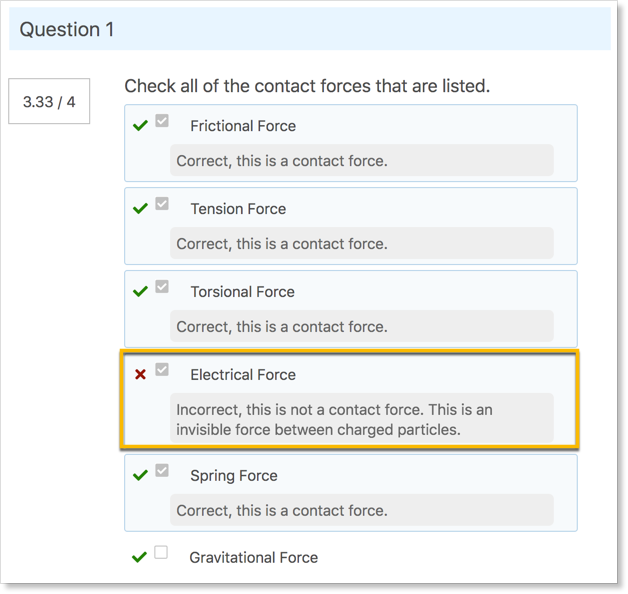
In this example, the student has correctly selected the 4 answers that apply and has left the 2 answers that do not apply unselected. When their test is graded, they will see checkmarks next to each possible answer – they properly selected the correct answers and left the incorrect answers unselected.
In this example, however, the student has correctly selected the 4 answers that apply, but they have also selected an answer that does not apply. When their test is graded, they will see checkmarks next to each of the answers that do apply, but an x next to the answer they selected that did not apply.
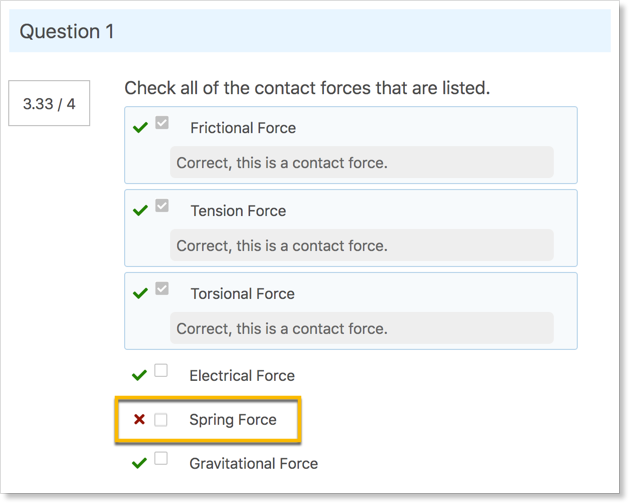
In this last example, the student has correctly selected 3 out of the 4 answers that apply and left the rest of the answers unchecked. When their test is graded, they will see checkmarks next to the 3 answers they selected as well as next to the answers they correctly identified as not applying, however, they will see an x next to the last answer that applied but the student did not select.
Short Answer
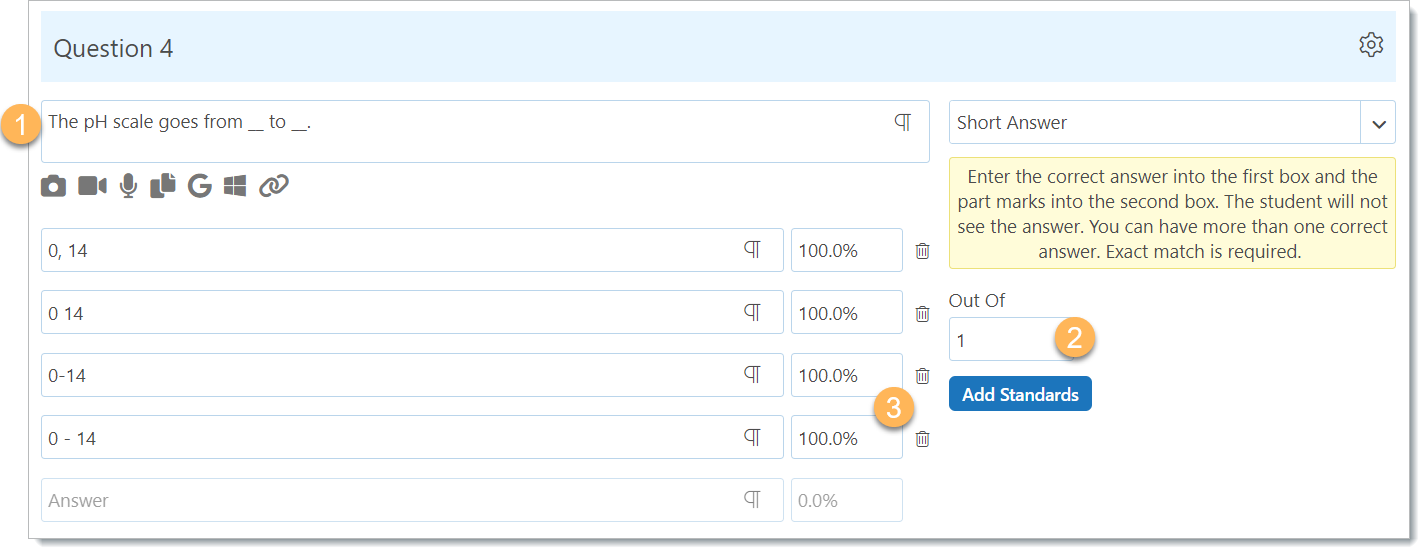
- Enter the question stem and enter the acceptable answers into the boxes. When students take the test, they will not see these answers. The question can have more than one correct answer. When students take the test, they must produce an answer that exactly matches one of the acceptable answers chosen during the question sheet’s setup.
- Set the Out of Value.
- Optional: Enter partial or negative marks into the box to the right of each answer. The percentage indicates the percentage of full marks each answer is awarded – ranging from 0% meaning zero marks to 100% meaning full marks.
Paragraph
- Enter the instructions for the students. Paragraph questions are manually graded by the teacher after students have submitted their completed question sheet.
- Set the Out of value.
Likert Scale
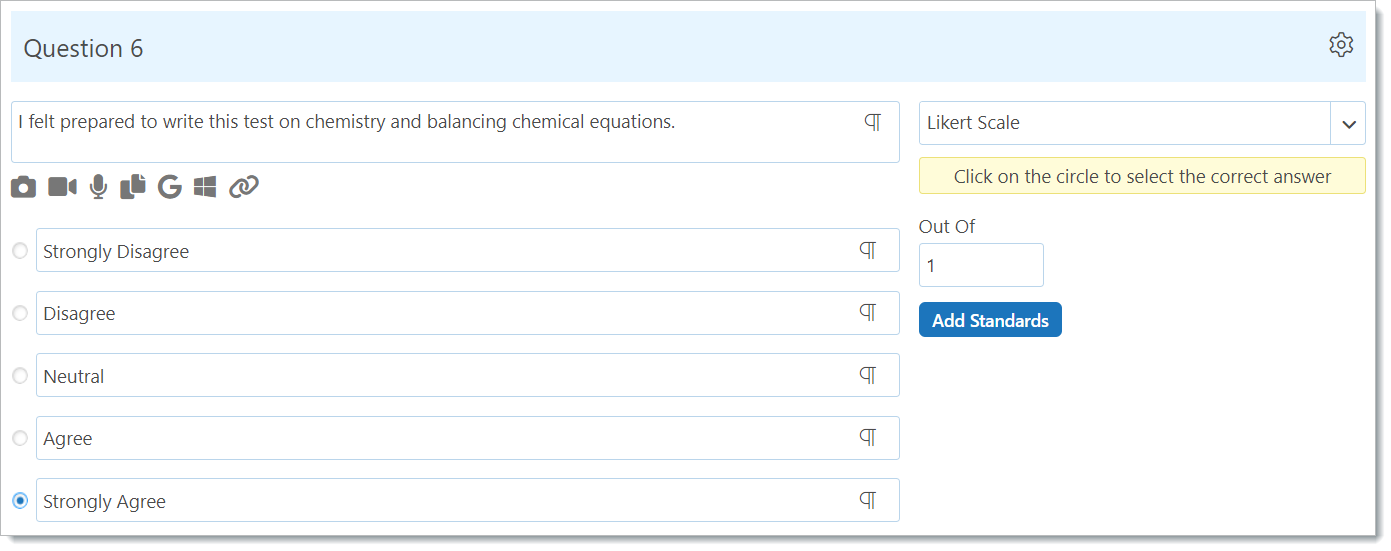
The Likert Scale is a multiple-choice question test with pre-filled choices. A common use includes gathering feedback from students on a formative assessment.
The text of the choices can be changed by the teacher on a question-by-question basis.
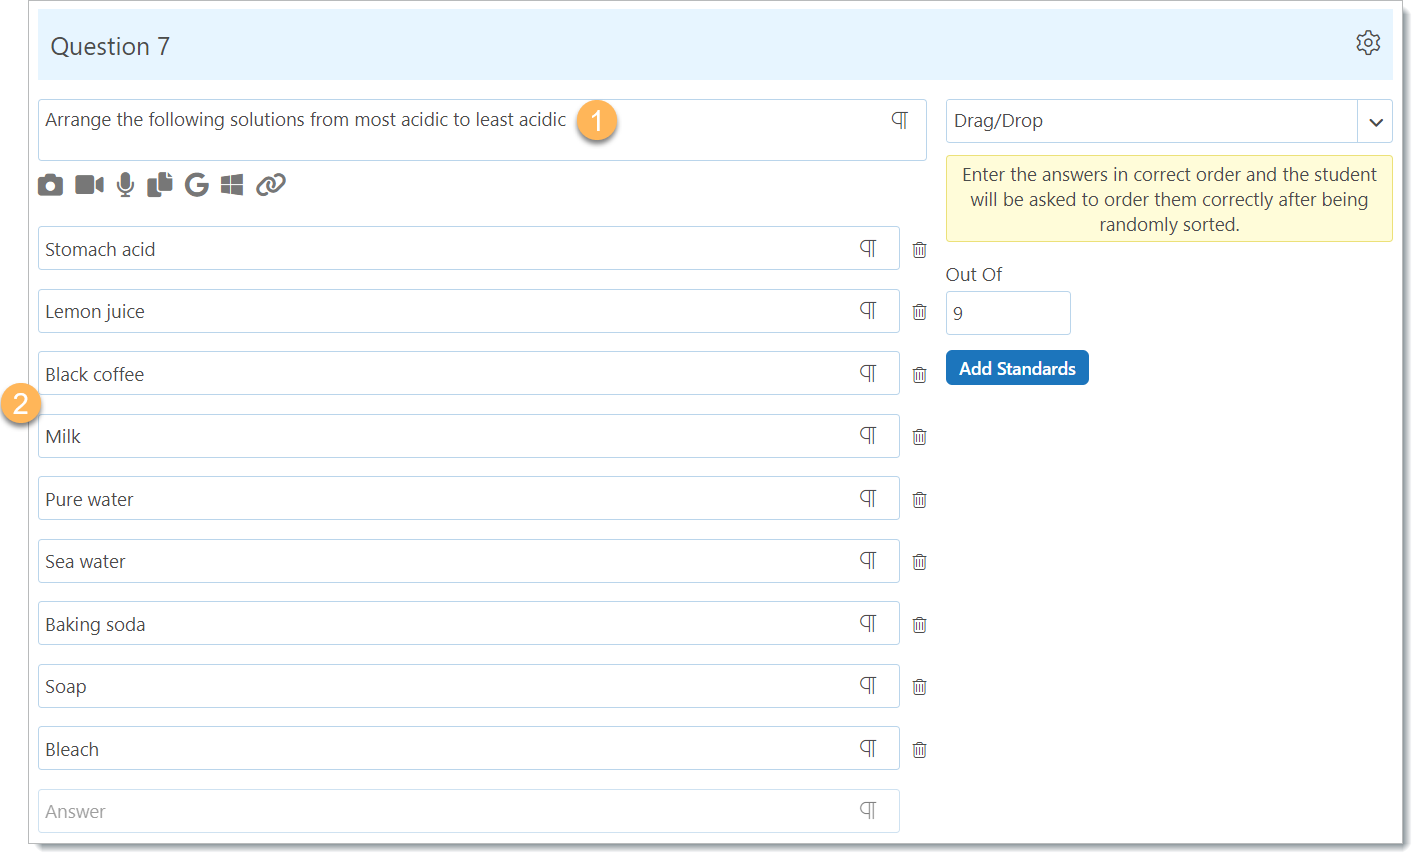
Drag and Drop
- Create the question.
- Add the choices in the correct order.
When students take the test, they will see the list of choices in a random order. Students drag the choices by clicking, holding, and moving the label to the correct order.
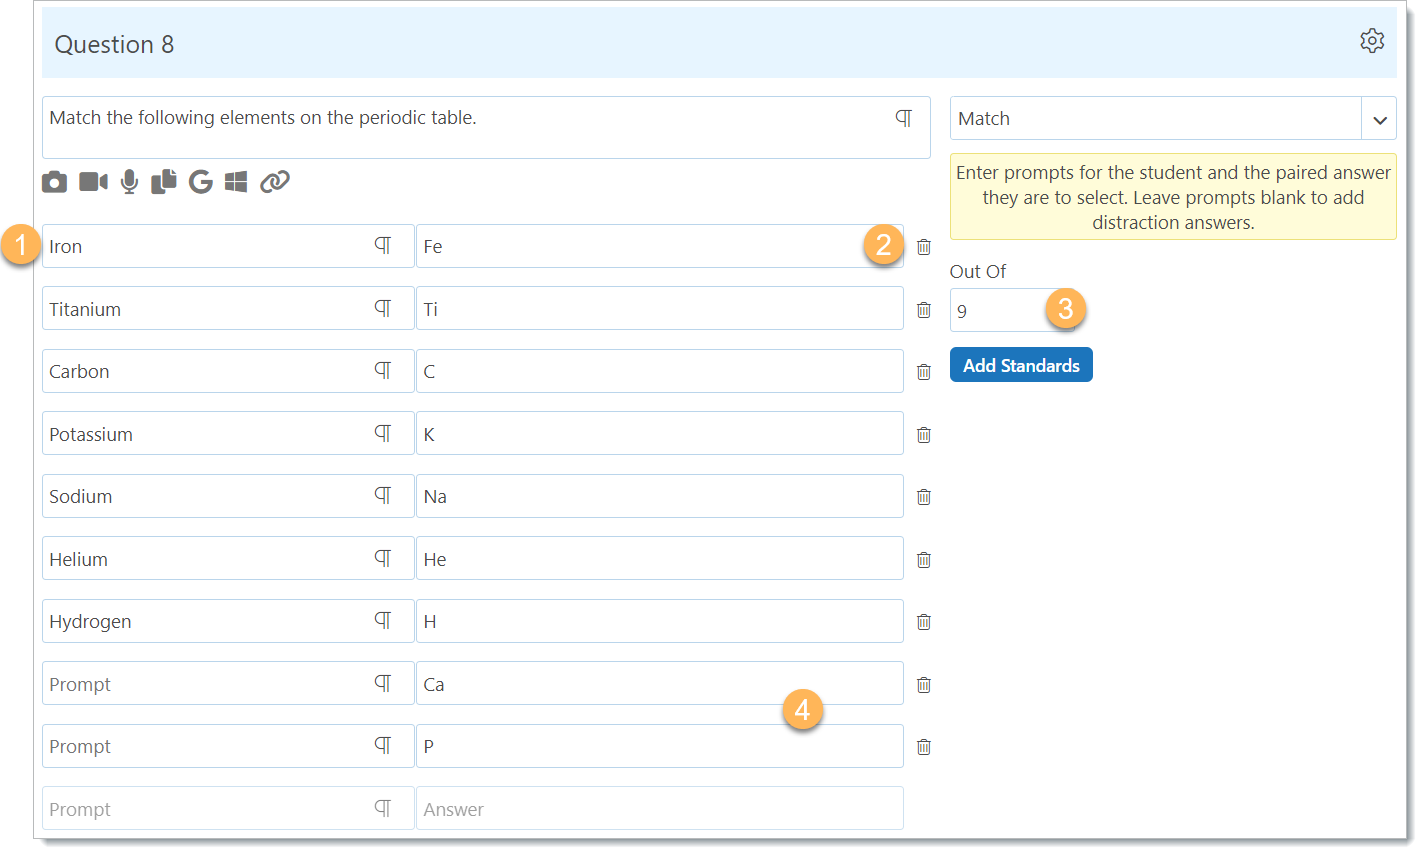
Match
With Match questions, the teacher supplies a list of items that must be matched against another list of items. Decoy answers can be supplied for added difficulty.
- Enter a list of prompts
- Enter the corresponding correct answers next to each prompt
- Set the Out Of value
- To supply a decoy answer, type the decoy into the answer box and leave the prompt box empty
Label
The Label type enables the teacher with a space to provide instructions to students. This can be at the start of the test, at the start of a new section, or in between questions. These instructions will not count as questions.
Numerical
Numerical type questions enable teachers to ask students questions that require a numerical answer. Numerical questions can also have an tolerance range assigned with which a student can give any number within the range, including the upper and lower limits of the range, and the answer will be marked as correct.
- Type the question text
- Type the correct numerical answer into the box
- Assign a tolerance range (the range of correct numerical answers) using the box to the right of the answer box. The range will apply in both the positive and negative directions of the correct answer.
- Set the Out Of value
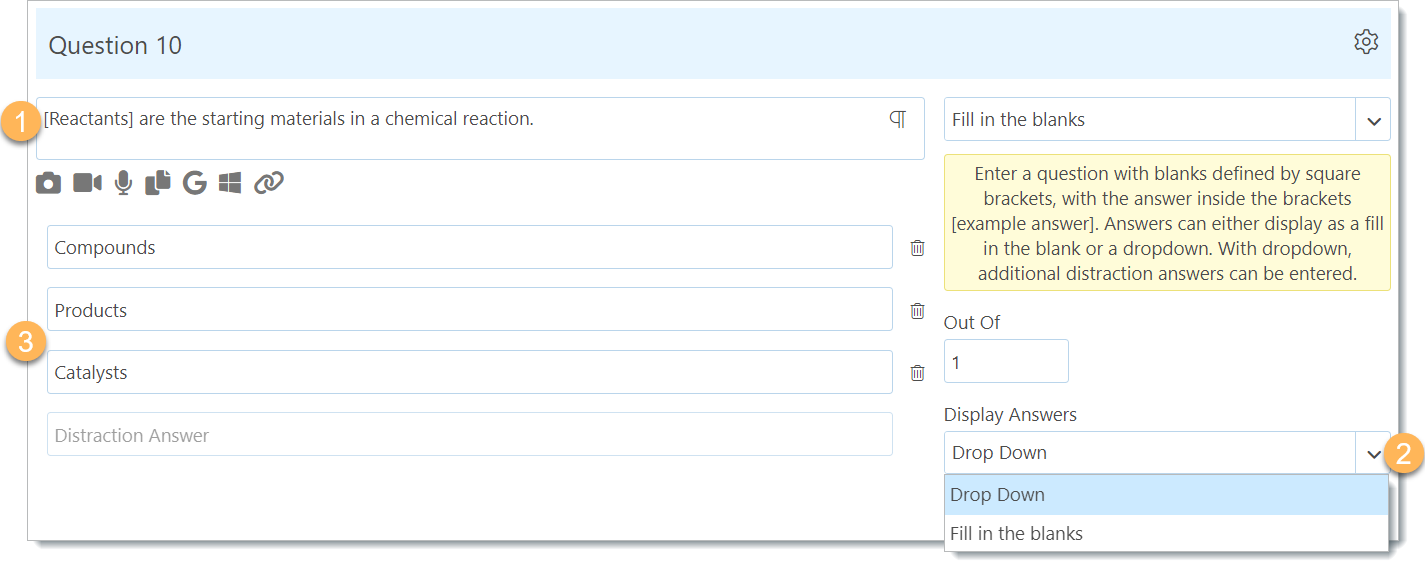
Fill in the Blanks
-
- Enter a question with blanks defined by square brackets, with the correct answer inside the brackets. In this example, civil is the correct answer.
- Choose how to display the answer. With Fill in the Blanks selected, the student will see an empty box where the blank was specified in the question and will be required to type the correct answer without seeing options. With Drop Down selected, additional distraction answers can be added and the student will be required to choose the correct answer from the list of drop-down items.
- If Drop Down is chosen,
supply distraction answers below the question.
Using the Rich Text Editor
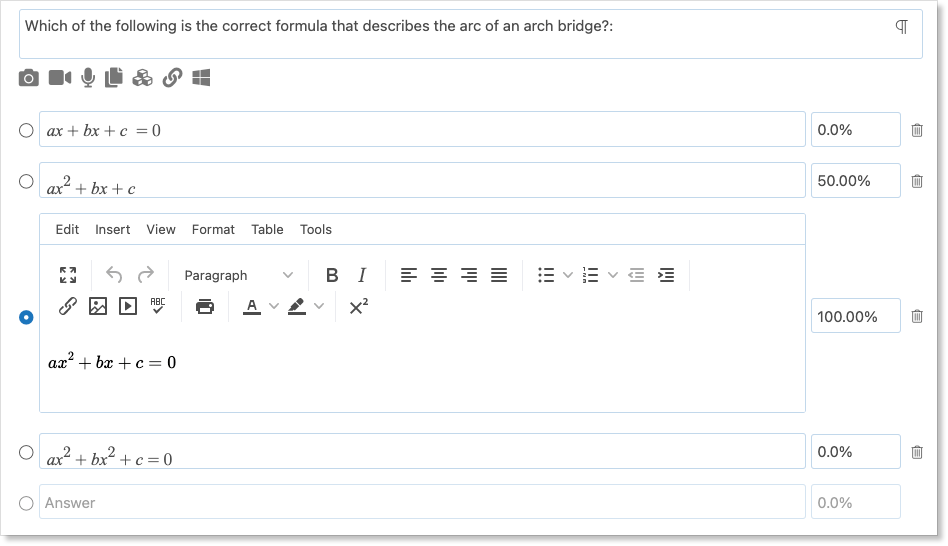
When creating each question and answer, teachers can use a Rich Text Editor to enhance their questions. Rich Text can include bold and italics, colours, tables, and equations.
To open the Rich Text Editor, click the thumbnail icon in the question box.
Rich text can be used in the answer options as well.
Type your question and experiment with different fonts, alignments, lists, etc.
Adding Tables
To add a table to the question, open the Rich Text Editor and click the Table drop-down. Hover over Table and select the number of rows and columns you would like.
The table will be added to the question.
Fill the table in and use any of the options to add or delete rows and columns or merge cells.
Adding Equations
Edsby enables teachers to enter mathematical symbols or equations to their questions. To do this, open the Rich Text Editor and click Equation.
This opens the Equation Editor. Choose from the various types of symbols and equations provided.
When the equation is complete, click Submit.
The equation will be added to the question.
Adding Attachments and Removing Questions
Questions can have images, videos, or other links attached to them. To do this, click one of the icons below the question box to take a photo, browse for a photo, or add links from various locations. Remove any questions from the Question Sheet by clicking the X in the top right corner of each question. Confirm the deletion. The question is removed from the sheet.
Reordering Questions
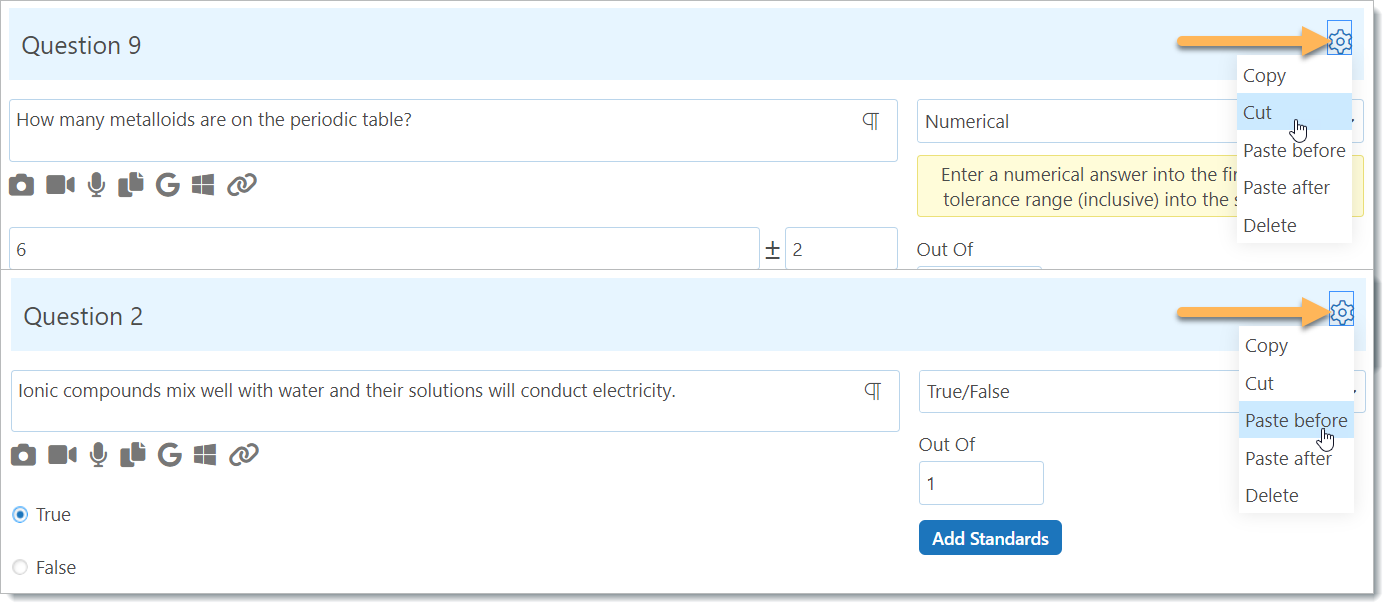
Questions within the Question Sheet can be reordered using the Cut, Copy, and Paste feature. Click the gear icon next to the question you wish to move. Select Cut.
Navigate to the question you would like to paste before or after. Click the gear icon. Select paste before or paste after depending on the order you would like the questions to appear.
Questions can be cut and pasted within a section or into other sections.
Providing Feedback
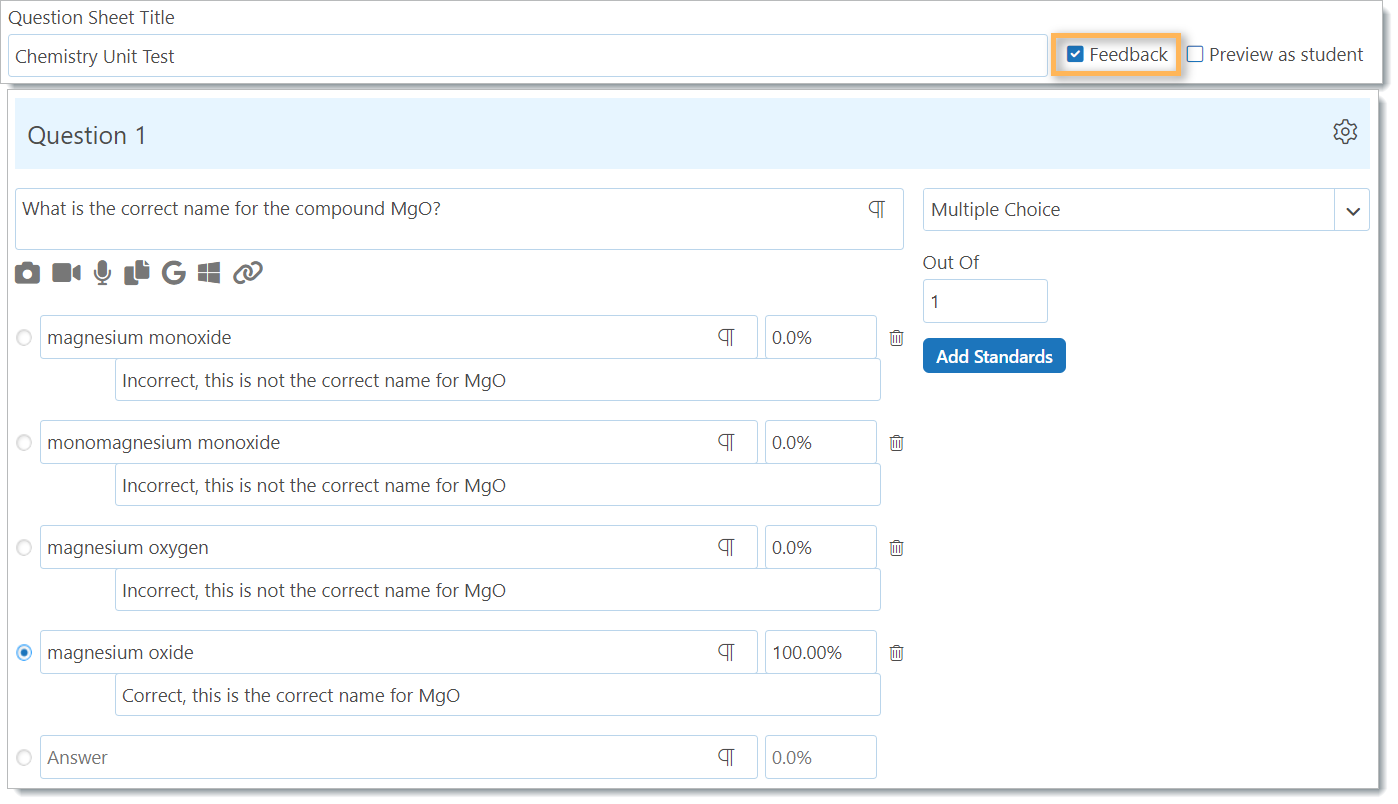
In online tests, teachers can choose to provide feedback to students for specific responses on questions. If you want to provide the correct answers to students, feedback needs to be enabled. The feedback is visible after the results of the test have been shared.
At the top of the Question Sheet, click the box next to Feedback. Under each answer for each question is a box where feedback can be entered.
Feedback can be used to explain why the specific answer chosen in an online test is either correct or incorrect.
Adding Questions from the Question Bank
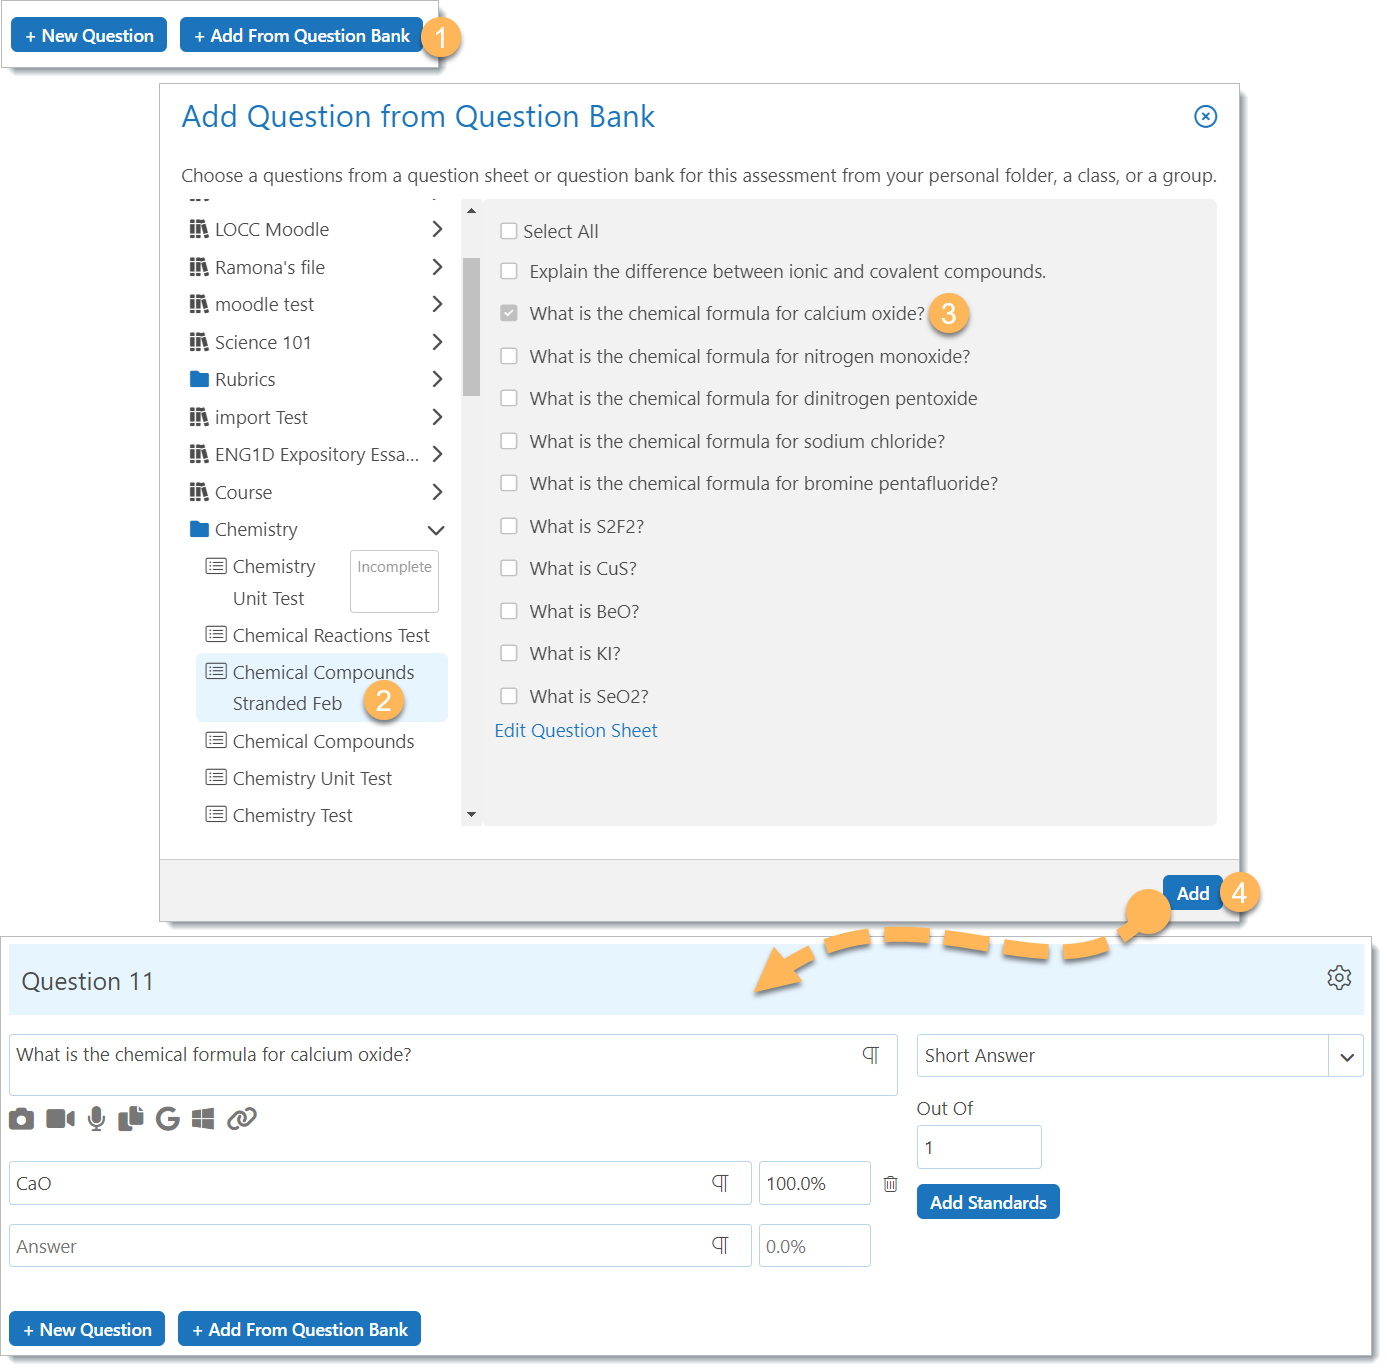
Edsby enables teachers to quickly reuse questions they have used in the past in new Question Sheets by adding from their Question Bank. Any questions the teacher has created in a previous Question Sheet, either in their Personal Folder or directly within a Class, is automatically added to their Question Bank. Additionally, the Question Bank also contains Question Sheets posted in groups the teacher is a member of.
To add a question from the Question Bank, click + Add from Question Bank.
A form opens with a list of the Classes you teach, your Personal Folder, and any groups you are a member of. Select the location of the Question Sheet you would like to use and then select the Question Sheet.
A list of the questions in the Question Sheet will be displayed. Select the question(s) you would like to use by clicking the box next to each one, or select all. Click Add.
The question will be added to the Question Sheet you are working on.
Preview as Student
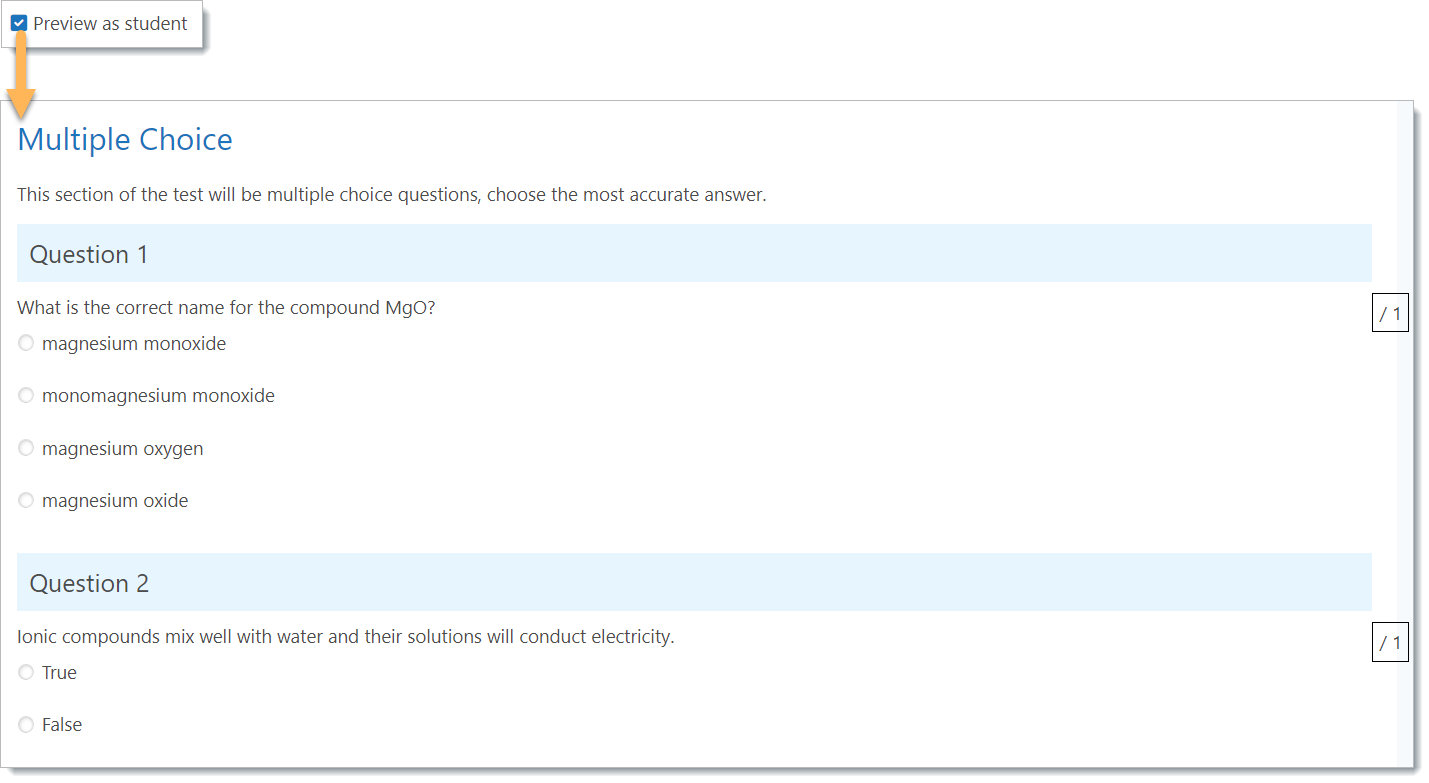
To preview how the Question Sheet will look when students go to take the test, click the box next to Preview as Student at the top of the sheet.
Sharing Online Tests with Other Teachers
Teachers can share tests they have created in their Personal Folder with other teachers by copying and pasting into Libraries, Content Builders, or Learning Object Repositories
For information on how to do this, click here.
Creating an Online Test
After the Question Sheet has been created in the Personal Folder, it can be linked to any assessment form.
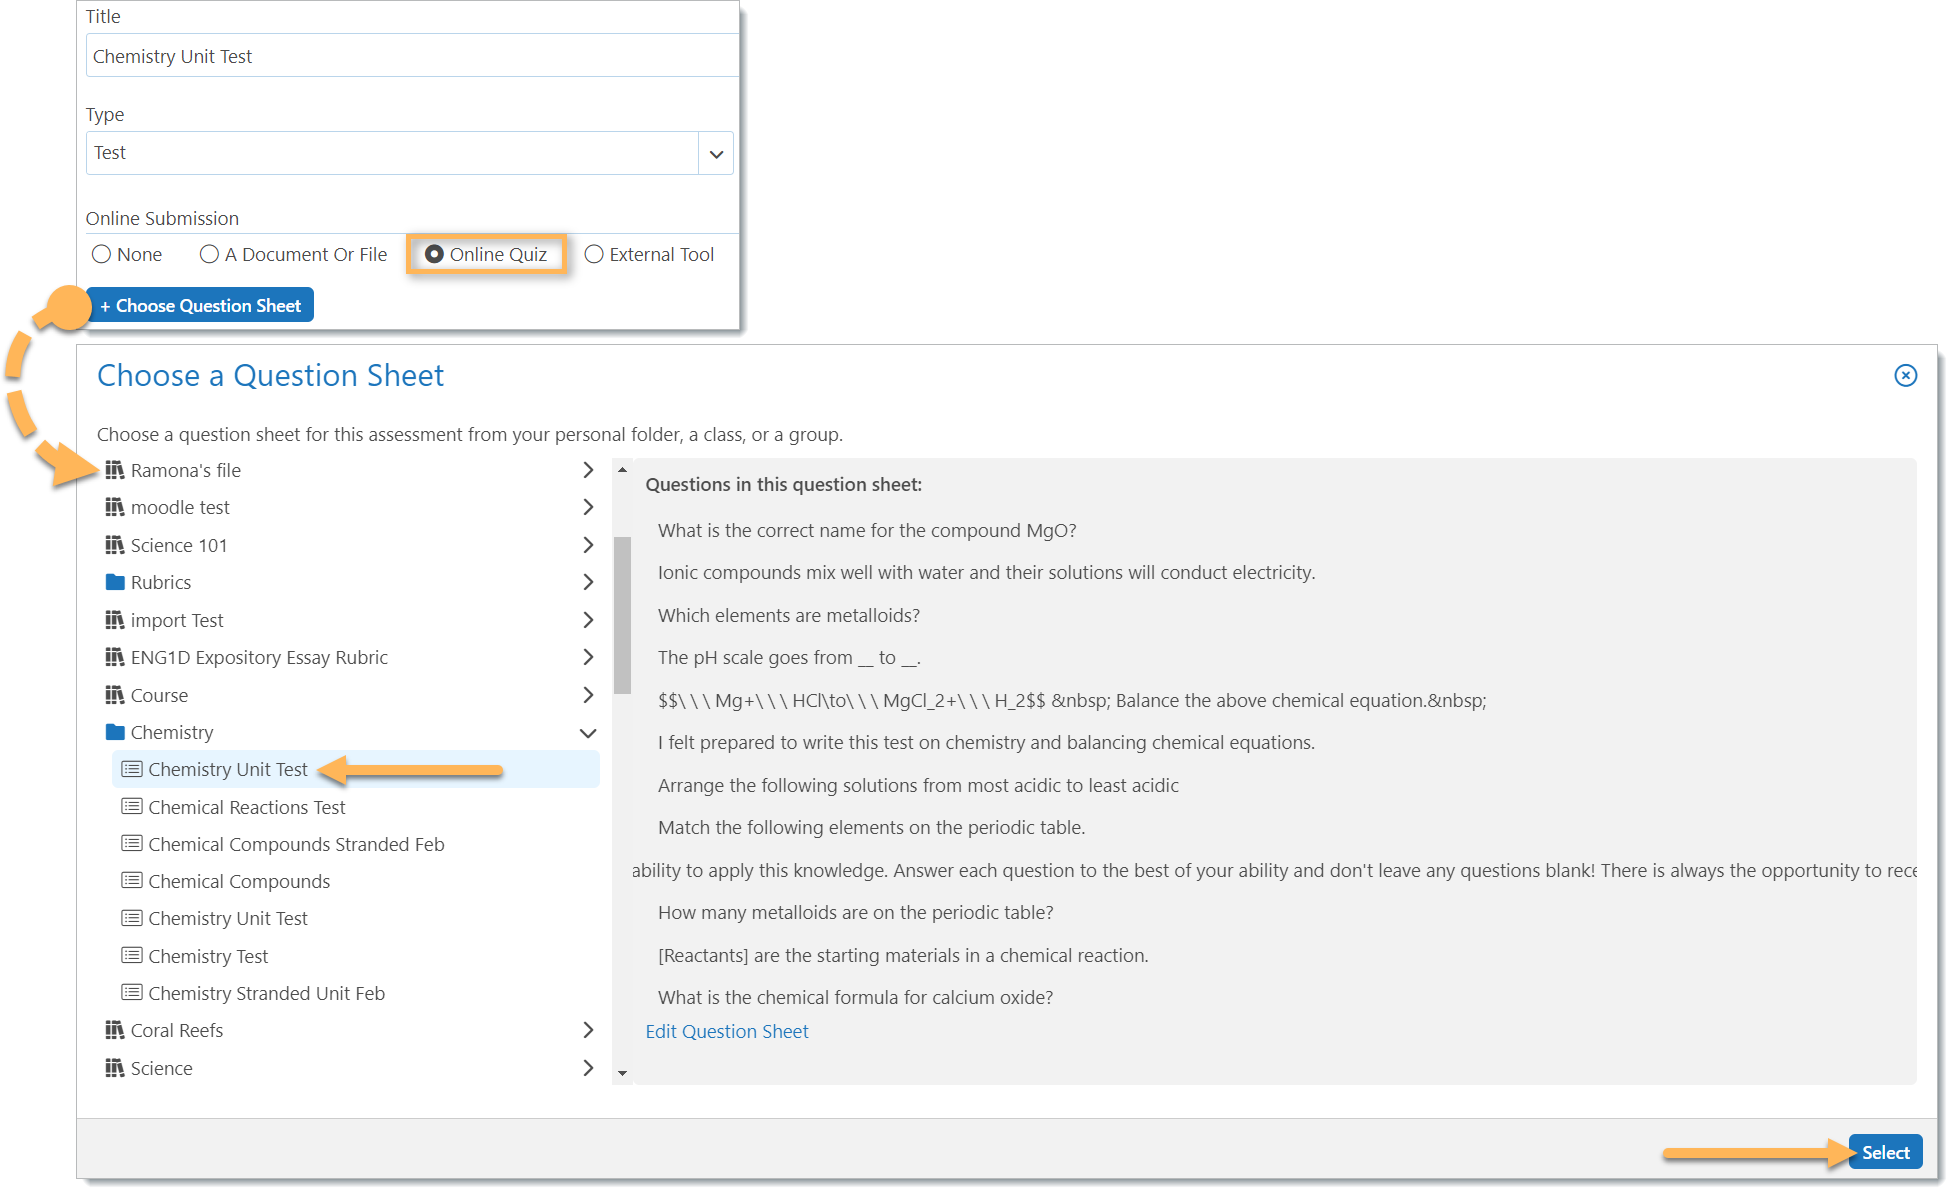
On the Assessment Form, under Online Submission, click Online Quiz. Click the +Choose Question Sheet button and select from the list. The list will contain any question sheets the teacher has created in their Personal Folder.
Note:
A copy of the current version of the Question Sheet is added to the assessment. If changes to online test are required after the assessment is created, a new assessment needs to be created.
It’s no different than handing out paper tests to your students. Changing the Word document wouldn’t magically change the test sheets that have already distributed. Your student would need a new copy of the paper test.
Set the Online Test options including the time limit, number of attempts, and whether the questions or answers are randomized.
| Time Limit | The time the student has to complete the test. |
| Number of Attempts | The number of times a student can retake the test. The time limit applies to each attempt. |
| Randomize Questions | Students see the questions in a random order. |
| Randomize Answers | Students see the answer choices in a random order. |
Set the Schedule for the Online Test.
| Closed | Students cannot begin the test. The name of the test and student instructions appear in the feed and calendar, but students do not have an option to take the test. |
| Open | Teachers can specify when to open the test. The default is the current day and time. If teachers do not change this, when the assessment form is saved, the test will be immediately available for students to take.
If you would like the test to open at a later date and time, specify this. |
| Schedule Open/Close | Students can begin the test between the open and close dates and times. The time limit applies based on the test start time. A test that ends at 12:05 with a time limit of 30 minutes, can be started at 11:34 and submitted anytime between 11:34 and 12:04. |
Note: The time an online test is set to open and close as well as an assessment’s due date is based on the time zone the teacher creates the assessment in, not the student’s time zone, if it differs from the teacher.
If a student is accessing content from a different time zone, ensure they are aware of this.
Using a Sub-Set of Online Test Questions
Teachers may wish for students to each receive a unique sub-set of all possible questions in an online test. If teachers have tests with multiple sections, this is done on a section-by-section basis.
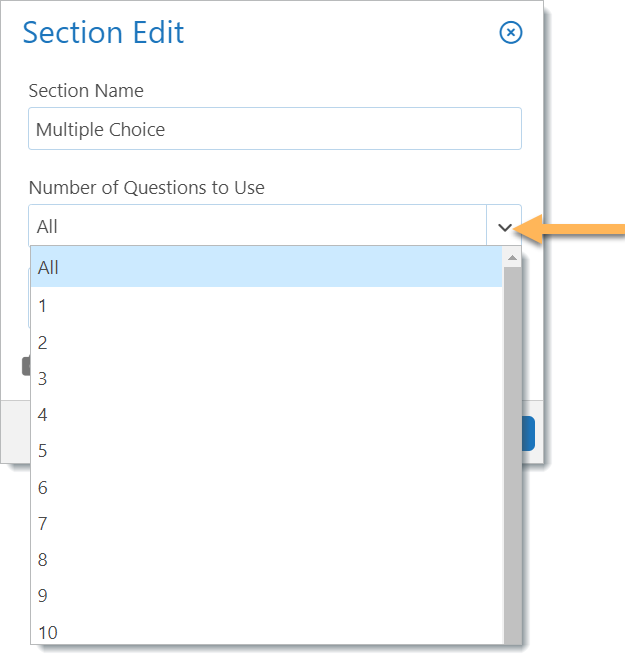
In the Question Sheet, click the pencil icon next to the section name to edit the section.
Under Number of Questions to Use, select the desired amount.
If the sheet only contains one section, this only needs to be done once.
However, if the sheet has multiple sections, select the number of questions to use in each section by using the Edit button.
Setting Retake Attempts for Specific Students
While teachers can increase the attempts for all students by adjusting the Number of Attempts field in the Assessment form, Edsby enables teachers to change the number of attempts for a specific student.
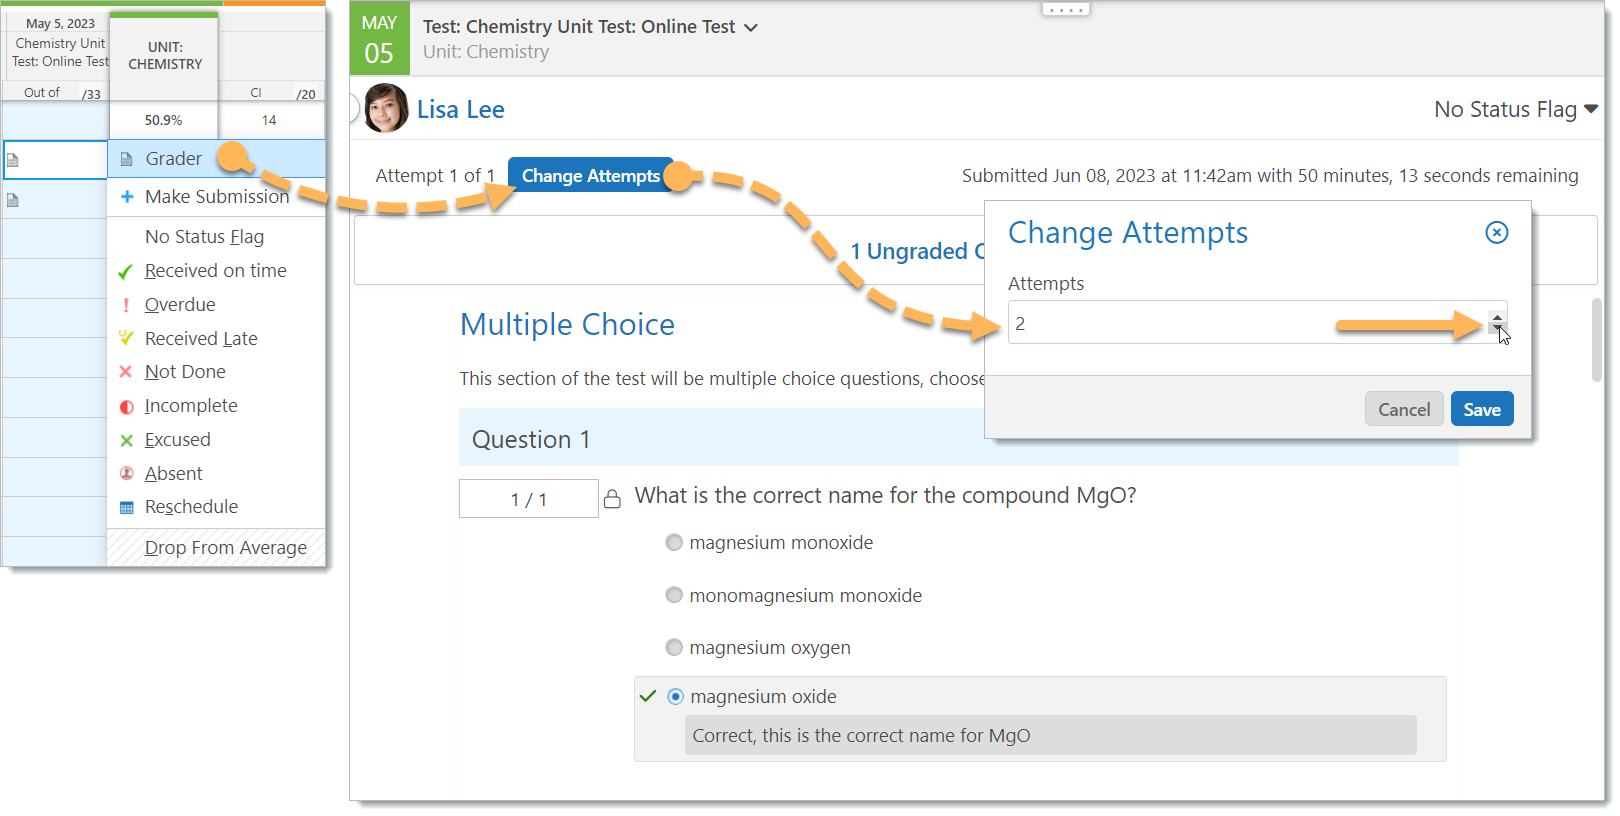
In this example, Lisa Lee experienced poor connection while writing her test and was unable to complete it before it timed out. Mr. Archer would like to provide Lisa with an additional attempt to write the test.
To do so, navigate to the Gradebook and select the cell with the student’s online test submission, then select Grader.
The Grader will open the testing sheet. At the top right of the sheet, click Change Attempts and set a number in the Attempts field.
The student will now see a Retake test button and can retake the test while it is open.
The Student Experience
When the assessment is created, students are notified of the upcoming test in all the usual ways – Feed, Planner, My Work, Calendar, and Recent Activity. Students can begin an Online Test anywhere they see the assessment name including in the Content Panel. Students will see the start time, end time, and duration of the test everywhere the assessment is visible. If the assessment’s Schedule field is set to Closed, the Take Test button is not available to the students.
When the assessment’s Schedule Field is set to Open or during the scheduled open time, students see the Take Test button.
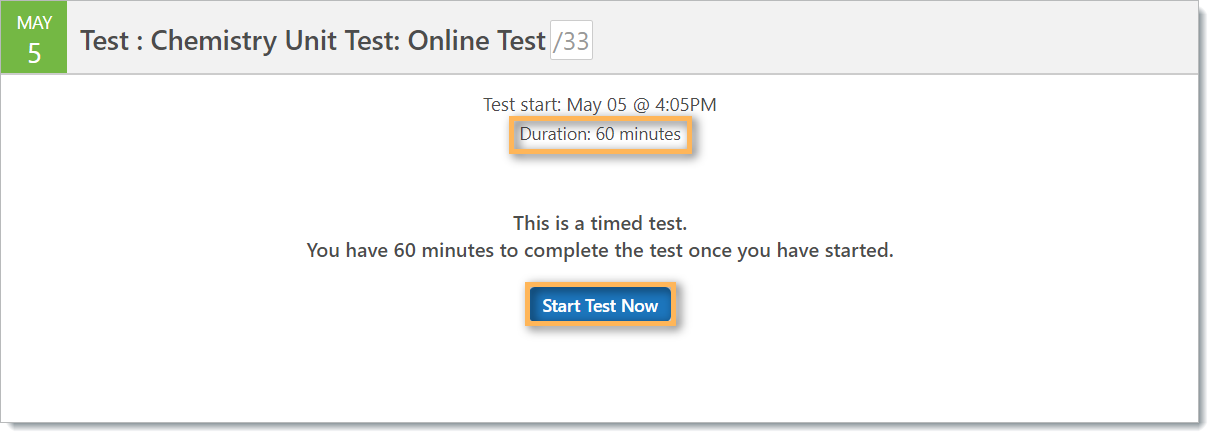
After clicking the Take Test button, students can view the test duration and are able to start the test.
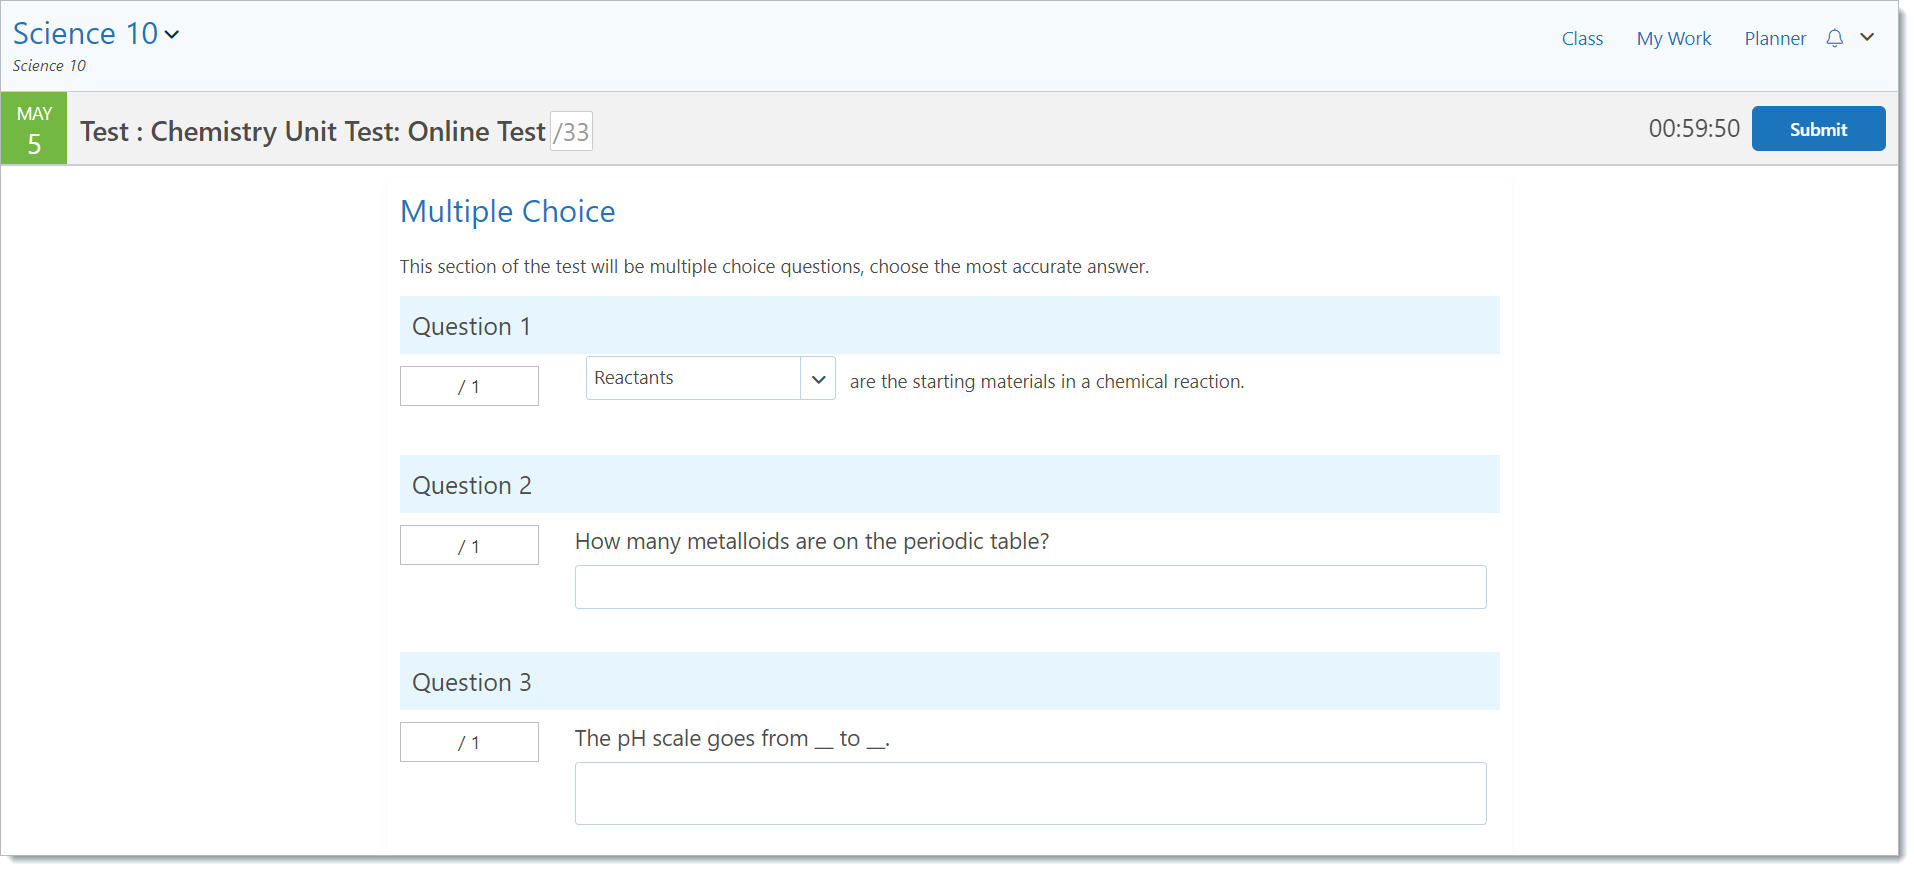
Clicking the Start Test Now button, opens the Question Sheet. The timer displays the remaining time.
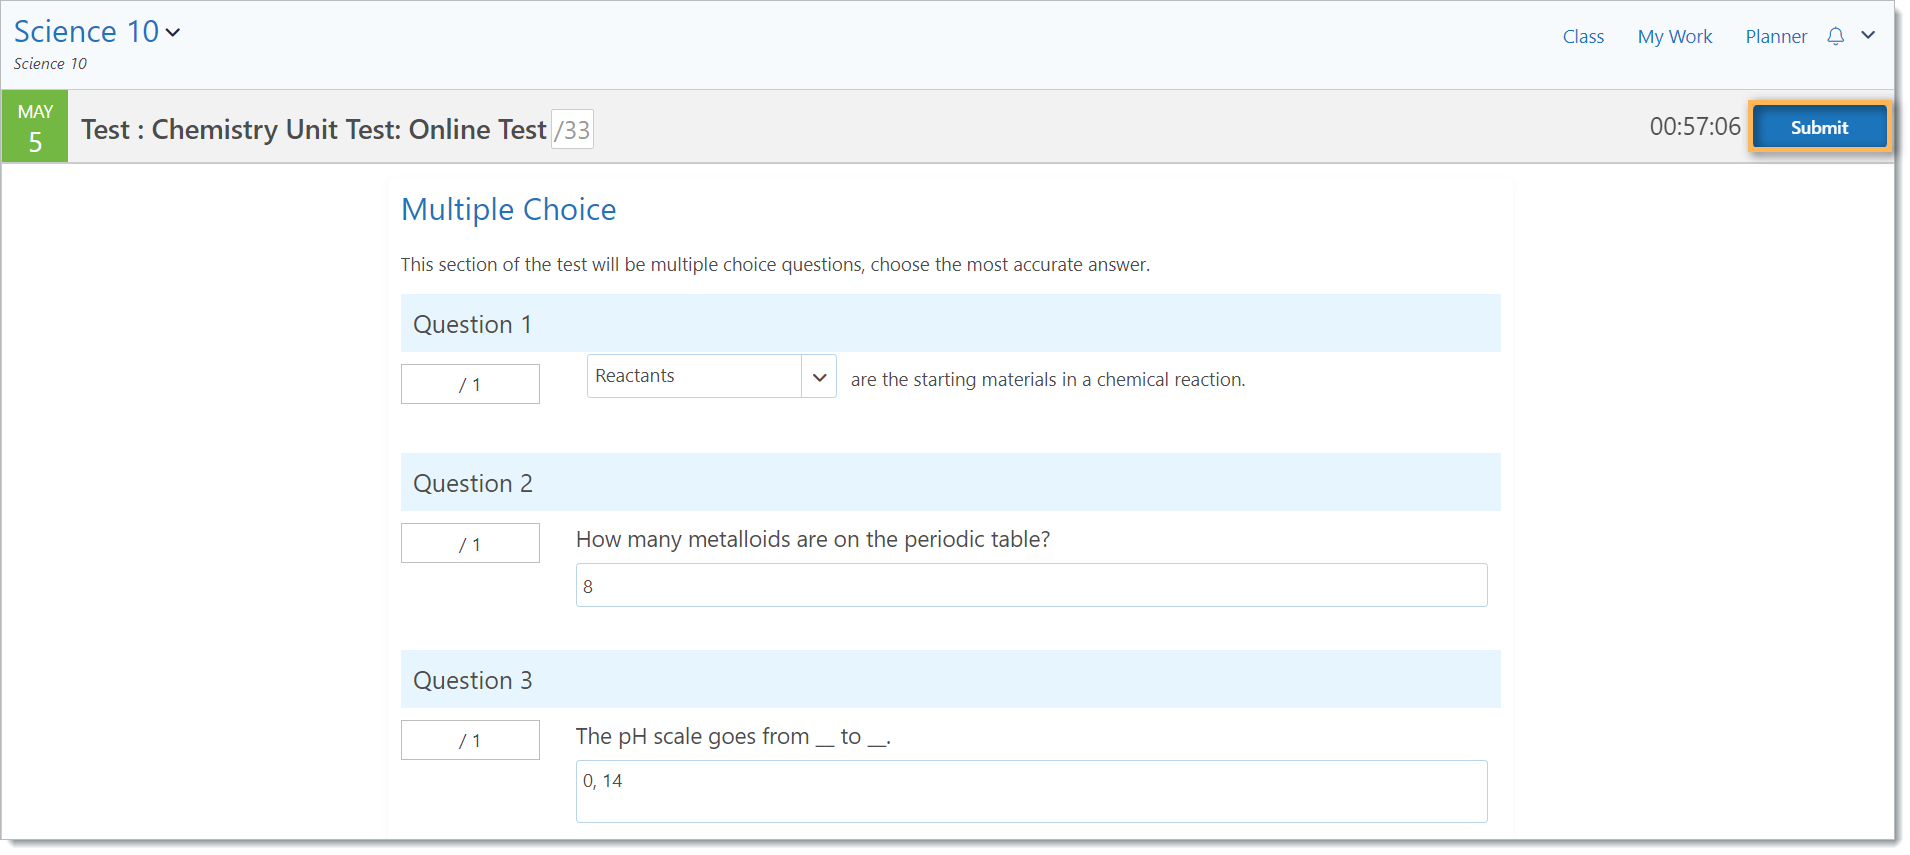
Once the test is completed, the student clicks the Submit button.
If a student submits a test with unanswered questions, Edsby will indicate which have been left blank for the student to answer.
After submitting, the student is provided with the following confirmation:
If a student does not complete the test within its specified duration, the test will be automatically submitted and the student will be given this prompt.
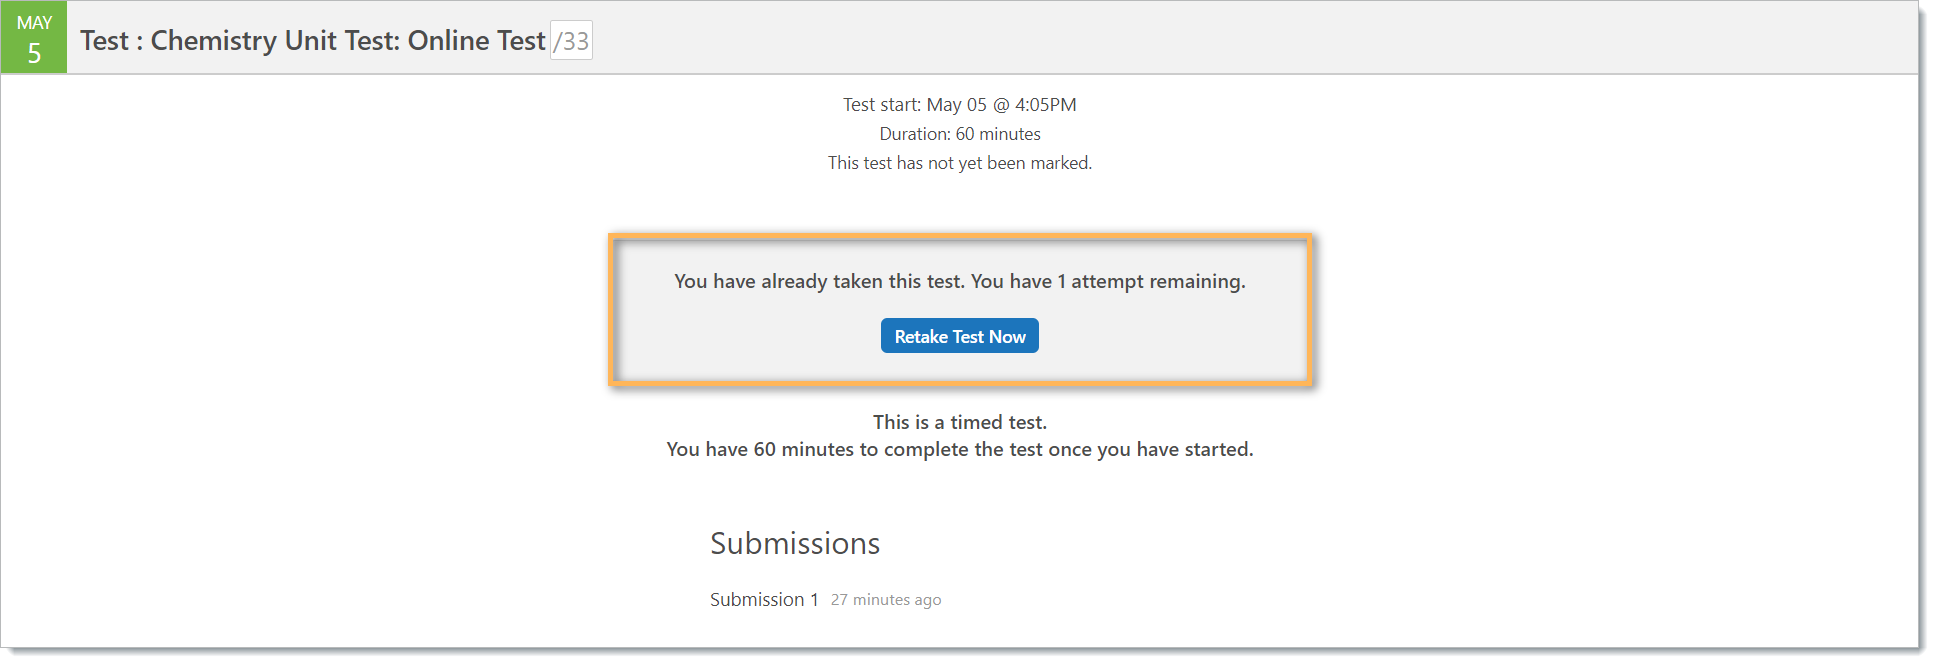
If the test has more than one attempt available, the student can retake the test by clicking the Retake Test button.
The student is notified of how many more attempts remain.
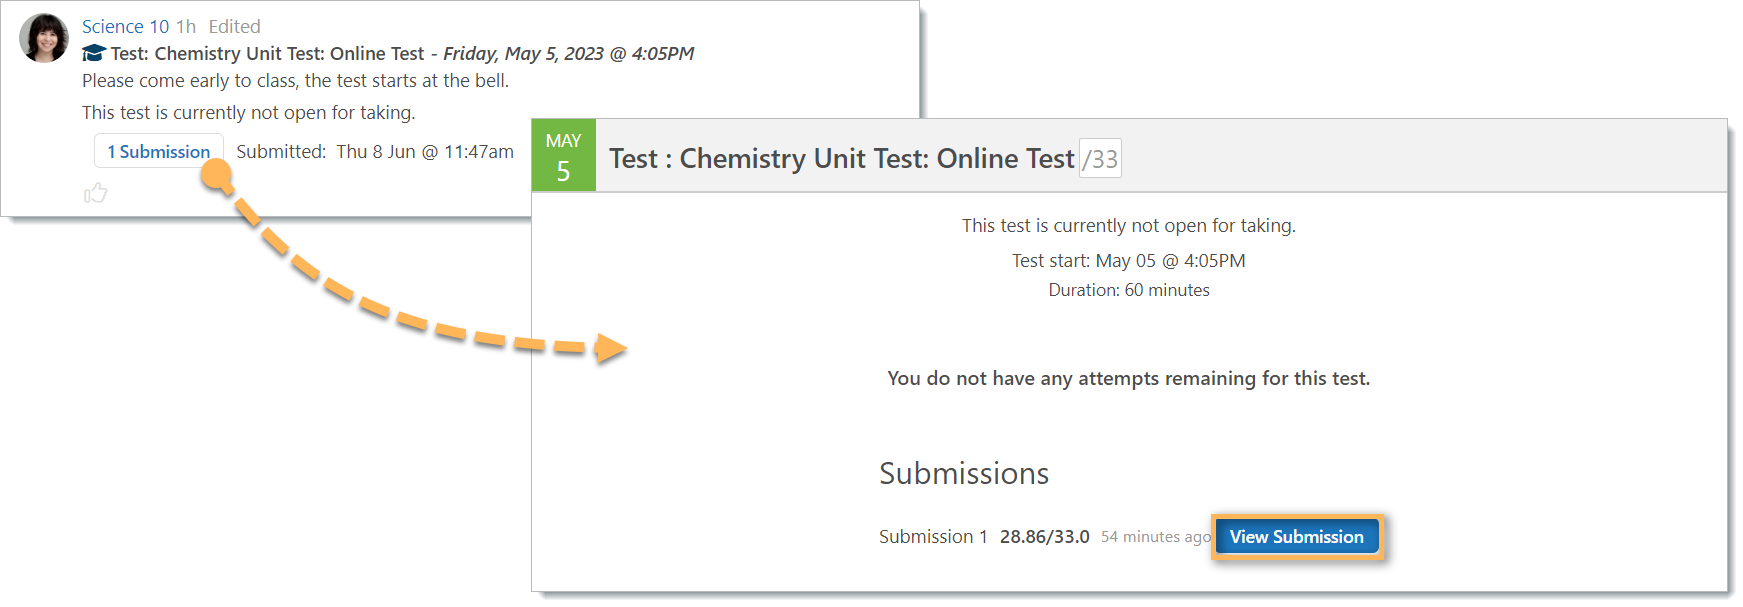
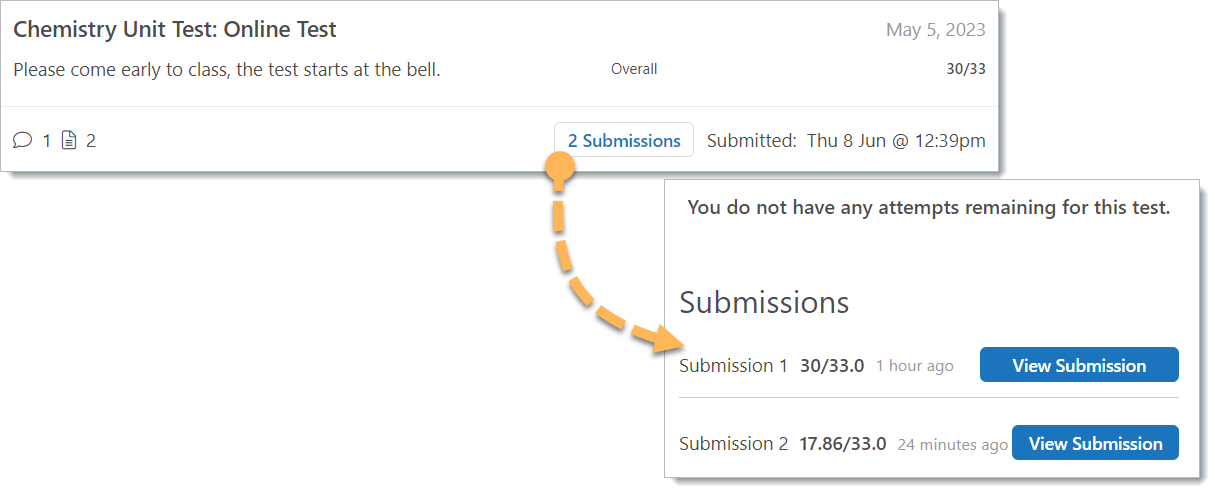
Students can view their submissions by clicking the submission link anywhere the assessment is visible.
Grading Online Tests
When a student submits an online test, a notification will appear on the Gradebook link and in the Gradebook Sidebar.
If all the questions on the test can be auto graded, the grade appears in the cell. If the test includes questions that need to be manually graded, a file icon appears in the cell.
To view a student’s test sheet, click the cell and choose Grader. The number of unmarked questions is listed at the top of the sheet.
Enter the grade and optional comment. The assessment grade is updated as the question points are added.
To override the calculated grade, click the lock icon and enter a number.
Modify Grades of an Online Test
If you’d like to modify the grade of an online test, e.g. a student received a calculated score of 9/20 but you’d like to bump them up to 10/20, you can unlock a specific question and add a “1” to it.
Here’s a more comprehensive way to modify grades, however, in Edsby online tests: When all students who are going to take the test have submitted it, edit the assessment and set the Online Submission from Online Test to None. The submitted tests and results will remain, but you’ll now be able to edit the grades for any students that you wish from this assessment.
Sharing Online Tests
Like all assessments, the teacher shares the results privately with the students by clicking the Share button. Once shared, the student sees a notification of a new result in the Classes panel.
When the student clicks on the link, the My Work report appears. The Retake Test button appears if the test is still open. The student can retake the test by clicking Retake Test.
Clicking on the number of submissions opens the test. The student sees the feedback, the scores for each question, and the correct answers.
Suggestions for Using Online Testing for Online Teaching
While it is common to use a standard quiz on material at the end of a lesson, unit, or block of material, try using Edsby’s Online Testing feature throughout all stages of learning information!
Consider creating a study quiz or guided practice quiz for students to complete during a lesson, unit, or block of material. Allow the students with unlimited time so they can work through the questions as they learn the material to solidify their understanding.
Or, you can try creating a quiz before a class discussion to assess whether or not your students worked through any supplementary material you provided outside of your class time. This is a great way to encourage your students to be accountable for the asynchronous work you assign.
Click here for more suggestions on using Edsby for online learning.

